Instructions
- Preheat your oven to 375°F (190°C). Grease a 9×13 inch baking dish with butter or cooking spray.
- Peel the potatoes and slice them very thinly, about 1/8-inch thick. A mandoline slicer is highly recommended for even slices, which ensures uniform cooking. If using a knife, take your time to slice them as evenly as possible. Set aside.
- In a large saucepan or Dutch oven, melt the butter over medium heat. Once melted, add the minced garlic and cook for about 30 seconds until fragrant, being careful not to brown it.
- Sprinkle the flour over the butter and garlic, whisking constantly for 1-2 minutes to create a roux. It should be a pale yellow color.
- Gradually whisk in the warm whole milk and heavy cream, a little at a time, ensuring no lumps form. Continue whisking until the sauce thickens to a consistency similar to a thin gravy, about 5-7 minutes.
- Remove the saucepan from the heat. Stir in 1 teaspoon of salt, 1/2 teaspoon of black pepper, and the freshly grated nutmeg. Taste and adjust seasoning if necessary.
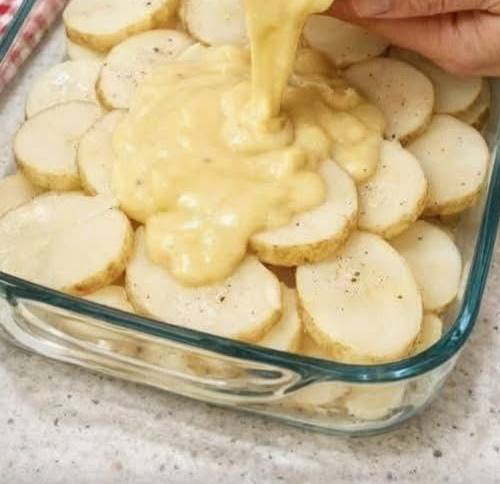
- Add 1.5 cups of the shredded sharp cheddar cheese (and 0.5 cup of Gruyère if using) to the sauce, stirring until the cheese is completely melted and incorporated. The sauce should be smooth and creamy.
- Arrange one-third of the sliced potatoes in an even layer at the bottom of the prepared baking dish.
- Pour one-third of the cheese sauce evenly over the potato layer.
- Repeat the layering process: add another one-third of the potatoes, followed by another one-third of the cheese sauce.
- Finish with the remaining one-third of the potatoes, and then pour the remaining cheese sauce over the top, spreading it evenly to cover all the potatoes as much as possible.
- Sprinkle the remaining 0.5 cup of sharp cheddar cheese (and 0.5 cup of Gruyère if using) over the top layer of potatoes and sauce.
- Cover the baking dish tightly with aluminum foil.
- Bake for 45-50 minutes, or until the potatoes are mostly tender when pierced with a fork.
- Remove the foil and continue baking for another 20-30 minutes, or until the top is golden brown and bubbly, and the potatoes are completely fork-tender. If the top starts to brown too quickly, you can loosely tent it with foil.
- Remove from the oven and let the scalloped potatoes rest for 10-15 minutes before serving. This allows the sauce to set and makes for easier serving.
- Garnish with fresh chopped chives, if desired, and serve warm.
Cooking Tips and Variations
For the best results with your scalloped potatoes, start with the right potatoes. Yukon Gold potatoes are highly recommended because their waxy texture holds up well during baking without becoming mushy, and their naturally buttery flavor enhances the dish. If Yukon Golds are unavailable, thin-skinned red potatoes or even Russets can work, though Russets might yield a slightly softer texture. The most crucial tip for perfect scalloped potatoes is to slice them as evenly and thinly as possible. This ensures that all the potato slices cook at the same rate, resulting in a uniformly tender dish. A mandoline slicer is an invaluable tool for achieving this consistency, but a sharp chef’s knife and a steady hand can also do the trick. If you are slicing by hand, try to aim for 1/8-inch thickness.
When making the cheese sauce, ensure your milk and cream are warm before adding them to the roux. This helps prevent lumps and ensures a smoother, more cohesive sauce. Whisk continuously as you add the liquid and cook the sauce to prevent scorching and to achieve the desired thickness. Don’t be shy with seasoning; potatoes absorb a lot of salt, so taste your sauce before layering and adjust as needed. Freshly grated nutmeg adds a wonderful, subtle warmth that complements the cheese and cream beautifully, so don’t skip it!
For variations, the possibilities are endless. To add a smoky, savory depth, consider layering cooked, crumbled bacon or diced ham between the potato layers. For a richer, more complex cheese flavor, experiment with different cheese combinations. Beyond cheddar and Gruyère, consider Fontina, Parmesan, or even a touch of smoked Gouda. If you prefer a richer, more herbaceous flavor, you can infuse your milk with a sprig of fresh thyme or a bay leaf while warming it, straining it out before adding to the roux. For a touch of heat, a pinch of cayenne pepper or a dash of hot sauce in the cheese sauce can add an exciting kick. You can also add thinly sliced onions or shallots in one of the potato layers for an extra aromatic dimension. For a healthier twist, you can use low-fat milk and a lighter cheese, but be aware that this may slightly alter the richness and texture of the sauce. Always remember to cover the dish with foil for the initial baking period to steam the potatoes and ensure they become tender before uncovering to achieve that beautiful golden-brown crust.
Storage and Reheating
Scalloped potatoes are wonderful as leftovers and often taste even better the next day as the flavors have more time to meld. To store leftover scalloped potatoes, allow them to cool completely to room temperature. Once cooled, cover the baking dish tightly with plastic wrap or aluminum foil, or transfer individual portions to airtight containers. Store in the refrigerator for up to 3-4 days.
For reheating, there are a few options depending on the quantity and your desired crispness. If reheating a large portion or the entire dish, the oven is the best method. Preheat your oven to 325°F (160°C). Cover the dish with foil to prevent drying out and bake for 20-30 minutes, or until heated through. If you prefer a slightly crisper top, remove the foil for the last 5-10 minutes. For individual servings, the microwave can be used, though it may result in a softer texture and less crispy top. Place a serving on a microwave-safe plate, cover loosely, and microwave on high for 2-3 minutes, stirring halfway through, until heated thoroughly. Be careful not to overheat, as this can cause the sauce to separate or become rubbery. You can also reheat individual portions in a toaster oven for about 10-15 minutes at 350°F (175°C) for a slightly crispier result.
Frequently Asked Questions
Why are my scalloped potatoes watery?
Watery scalloped potatoes are usually a result of the potatoes releasing too much moisture during baking, or the sauce not being thick enough. To prevent this, ensure your sauce is adequately thickened before layering. Also, sometimes using very high-moisture potatoes can contribute. Letting the dish rest after baking allows the sauce to set and reabsorb some of the moisture, which can help. You can also try patting potato slices dry before layering.
Can I make scalloped potatoes ahead of time?
Yes, scalloped potatoes are an excellent make-ahead dish. You have a couple of options: you can assemble the entire dish, cover it tightly, and refrigerate it for up to 24 hours before baking. When ready to bake, add an extra 15-20 minutes to the covered baking time to account for starting from cold. Alternatively, you can bake the dish completely, let it cool, and then refrigerate. Reheat it covered in the oven as described in the storage and reheating section.
What kind of potatoes are best for scalloped potatoes?
Yukon Gold potatoes are generally considered the best choice for scalloped potatoes. Their medium starch content and waxy texture allow them to hold their shape well during cooking without becoming mushy, and they have a naturally buttery flavor that complements the creamy sauce beautifully. Other good options include red potatoes or new potatoes. Avoid very starchy potatoes like Russets if you prefer a firmer texture, as they tend to break down more easily.
How do I prevent the top from burning while baking?
To prevent the top of your scalloped potatoes from burning while ensuring the potatoes cook through, always cover the dish tightly with aluminum foil for the majority of the baking time. This traps steam and helps cook the potatoes from the inside out. Remove the foil only for the last 20-30 minutes to allow the top to brown and become bubbly. If you notice the top browning too quickly even after removing the foil, you can loosely tent it with foil for the remaining baking time to shield it from direct heat.