Instructions
- In a large mixing bowl, combine the warm water and a pinch of granulated sugar. Sprinkle the active dry yeast over the top. Let it sit for 5-10 minutes until the mixture becomes foamy. This indicates that your yeast is active and ready to go. If it doesn’t foam, your yeast may be old or the water temperature was incorrect, and you should start over with fresh yeast.
- Once the yeast is bloomed, add the warm milk, ¼ cup granulated sugar, salt, and vegetable oil (or melted butter) to the bowl. Stir gently to combine these wet ingredients thoroughly.
- Gradually add 3 cups of flour to the wet mixture, one cup at a time, mixing with a wooden spoon or a stand mixer with a dough hook on low speed until just combined after each addition. The mixture will be shaggy at this point.
- Continue adding flour, ½ cup at a time, mixing well after each addition, until the dough starts to pull away from the sides of the bowl and forms a cohesive ball. You may not need all 6 cups of flour; the amount can vary based on humidity and flour type. The dough should be soft, slightly sticky but not overly so, and pliable.
- Turn the dough out onto a lightly floured surface. Knead the dough for 8-10 minutes, or until it is smooth, elastic, and springs back when gently poked. If using a stand mixer, knead on medium-low speed with the dough hook for 6-8 minutes. Proper kneading is crucial for developing the gluten structure that gives the bread its soft, chewy texture.
- Lightly grease a large clean bowl with a small amount of vegetable oil. Place the kneaded dough in the bowl, turning it once to coat the top. Cover the bowl tightly with plastic wrap or a clean kitchen towel.
- Place the covered bowl in a warm, draft-free place to rise for 1-1 ½ hours, or until the dough has doubled in size. A good warm spot can be inside a slightly warmed (but turned off) oven, or near a sunny window.
- Once the dough has doubled, gently punch it down to release the air. Turn the dough out onto a lightly floured surface.
- Divide the dough into two equal portions. For each portion, flatten the dough into a rectangle, about 9×13 inches. Starting from one of the short ends, tightly roll the dough into a log. Pinch the seam closed along the bottom and tuck the ends under to create a neat loaf shape.
- Place each shaped loaf, seam-side down, into two lightly greased 9×5-inch loaf pans.
- Cover the loaf pans loosely with plastic wrap or a clean kitchen towel. Let the loaves rise again in a warm, draft-free place for another 30-45 minutes, or until they have nearly doubled in size and the dough crowns above the rim of the pans.
- While the loaves are rising for the second time, preheat your oven to 375°F (190°C).
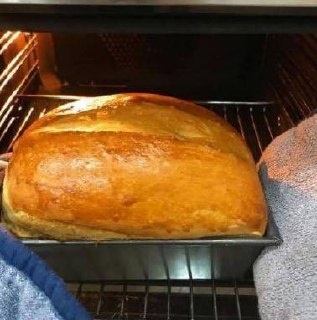
- Once the loaves have risen sufficiently, place them in the preheated oven. Bake for 25-30 minutes, or until the tops are golden brown and the internal temperature reaches 200-210°F (93-99°C) when measured with an instant-read thermometer. If the tops are browning too quickly, you can loosely tent them with aluminum foil.
- Remove the bread from the oven. If desired, immediately brush the tops of the hot loaves with a little melted butter for a softer crust and added shine.
- Carefully remove the loaves from the pans and transfer them to a wire rack to cool completely before slicing. Slicing hot bread can lead to a gummy texture.
Cooking Tips and Variations
For the best results with your Amish White Bread, always ensure your yeast is fresh and active. The water and milk temperatures are crucial; too hot will kill the yeast, and too cold will hinder its activation. Use an instant-read thermometer for accuracy. When kneading, don’t be afraid to get your hands dirty! The dough should be smooth and elastic, indicating good gluten development. If it’s too sticky, add a tiny bit more flour; if too stiff, a touch of water. The first rise (bulk fermentation) is key for flavor development, and the second rise (proofing) ensures a light, airy loaf. A warm, draft-free environment is essential for both rises. If your kitchen is cool, you can use a turned-off oven with the light on, or place the bowl in a larger bowl of warm water.
To ensure even baking and a beautiful crust, make sure your oven is preheated fully. An oven thermometer can help verify your oven’s accuracy. If the top of your bread is browning too quickly, loosely tent it with aluminum foil for the remainder of the baking time. Always allow the bread to cool completely on a wire rack before slicing. This allows the internal structure to set and prevents a gummy texture. Brushing the hot loaves with melted butter straight out of the oven not only adds a lovely sheen but also contributes to a softer, more pliable crust.
While this classic recipe is perfect as is, you can explore several variations. For a richer flavor, substitute some of the water with milk entirely. You can also add a tablespoon of honey or maple syrup along with the sugar for a different kind of sweetness. For a subtle savory twist, try adding a tablespoon of dried herbs like rosemary or thyme to the dough during the last few minutes of kneading. For a heartier loaf, you could replace up to 1 cup of the all-purpose flour with whole wheat flour, though this will result in a denser texture. Dairy-free? Simply use a non-dairy milk alternative and a neutral oil instead of butter. This recipe is wonderfully adaptable to your preferences.
Storage and Reheating
To maintain the freshness of your homemade Amish White Bread, it’s best stored at room temperature. Once cooled completely, slice the bread and place it in an airtight container or a large, sealable plastic bag. It will stay wonderfully fresh and soft for 3-4 days. Avoid refrigerating homemade bread, as this can actually cause it to dry out and become stale more quickly. If you want to keep the bread for longer, freezing is an excellent option.
To freeze Amish White Bread, allow the loaf to cool completely. You can freeze it whole, in halves, or pre-sliced. For pre-sliced bread, it’s helpful to place a small piece of parchment paper between each slice to prevent them from sticking together. Wrap the bread tightly in plastic wrap, then wrap it again in aluminum foil or place it in a heavy-duty freezer bag, removing as much air as possible. Frozen bread can be stored for up to 3 months. When you’re ready to enjoy it, simply thaw the bread at room temperature. Sliced bread will thaw quickly, and you can even toast individual slices directly from frozen. A whole loaf can be thawed on the counter for several hours or overnight. For a “just baked” experience, you can warm a thawed whole loaf in a preheated oven at 300°F (150°C) for 10-15 minutes.
Reheating individual slices of Amish White Bread is quick and easy. You can pop them in a toaster for a crispy exterior, or place them on a baking sheet in a preheated oven at 350°F (175°C) for 3-5 minutes until warmed through. For a softer texture, you can briefly microwave a slice for 10-15 seconds, but be careful not to overdo it, as microwaving can sometimes make bread chewy. No matter how you store or reheat it, this homemade bread is sure to bring a smile to your face with its comforting flavor and texture.
Frequently Asked Questions
Why is my homemade bread dense and not fluffy?
A dense loaf of bread can be caused by several factors. The most common reasons include not enough kneading, which means the gluten hasn’t developed sufficiently to trap air, or over-proofing, where the yeast has consumed all its food and run out of gas, causing the dough to collapse. It can also be due to using too much flour, making the dough too stiff, or insufficient rising time, where the dough hasn’t had enough opportunity to double in size before baking. Ensure you’re following the kneading and rising times closely and adjusting flour amounts based on the dough’s feel.
Can I substitute active dry yeast for instant yeast?
Yes, you can generally substitute active dry yeast for instant yeast in most recipes, including this Amish White Bread, at a 1:1 ratio. The main difference is that active dry yeast typically needs to be “bloomed” in warm liquid first to ensure it’s active, as instructed in this recipe. Instant yeast, on the other hand, can usually be mixed directly with the dry ingredients without prior proofing. Since this recipe already includes the blooming step for active dry yeast, you can proceed as written even if you were to use instant yeast, or simply mix the instant yeast directly with the flour if you prefer.
How do I know if my water or milk is the right temperature for yeast?
The ideal temperature range for activating active dry yeast is between 105°F and 115°F (40-46°C). If the liquid is too cold, the yeast won’t activate, and if it’s too hot (above 130°F / 54°C), it can kill the yeast, preventing the dough from rising. The best way to ensure the correct temperature is to use an instant-read thermometer. If you don’t have one, you can test it with your finger: it should feel comfortably warm, like a baby’s bathwater, but not hot. Water that feels too hot to the touch is likely too hot for the yeast.