Instructions
- Line an 8×8-inch baking dish with parchment paper, leaving an overhang on the sides to easily lift the fudge out later.
- In a large microwave-safe bowl, combine the creamy peanut butter and milk chocolate chips.
- Microwave the mixture on high for 60 seconds. Remove and stir well with a spatula until partially melted and combined.
- Return the bowl to the microwave and heat for another 30-second interval. Stir again until the mixture is smooth, glossy, and completely melted. If there are still a few lumps, microwave for an additional 15-second interval, stirring thoroughly after each. Be careful not to overheat.
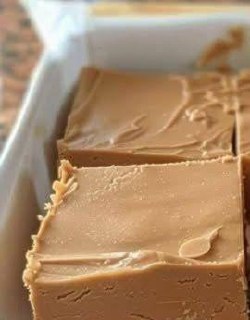
- Immediately pour the melted peanut butter and chocolate mixture into the prepared 8×8-inch baking dish.
- Using the back of a spoon or an offset spatula, spread the fudge evenly into the dish, ensuring the top is relatively smooth.
- Place the baking dish in the refrigerator and chill for at least 2-3 hours, or until the fudge is completely firm and set.
- Once firm, use the parchment paper overhang to lift the fudge out of the dish and place it on a cutting board.
- Using a sharp knife, cut the fudge into 1-inch squares. For cleaner cuts, you can run your knife under hot water and wipe it dry between cuts.
- Serve immediately or store for later enjoyment.
Cooking Tips and Variations
Achieving perfect 2-ingredient peanut butter fudge is incredibly simple, but a few tips can elevate your results even further. For the best texture, always opt for creamy peanut butter rather than natural peanut butter that separates, as the oils in natural varieties can affect the fudge’s consistency. When melting, stir the mixture thoroughly after each microwave interval to prevent the chocolate from seizing or burning, and to ensure a smooth, uniform consistency. Don’t be tempted to overcook it; once it’s smooth and glossy, it’s ready.
The beauty of this recipe lies in its versatility. While milk chocolate chips offer a classic, sweet flavor, feel free to experiment with other types of chocolate. Dark chocolate chips will yield a richer, less sweet fudge, perfect for those who prefer a more intense cocoa flavor. White chocolate chips can also be used for a different, sweeter profile. For an extra layer of flavor and texture, consider adding a pinch of sea salt to the mixture before chilling; the salt perfectly complements the sweetness of the peanut butter and chocolate.
Want to get creative with add-ins? After spreading the fudge into the pan, sprinkle the top with a handful of mini chocolate chips, chopped peanuts, or even colorful sprinkles for a festive touch. You can also fold in a quarter cup of chopped roasted peanuts into the mixture before pouring it into the pan for a delightful crunch. For an even more decadent treat, swirl in a tablespoon of marshmallow fluff or a drizzle of caramel sauce just before chilling. The possibilities are endless, allowing you to customize this easy fudge to your exact preferences!
Storage and Reheating
Storing your 2-ingredient peanut butter fudge properly is key to maintaining its delicious texture and freshness. Once cooled and cut, transfer the fudge squares to an airtight container. You can layer the fudge with small pieces of parchment paper between layers to prevent them from sticking together. Store the container in the refrigerator for up to 2-3 weeks. The cold temperature helps the fudge maintain its firm consistency and prevents it from becoming too soft or sticky.
While this fudge is best enjoyed chilled or at room temperature, it can also be frozen for longer storage. To freeze, place the fudge squares in a single layer on a baking sheet lined with parchment paper and freeze until solid (about 1-2 hours). Once frozen, transfer the solid pieces to a freezer-safe airtight container or a heavy-duty freezer bag, again using parchment paper between layers if stacking. Frozen fudge will keep well for up to 3 months. When you’re ready to enjoy, simply remove the desired amount from the freezer and let it thaw at room temperature for about 15-30 minutes, or in the refrigerator for an hour, until it reaches your preferred texture. Reheating is generally not recommended as it will alter the fudge’s texture, making it too soft or oily.
Frequently Asked Questions
Can I use natural peanut butter for this recipe?
While technically possible, it’s generally not recommended. Natural peanut butter, especially the kind that separates, has a different oil content and consistency than processed creamy peanut butter. This can result in a fudge that is too oily, doesn’t set properly, or has a grainy texture. For the best, most consistent results, stick with a creamy, processed peanut butter like Jif or Skippy.
What if my fudge doesn’t set properly?
If your fudge is still too soft after the recommended chilling time, it might be due to a few factors. Ensure you used the correct proportions of peanut butter and chocolate, as an imbalance can affect setting. Also, make sure it was chilled for long enough in a cold refrigerator. If it’s still too soft, you can try placing it in the freezer for an hour or two to help it firm up. In rare cases, if the mixture was overheated, the chocolate might have seized, preventing it from setting correctly.
Can I make this fudge without a microwave?
Absolutely! If you don’t have a microwave, you can melt the peanut butter and chocolate together using a double boiler method. Place the ingredients in a heatproof bowl set over a saucepan of simmering water (make sure the bottom of the bowl doesn’t touch the water). Stir constantly until the mixture is smooth and melted. Once melted, proceed with the rest of the instructions for pouring and chilling.
How long does this fudge last?
When stored in an airtight container in the refrigerator, this peanut butter fudge will stay fresh for up to 2-3 weeks. If you choose to freeze it, it can last for up to 3 months. Always ensure it’s stored properly to maintain its best taste and texture.