Instructions
- Prepare the Ice Cream Maker: Ensure your ice cream maker’s freezer bowl has been thoroughly frozen for at least 12-24 hours, or according to manufacturer’s instructions. This step is crucial for proper churning.
- Make the Base Mixture: In a large bowl, combine the cold heavy cream, cold whole milk, and 3/4 cup granulated sugar. Whisk vigorously until the sugar is completely dissolved and the mixture is smooth. This may take a few minutes.
- Add Vanilla Flavor (for Vanilla Ice Cream): If making classic vanilla ice cream, stir in 1 teaspoon of pure vanilla extract into the base mixture.
- Prepare Fruit Puree (for Fruit Flavors):
- For Strawberry Ice Cream: In a food processor or blender, combine the hulled and quartered strawberries with 1/2 cup additional granulated sugar (adjust to your sweetness preference based on the ripeness of the berries). Process until smooth. You can strain the puree through a fine-mesh sieve for a smoother texture, or leave some small pieces for added texture.
- For Mango Ice Cream: In a food processor or blender, combine the diced mango with 1-2 tablespoons of sugar (optional, depending on the sweetness of the mango). Process until smooth.
- For Banana Ice Cream: In a food processor or blender, combine the sliced bananas with 1-2 tablespoons of sugar (optional). Process until smooth.
- Combine Base and Fruit Puree (if making fruit flavors): Gently fold the prepared fruit puree into the cream base mixture. Mix until just combined.
- Chill the Mixture: For best results, cover the ice cream base (with or without fruit puree) and refrigerate for at least 2-4 hours, or ideally overnight. A thoroughly chilled base churns faster and results in a creamier ice cream.
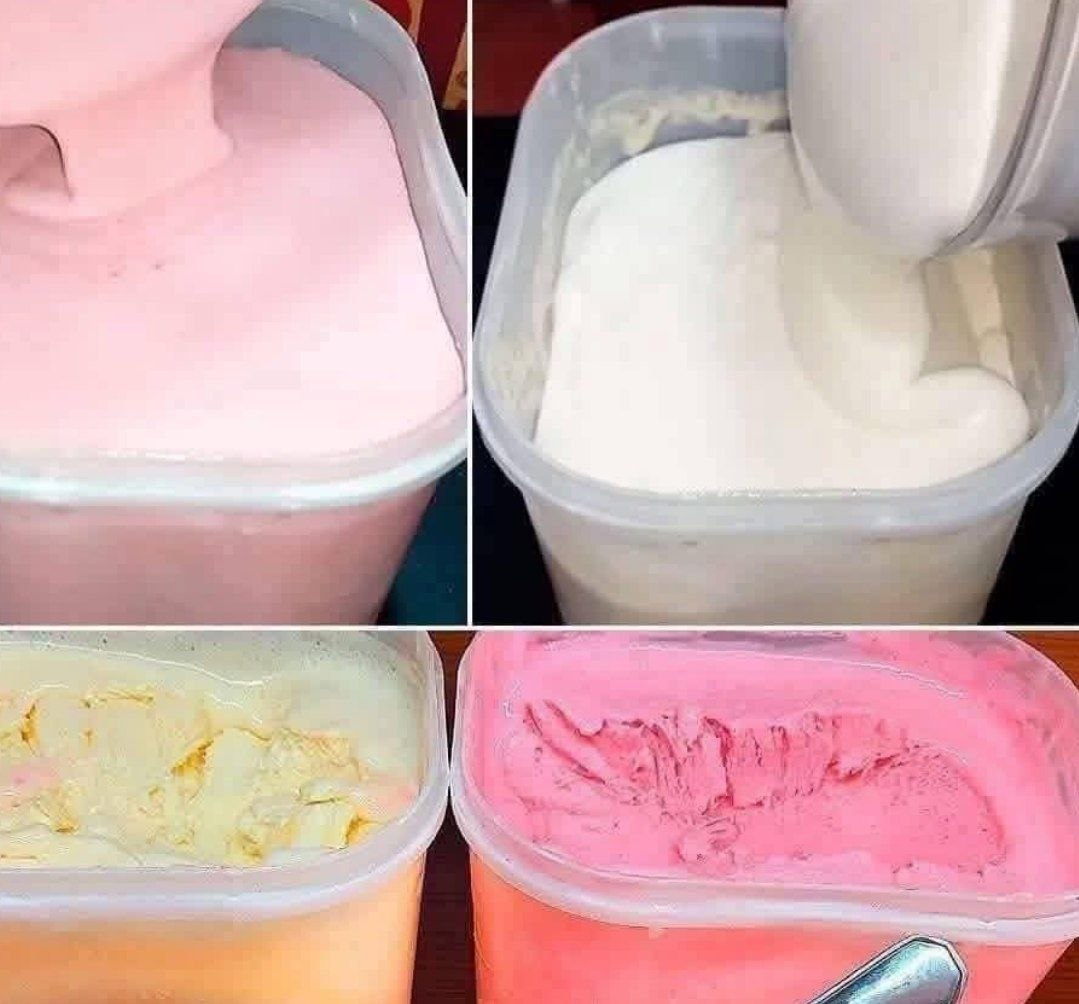
- Churn the Ice Cream: Pour the well-chilled ice cream mixture into your pre-frozen ice cream maker bowl. Churn according to the manufacturer’s instructions, usually for 20-30 minutes, until the mixture thickens to the consistency of soft-serve ice cream. The image shows the ice cream maker actively pouring into a container, indicating this stage.
- Transfer and Freeze: Once churned, immediately transfer the soft ice cream to an airtight freezer-safe container. Press a piece of parchment paper or plastic wrap directly onto the surface of the ice cream to prevent ice crystals from forming.
- Harden in the Freezer: Freeze for at least 4-6 hours, or preferably overnight, until the ice cream is firm. This allows the ice cream to fully set and develop its final texture.
- Serve: Let the ice cream sit at room temperature for 5-10 minutes before scooping to achieve a perfect, creamy consistency. Enjoy your homemade delight!
Cooking Tips and Variations
Achieving perfect homemade ice cream is easier than you think, especially with a few key tips. First and foremost, ensure your ice cream maker bowl is frozen solid. This can’t be stressed enough; an insufficiently frozen bowl will lead to a soupy mess. Plan ahead and put it in the freezer at least 24 hours before you intend to churn. Another crucial tip is to chill your ice cream base thoroughly before churning. A cold base churns more efficiently and results in a smoother, creamier texture. Don’t rush this step; an overnight chill is ideal.
When churning, avoid overfilling your ice cream maker. The mixture will expand as it churns, and overfilling can lead to spills and inefficient churning. Follow your machine’s maximum fill line. Once churned, immediately transfer the soft ice cream to an airtight container. Pressing plastic wrap directly onto the surface before sealing helps prevent ice crystals from forming, keeping your ice cream smooth. For the best texture, allow the ice cream to harden in the freezer for at least 4-6 hours, or overnight.
The beauty of this recipe lies in its endless variations. For a classic chocolate ice cream, melt 4 ounces of good quality semi-sweet chocolate and stir it into the chilled base mixture before churning. For mint chocolate chip, add 1/2 teaspoon of mint extract and a handful of mini chocolate chips during the last few minutes of churning. Coffee lovers can dissolve 2 tablespoons of instant espresso powder in a small amount of hot milk before adding it to the base. You can also experiment with other fruit purees like peaches, blueberries, or raspberries. For a richer, custard-like texture without the fuss, consider adding 1-2 tablespoons of cream cheese to the base mixture before chilling.
Mix-ins are where you can really get creative! During the last 5-10 minutes of churning, or when transferring to the freezer container, fold in your favorite additions. Think chocolate chips (milk, dark, or white), chopped nuts (pecans, walnuts, almonds), crushed cookies (Oreos, graham crackers), brownie pieces, swirls of caramel or fudge, or even mini marshmallows. The possibilities are truly limitless, allowing you to create a unique flavor every time. Remember to taste your base mixture before churning and adjust sweetness as needed; ripe fruits may require less added sugar.
Storage and Reheating
Proper storage is key to maintaining the creamy texture and delicious flavor of your homemade ice cream. Once churned, immediately transfer the soft ice cream to an airtight, freezer-safe container. Glass containers or sturdy plastic containers with tight-fitting lids work best. The goal is to minimize exposure to air, which can cause ice crystals to form and lead to a grainy texture.
For optimal results, press a piece of plastic wrap or parchment paper directly onto the surface of the ice cream before securing the lid. This creates an extra barrier against air and helps prevent freezer burn. Store the ice cream in the coldest part of your freezer, typically towards the back, and avoid placing it near the door where temperatures fluctuate more frequently. Homemade ice cream, due to its lack of artificial stabilizers, is best enjoyed within 1-2 weeks for peak freshness and texture. While it can last longer, its quality may diminish over time.
Homemade ice cream doesn’t typically “reheat” in the traditional sense, as it’s a frozen dessert. However, if your ice cream is too hard to scoop directly from the freezer, you’ll want to “temper” it. Simply remove the container from the freezer and let it sit at room temperature for 5-15 minutes before serving. The exact time will depend on the ambient temperature of your kitchen and how hard the ice cream is. This brief tempering period allows the ice cream to soften slightly, making it much easier to scoop and giving it that perfect creamy mouthfeel. Avoid using a microwave or other heating methods, as this will melt the ice cream unevenly and ruin its texture.
Frequently Asked Questions
Why is my homemade ice cream icy or hard?
Icy or hard ice cream is usually due to insufficient fat content, too much water, or improper freezing. Ensure you’re using heavy cream and whole milk as specified. Also, make sure your ice cream maker bowl is thoroughly frozen and that you chill your base mixture completely before churning. Finally, store the ice cream in an airtight container with plastic wrap pressed directly on the surface to prevent ice crystals from forming.
Can I make this recipe without an ice cream maker?
While this specific recipe is designed for an ice cream maker, you can adapt it to a “no-churn” method. For a no-churn version, you would typically use sweetened condensed milk folded into whipped heavy cream. This recipe’s base could be modified by whipping the heavy cream separately until soft peaks form, then gently folding in the milk, sugar, and flavorings, and freezing in a shallow pan, stirring every 30-45 minutes for the first few hours to break up ice crystals.
How long does homemade ice cream last in the freezer?
Homemade ice cream is best enjoyed within 1-2 weeks. Unlike commercial ice creams, it doesn’t contain the same stabilizers or preservatives, so its texture and freshness will degrade more quickly over time. Always store it in an airtight container in the coldest part of your freezer to maximize its shelf life.