Instructions
- In a large mixing bowl, combine the flour, instant dry yeast, sugar, and salt. Whisk briefly to ensure all dry ingredients are well distributed.
- Gradually pour the warm water into the dry ingredients, stirring with a wooden spoon or spatula until a shaggy, cohesive dough forms.
- Add 2 tablespoons of olive oil to the dough. Turn the dough out onto a lightly floured surface and knead for 8-10 minutes, or until the dough is smooth, elastic, and no longer sticky. If the dough is too sticky, add a very small amount of flour, one teaspoon at a time.
- Lightly grease a clean bowl with olive oil. Place the kneaded dough in the bowl, turning it once to coat the entire surface with oil. Cover the bowl with plastic wrap or a clean kitchen towel and let it rise in a warm place for 60-90 minutes, or until doubled in size.
- While the dough is rising, prepare the garlic topping. In a small bowl, combine the minced garlic, chopped fresh parsley or cilantro, and red pepper flakes (if using). Set aside.
- Once the dough has doubled, gently punch it down to release the air. Turn the dough out onto a lightly floured surface and divide it into 6-8 equal pieces.
- Take one piece of dough and flatten it with the palm of your hand. Using a rolling pin, roll the dough into an oval or round shape, about ¼ inch thick. The exact shape doesn’t need to be perfect.
- Heat a large cast-iron skillet or non-stick pan over medium-high heat. Add a teaspoon of olive oil to the hot pan, ensuring it coats the bottom evenly.
- Carefully place one rolled flatbread into the hot pan. Cook for 2-3 minutes per side, or until golden brown spots appear and the flatbread puffs up. You might see some beautiful char marks, which add to the flavor.
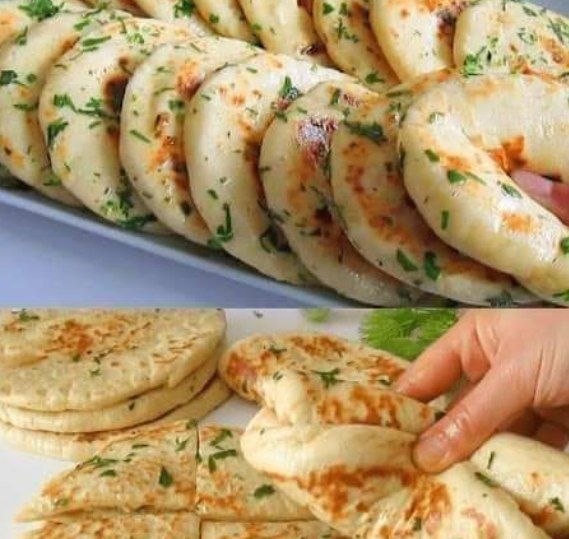
- As soon as you remove a cooked flatbread from the pan, immediately brush one side generously with olive oil and sprinkle a portion of the prepared garlic and herb mixture over it, gently pressing it into the warm surface.
- Repeat the process with the remaining dough pieces, adding a little more olive oil to the pan as needed for each new flatbread.
- Serve the garlic flatbreads warm, either whole or cut into wedges.
Cooking Tips and Variations
Achieving the perfect garlic flatbread is a delightful journey, and a few simple tips can elevate your results from good to spectacular. Firstly, always ensure your water is warm, not hot, when activating the yeast. Water that’s too hot can kill the yeast, preventing your dough from rising properly. Aim for a temperature between 105-115°F (40-46°C), which feels comfortably warm to the touch. When kneading the dough, don’t rush it. The 8-10 minutes of kneading are crucial for developing the gluten, which gives the flatbread its characteristic chewiness and elasticity. A well-kneaded dough will be smooth, supple, and spring back slowly when poked.
Resting the dough after kneading is equally important. This allows the gluten to relax, making the dough easier to roll out and contributing to a tender texture. Let it rise in a warm, draft-free place until it has visibly doubled in size. If your kitchen is cool, you can place the bowl in a slightly warm oven (turned off) or even on top of your refrigerator. When cooking the flatbreads, use a hot pan, preferably cast iron, to achieve that beautiful golden-brown exterior and slight charring. Don’t overcrowd the pan; cook one or two at a time, depending on the size of your pan, to maintain consistent heat. Brushing with garlic oil and pressing fresh herbs onto the hot flatbread immediately after it comes off the pan ensures maximum flavor absorption and a vibrant presentation.
For variations, the possibilities are endless. To the dough itself, you could incorporate a tablespoon of dried herbs like oregano or thyme for an extra layer of flavor. A pinch of black pepper or even a small amount of grated Parmesan cheese can also be kneaded into the dough. For the topping, consider adding a sprinkle of red pepper flakes for a subtle heat, or finely grated lemon zest for a bright, citrusy note. Different fresh herbs like dill or chives can also be used in place of or in addition to parsley or cilantro. For a cheesy garlic flatbread, sprinkle shredded mozzarella or a blend of Italian cheeses over the flatbread during the last minute of cooking, allowing it to melt and bubble. You could even turn these into mini pizzas by adding a thin layer of tomato sauce, cheese, and your favorite toppings before a quick bake or broil.
Another delicious variation involves making a garlic butter spread instead of just brushing with oil. Melt a few tablespoons of butter, stir in the minced garlic and herbs, and then brush this mixture onto the hot flatbreads. This creates an even richer, more indulgent flavor. Experiment with different oils too; a good quality extra virgin olive oil will impart a more robust flavor than a lighter cooking oil. Remember not to overcook your flatbreads, as they can quickly become dry and tough. The goal is a soft, pliable interior with a slightly crisp exterior. Finally, if you’re feeling adventurous, try cooking these on a grill for a smoky flavor and beautiful grill marks.
Storage and Reheating
To store leftover garlic flatbreads, allow them to cool completely to room temperature. Stacking them while warm can lead to sogginess. Once cooled, place them in an airtight container or a resealable plastic bag. They can be stored at room temperature for up to 2 days. For longer storage, you can refrigerate them for up to 4-5 days. If you plan to keep them for an extended period, they freeze exceptionally well. Wrap individual flatbreads tightly in plastic wrap, then place them in a freezer-safe bag or container. Frozen flatbreads will maintain their quality for up to 2-3 months.
Reheating garlic flatbreads properly is key to restoring their delicious texture and flavor. If refrigerated, you can quickly reheat them in a dry skillet over medium heat for 1-2 minutes per side, until warmed through and slightly crisp again. Alternatively, you can place them on a baking sheet and warm them in a preheated oven at 350°F (175°C) for about 5-7 minutes. For frozen flatbreads, there’s no need to thaw them first. Simply place them directly into a preheated oven at 375°F (190°C) for 8-12 minutes, or until heated through and soft. You can also toast them in a toaster oven. Avoid using a microwave for reheating, as it can often make the flatbreads chewy and less appealing. A quick brush with a little fresh olive oil before reheating can also help revive their texture and flavor.
Frequently Asked Questions
What’s the difference between flatbread and naan?
While both flatbreads and naan are types of leavened, flat breads, naan specifically refers to a leavened, often yeast-based, flatbread typically cooked in a tandoor (a clay oven) and is a staple in South Asian, Central Asian, and Caribbean cuisine. Flatbread is a broader term encompassing any bread made from flour, water, and salt, which is then flattened and cooked. Many flatbreads are unleavened, while others, like naan, are leavened. Our garlic flatbread recipe is a type of leavened flatbread, similar in texture to a homemade naan, but typically cooked in a pan rather than a tandoor.
Can I make the dough ahead of time?
Yes, you can absolutely prepare the dough in advance! After the first rise, punch down the dough, shape it into a ball, and place it in a lightly oiled airtight container or wrap it tightly in plastic wrap. You can then refrigerate it for up to 24-48 hours. When you’re ready to cook, remove the dough from the refrigerator and let it sit at room temperature for about 30-60 minutes to take the chill off before dividing and rolling. This slow fermentation can even enhance the flavor of the flatbreads.
What can I serve with garlic flatbreads?
Garlic flatbreads are incredibly versatile! They make an excellent accompaniment to a wide range of dishes. They’re perfect for dipping into hummus, baba ghanoush, tzatziki, or a flavorful olive oil and balsamic vinegar mixture. Serve them alongside hearty stews, curries, or chili. They also pair wonderfully with grilled meats, roasted vegetables, or as a side for a fresh green salad. You can even use them as a base for mini pizzas, open-faced sandwiches, or wraps.
Why aren’t my flatbreads puffing up?
There are a few common reasons why your flatbreads might not be puffing up. Firstly, your yeast might not be active enough; ensure you’re using fresh yeast and warm (not hot) water. Secondly, the dough might not have risen sufficiently during its proofing stage, meaning it didn’t develop enough gas. Make sure it doubles in size. Thirdly, your pan might not be hot enough. A hot pan creates steam inside the dough, which causes it to puff. Finally, if the dough is rolled too thick or too thin, it can affect puffing. Aim for about ¼ inch thickness for ideal results.