Instructions
- Activate the Yeast: In a small bowl, combine the warm water and a pinch of the granulated sweetener. Sprinkle the active dry yeast over the water and stir gently. Let it sit for 5-10 minutes until frothy, indicating the yeast is active. If it doesn’t foam, your yeast may be dead, or the water wasn’t the right temperature. Start over with new yeast.
- Combine Dry Ingredients: In a large mixing bowl, whisk together the blanched almond flour, coconut flour, psyllium husk powder, xanthan gum, salt, and the remaining granulated sweetener until well combined. Ensure there are no lumps, especially from the psyllium husk.
- Prepare Wet Ingredients: In a separate medium bowl, whisk together the 4 large eggs, apple cider vinegar, and vanilla extract (if using).
- Form the Dough: Add the activated yeast mixture and the egg mixture to the dry ingredients. Begin mixing with a sturdy spoon or a stand mixer with a paddle attachment on low speed. Once the ingredients are partially combined, gradually add the softened butter pieces, one at a time, mixing until each piece is incorporated.
- Knead the Dough: Continue mixing for 5-7 minutes on medium-low speed (if using a stand mixer) or kneading by hand. The dough will be much softer and stickier than traditional wheat dough, but it should come together into a cohesive ball. It won’t develop gluten like conventional dough, but mixing helps distribute ingredients evenly and activate the psyllium husk for structure. The dough should look somewhat smooth, albeit still soft and slightly tacky.
- First Rise (Proofing): Lightly grease a large bowl with butter or cooking spray. Transfer the dough to the bowl, turning it once to coat. Cover the bowl tightly with plastic wrap or a clean kitchen towel. Place the bowl in a warm, draft-free place for 1 to 1.5 hours, or until the dough has noticeably increased in size (it may not double like traditional brioche, but it should look puffier). A good warm spot is often a slightly warmed (but turned off) oven.
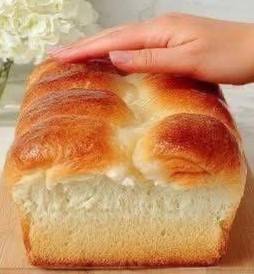
- Shape the Brioche: Gently punch down the risen dough to release air. Lightly grease a standard loaf pan (8.5 x 4.5 inches or 9 x 5 inches) with butter. You can also line it with parchment paper, leaving an overhang on the sides for easy removal.
- Option 1 (Traditional Loaf): You can form the dough into a single loaf shape and place it in the prepared pan.
- Option 2 (Pull-Apart Style): For a more classic brioche look, divide the dough into 6-8 equal pieces. Roll each piece into a smooth ball. Arrange the dough balls in two rows in the prepared loaf pan.
- Second Rise: Cover the loaf pan loosely with plastic wrap or a kitchen towel. Return it to a warm, draft-free place for another 30-45 minutes, or until the dough has puffed up again.
- Preheat Oven & Prepare Egg Wash: While the dough is on its second rise, preheat your oven to 350°F (175°C). In a small bowl, whisk together the remaining large egg and heavy cream to create the egg wash.
- Bake the Brioche: Just before baking, gently brush the top of the risen brioche with the egg wash. This will give it that beautiful golden, glossy crust.
- Bake for 40-50 minutes, or until the top is deeply golden brown and a wooden skewer inserted into the center comes out clean. If the top starts to brown too quickly, you can loosely tent it with aluminum foil.
- Cooling: Once baked, remove the loaf pan from the oven and let the brioche cool in the pan for about 10-15 minutes. Then, carefully remove the brioche from the pan and transfer it to a wire rack to cool completely before slicing. This is crucial for keto breads, as they need to set properly.
Cooking Tips and Variations
Don’t Be Afraid of the Butter: Brioche is all about the butter! Make sure your butter is truly softened, not melted, for the best dough consistency. This ensures it incorporates smoothly and provides that rich flavor and tender crumb.
Yeast Activation is Key: Always check your yeast. If it doesn’t get frothy in the warm water, it’s likely dead, and your bread won’t rise. Water that’s too hot will kill the yeast, and water that’s too cold won’t activate it. Aim for a temperature around 105-115°F (40-46°C).
Handle with Care: Keto doughs, especially those with psyllium husk, can be a bit more delicate and sticky than traditional wheat doughs. Don’t overwork it, and use lightly greased hands if you need to shape it. The psyllium husk will absorb liquid, so don’t be surprised if the dough feels a bit different than what you’re used to.
Warm Proofing Environment: A warm, draft-free spot is essential for proper rising. If your kitchen is cool, you can preheat your oven to its lowest setting for a few minutes, then turn it off and let the dough rise inside with the door slightly ajar. Just make sure it’s not too hot!
Cool Completely: This tip cannot be stressed enough for keto baked goods. Slicing warm keto bread can often lead to a gummy texture or the bread falling apart. Allow it to cool thoroughly on a wire rack for several hours, or even overnight, for the best texture and stability.
Sweetener Adjustments: Different keto sweeteners have varying levels of sweetness and can sometimes have a cooling aftertaste. Feel free to adjust the amount of sweetener to your personal preference. You can also use a liquid sweetener equivalent if you prefer, but you may need to slightly reduce the water content.
Flavor Variations:
- Orange Zest: Add 1-2 teaspoons of fresh orange zest to the dry ingredients for a delightful citrus note.
- Cardamom Brioche: Incorporate ½-1 teaspoon of ground cardamom for a warm, aromatic flavor.
- Chocolate Chip Brioche: Fold in ¼ cup of sugar-free chocolate chips during the last few minutes of mixing the dough.
- Savory Brioche: Omit the vanilla extract and reduce the sweetener to 1 tablespoon. Add 1 teaspoon of garlic powder, ½ teaspoon of dried herbs (like rosemary or thyme), and ¼ cup of shredded Parmesan cheese to the dough. Great for sandwiches!
Storage and Reheating
Countertop Storage: Once completely cooled, store your Keto Brioche Bread in an airtight container or a resealable bag at room temperature for up to 3-4 days. While it’s best enjoyed fresh, it maintains its softness quite well.
Refrigeration: If you live in a warm, humid climate or want to extend its freshness, you can refrigerate the brioche in an airtight container for up to a week. However, refrigeration can sometimes dry out keto breads, so bring it to room temperature before enjoying or reheat it.
Freezing: Keto Brioche freezes beautifully! Once completely cooled, slice the loaf and place the slices in a single layer on a baking sheet. Freeze until solid (about 1-2 hours). Then, transfer the frozen slices to a freezer-safe bag or airtight container. This prevents sticking and allows you to grab just a few slices at a time. It will keep well in the freezer for up to 2-3 months.
Reheating from Countertop/Refrigerated:
- Toaster/Toaster Oven: The best way to revive the brioche is by toasting slices until lightly golden and warmed through. This brings back a lovely crispness to the exterior while keeping the interior soft.
- Microwave: For a quick warm-up, microwave individual slices for 10-20 seconds. Be careful not to over-microwave, as it can make keto breads tough.
- Oven: For a whole loaf or multiple slices, wrap them loosely in foil and reheat in a preheated oven at 300°F (150°C) for 10-15 minutes, or until warmed through.
Reheating from Frozen:
- Toaster/Toaster Oven: Place frozen slices directly into the toaster or toaster oven. You may need to toast them a bit longer than defrosted slices.
- Oven: For a whole frozen loaf or several slices, you can reheat them wrapped in foil in a preheated oven at 325°F (160°C) for 20-30 minutes, or until thawed and warmed through.
Frequently Asked Questions
Why is my keto brioche not rising as much as traditional bread?
Keto brioche, made with almond and coconut flours, does not contain gluten, which is the protein responsible for the expansive rise in traditional wheat-based bread. While yeast is used and psyllium husk provides some structure, keto breads will never achieve the same dramatic rise as their gluten-filled counterparts. A noticeable puffing and slight increase in volume during proofing is considered a success for keto brioche.
Can I substitute other flours for almond or coconut flour?
Substituting flours in keto baking is tricky because different low-carb flours (like almond, coconut, or lupin) have vastly different absorption rates and properties. This recipe relies on the specific balance of almond and coconut flour, along with psyllium husk, for its texture and structure. While minor adjustments might be possible with experience, it’s generally not recommended to substitute these flours without significant recipe re-testing, as it can drastically change the outcome.
My brioche turned out too dense or crumbly. What went wrong?
There are a few common culprits for density or crumbliness in keto brioche. It could be insufficient mixing time, which means the psyllium husk didn’t fully hydrate and activate to provide structure. Or, it might be due to not allowing the bread to cool completely before slicing; keto breads need time to set. Over-measuring flours, especially coconut flour, which is very absorbent, can also lead to a dry, dense crumb. Ensure accurate measurements and proper cooling time.
Can I make this brioche in a bread machine?
While some keto bread recipes can be adapted for a bread machine, this particular brioche recipe is designed for oven baking due to the specific handling of the dough and the two-stage proofing process. The high butter and egg content, combined with the lack of gluten, makes it less ideal for the consistent kneading cycles of a bread machine. For best results, stick to the instructions provided for conventional oven baking.