Instructions
- Prepare the Ribs: Begin by preparing your ribs. Lay each rack meat-side down on a cutting board. Locate the thin, silvery membrane on the bone side of the ribs. Using a small knife or the back of a spoon, gently lift a corner of the membrane. Once you have a good grip, use a paper towel to firmly pull the membrane off the entire rack. This step is crucial for tender ribs, as the membrane can become tough when cooked. Pat the ribs dry thoroughly with paper towels.
- Make the Dry Rub: In a small bowl, combine the brown sugar, smoked paprika, garlic powder, onion powder, black pepper, salt, cayenne pepper (if using), and dry mustard. Mix well until all ingredients are evenly distributed. This dry rub will form the flavor base for your ribs, providing a smoky, sweet, and savory profile.
- Season the Ribs: Generously sprinkle the dry rub all over both sides of the rib racks, ensuring they are completely coated. Don’t be shy – really massage the rub into the meat. This allows the flavors to penetrate deeply. For best results, you can do this step an hour or two in advance, or even the night before, and refrigerate the seasoned ribs to allow the flavors to meld. If refrigerating, bring them to room temperature for about 30 minutes before baking.
- Preheat Oven and Prepare Baking Sheet: Preheat your oven to 275°F (135°C). Tear off two large sheets of heavy-duty aluminum foil for each rack of ribs (so four sheets total for two racks). You’ll want them large enough to completely encase the ribs. Place one large sheet of foil on a baking sheet, then layer another sheet on top, perpendicular to the first, to create a double-layered, sturdy wrap. Repeat for the second rack of ribs on another baking sheet, if using.
- Wrap the Ribs: Place one seasoned rib rack, meat-side up, in the center of the double-layered foil. Pour 1/4 cup of apple cider vinegar and 1/2 cup of water around the ribs (not directly on top of the rub). This liquid will create steam, keeping the ribs incredibly moist and tender during the long baking process. Carefully bring the edges of the foil up and over the ribs, sealing them tightly to form a secure packet. Ensure there are no gaps for steam to escape. Repeat with the second rack of ribs.
- First Bake (Low and Slow): Transfer the foil-wrapped ribs on their baking sheets to the preheated oven. Bake for 2 1/2 to 3 hours. The exact time will depend on the thickness of your ribs. The goal here is to slowly tenderize the meat until it’s very pliable. You’ll know they’re ready when the meat has pulled back from the ends of the bones by about an inch and they are very tender when gently prodded.
- Prepare for Glazing: Carefully remove the baking sheets from the oven. Open the foil packets, being cautious of the hot steam that will escape. Discard any accumulated liquid in the foil. Increase the oven temperature to 375°F (190°C).
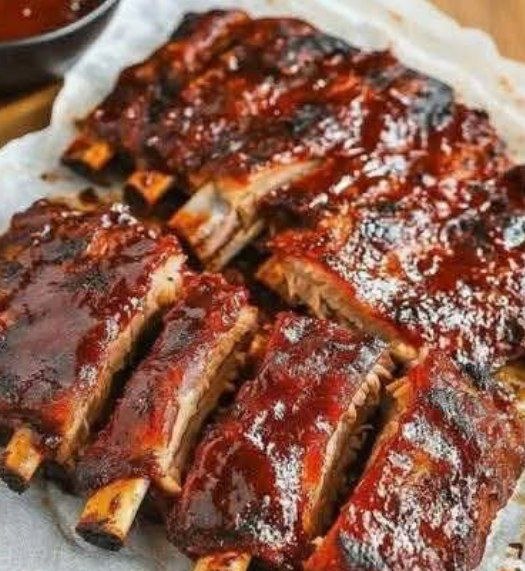
- Apply BBQ Sauce: Transfer the partially cooked ribs directly onto a clean baking sheet, or line the original baking sheets with fresh foil for easier cleanup. Generously brush both sides of the ribs with a thick layer of your favorite BBQ sauce. Ensure they are well coated for maximum flavor and caramelization.
- Second Bake (Glazing): Return the sauced ribs to the 375°F (190°C) oven. Bake for an additional 20-30 minutes, or until the BBQ sauce is bubbly, caramelized, and slightly sticky. For an even deeper glaze, you can brush on another layer of BBQ sauce halfway through this second baking period. Keep a close eye on them to prevent the sauce from burning.
- Rest and Serve: Once the ribs are beautifully glazed, remove them from the oven. Let them rest on the baking sheet for 5-10 minutes before slicing. This resting period allows the juices to redistribute, ensuring every bite is succulent. Slice between the bones and serve immediately.
Cooking Tips and Variations
Removing the Membrane is Key: This step cannot be stressed enough. The membrane on the back of the ribs is tough and will prevent the meat from becoming truly tender. If you struggle to get a grip, use a paper towel for better traction. Most butchers will remove it for you if you ask.
Don’t Rush the Low and Slow: The initial long, low-temperature bake is where the magic happens. It breaks down the tough connective tissues in the ribs, resulting in that coveted fall-off-the-bone tenderness. Resist the urge to increase the temperature or shorten the time.
Wrap Tightly: When wrapping the ribs in foil, make sure the packets are sealed very tightly. Any gaps will allow steam to escape, leading to drier ribs. Heavy-duty foil is recommended to prevent tearing.
Moisture is Your Friend: The apple cider vinegar and water mixture in the foil packet creates a steamy environment that keeps the ribs incredibly moist. You can experiment with other liquids like beer, chicken broth, or even apple juice for subtle flavor variations.
The Dry Rub is Flexible: While the provided dry rub is balanced and delicious, feel free to customize it. Add a pinch of smoked paprika for more smokiness, a dash of chili powder for extra depth, or increase the cayenne for more heat. Pre-made BBQ rubs are also a convenient option.
BBQ Sauce Timing Matters: Apply the BBQ sauce only after the ribs are mostly cooked and tender. If applied too early, the sugars in the sauce can burn during the long bake, leading to a bitter taste. The higher temperature at the end caramelizes the sauce perfectly.
Broiler for Extra Char: For a slightly charred, extra-sticky finish, you can briefly place the sauced ribs under a preheated broiler for 1-2 minutes after the second bake. Watch them very carefully, as they can burn quickly.
Different Rib Cuts: This recipe works wonderfully for both Baby Back Ribs and Spare Ribs. Baby back ribs are leaner and cook a bit faster (2.5-3 hours), while spare ribs (St. Louis style) are meatier, fattier, and may require slightly longer cooking (3-3.5 hours) for optimal tenderness.
Smoky Flavor Boost: To infuse a hint of smoky flavor without a smoker, add a few drops of liquid smoke to the apple cider vinegar and water mixture in the foil packet. Alternatively, use a smoked paprika in your dry rub.
Spice It Up: For those who love a kick, add a generous pinch of red pepper flakes to your dry rub or mix some hot sauce into your BBQ sauce.
Storage and Reheating
Storage: Allow any leftover ribs to cool completely to room temperature. Once cool, transfer them to an airtight container. You can store them whole, in sections, or already sliced. Properly stored, oven-baked BBQ ribs will last for 3-4 days in the refrigerator. For longer storage, ribs can be frozen for up to 2-3 months. To freeze, wrap individual portions tightly in plastic wrap, then again in aluminum foil, and place them in a freezer-safe bag or container to prevent freezer burn.
Reheating in the Oven: This is the best method for reheating ribs, as it helps retain moisture and flavor. Preheat your oven to 250-300°F (120-150°C). Place the ribs in an oven-safe dish with a splash of water or broth (about 1/4 cup) at the bottom. Cover the dish tightly with aluminum foil. Heat for 20-30 minutes, or until warmed through. If you want to refresh the glaze, uncover the ribs for the last 5-10 minutes of heating, or brush with a little more BBQ sauce and bake uncovered until bubbly.
Reheating on the Grill: If you have a grill handy, it’s a great way to bring back some of that BBQ char. Preheat your grill to medium-low heat. Wrap the ribs loosely in foil with a tablespoon of water or broth. Place on the grill grates and heat for about 10-15 minutes, flipping once, until warmed through. For a fresh glaze, unwrap, brush with more BBQ sauce, and grill uncovered for a few minutes until caramelized, watching carefully to prevent burning.
Reheating in the Microwave: While convenient, the microwave can sometimes dry out ribs. If using, place ribs on a microwave-safe plate, cover loosely with a damp paper towel, and heat in 30-60 second intervals until warm. This method is best for small portions and quick reheating.
Frequently Asked Questions
Do I have to remove the membrane from the ribs?
Yes, absolutely! Removing the membrane from the back of the ribs is a crucial step that makes a huge difference in the final texture. If left on, the membrane becomes tough and chewy, preventing the meat from becoming truly tender and fall-off-the-bone. It also prevents the dry rub and sauce from fully penetrating the meat. It’s a quick and easy task that significantly improves the eating experience.
Can I prepare the ribs ahead of time?
You can definitely prepare parts of this recipe in advance. The dry rub can be applied to the ribs up to 24 hours before baking; simply wrap them tightly in plastic wrap and refrigerate. This allows the flavors to meld even more deeply. You can also fully cook the ribs through the first low-and-slow baking step, cool them, and refrigerate. When ready to serve, bring them to room temperature, apply the BBQ sauce, and proceed with the second baking step (glazing) at 375°F until heated through and caramelized.
What type of ribs are best for this recipe?
This recipe works wonderfully with both Baby Back Ribs and Spare Ribs (often sold as St. Louis style). Baby Back Ribs are leaner, more tender, and cook a bit faster, typically having more meat on top of the bone. Spare Ribs, particularly St. Louis style (which are trimmed spare ribs), are meatier, fattier, and incredibly flavorful, often requiring a slightly longer cooking time for optimal tenderness. Both cuts yield delicious results with the low-and-slow oven method, so choose based on your preference and availability.
How do I know when the ribs are fully cooked and tender?
During the initial low-and-slow bake, the ribs are fully cooked when the meat has visibly pulled back from the ends of the bones by about an inch. You should also be able to easily poke the meat with a fork or gently wiggle a bone, and it should feel very tender and pliable. The ribs shouldn’t be falling apart completely at this stage, as they still need to hold together for saucing. The final glazing step will then finish them off, making them perfectly succulent and caramelized.