Instructions
- In a large mixing bowl, combine the instant vanilla pudding mix and cold milk. Whisk vigorously for 2-3 minutes until the pudding thickens. Stir in the vanilla extract.
- Gently fold half of the thawed whipped topping (or whipped cream) into the prepared pudding mixture until just combined. Be careful not to overmix, as this can deflate the whipped topping.
- If desired, to prevent your banana slices from browning too quickly, gently toss them in 1 tablespoon of lemon juice. This step is optional but recommended for visual appeal, especially if making ahead.
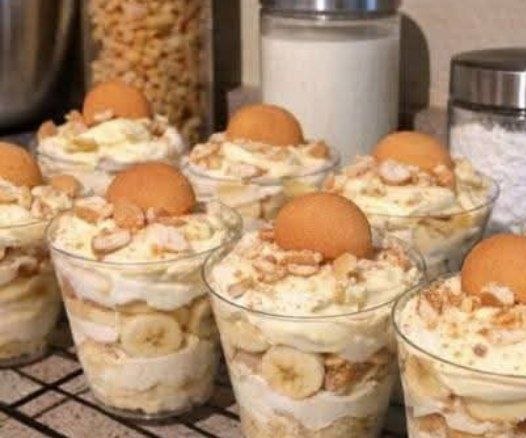
- Start assembling your banana pudding cups. For each individual serving cup (approximately 8-10 ounce capacity), place 3-4 whole vanilla wafers at the bottom. You may need to break some to fit snugly.
- Spoon a layer of sliced bananas over the vanilla wafers, ensuring an even distribution.
- Dollop a generous spoonful of the pudding mixture over the bananas, spreading it gently to cover the banana layer.
- Repeat the layering process: Add another layer of vanilla wafers, followed by more banana slices, and then another layer of the pudding mixture.
- Continue layering until the cup is almost full, ending with a layer of pudding.
- Top each assembled cup with a generous swirl or dollop of the remaining whipped topping (or whipped cream).
- For an extra touch, garnish with a whole vanilla wafer, some crushed vanilla wafers, or a fresh banana slice.
- Cover the cups loosely with plastic wrap and refrigerate for at least 4 hours, or preferably overnight, to allow the flavors to meld and the wafers to soften.
- Serve chilled and enjoy!
Cooking Tips and Variations
For the freshest flavor and best texture, use ripe but firm bananas. Overly ripe bananas can become mushy, while underripe ones lack sweetness. If you’re concerned about bananas browning, a quick dip in a diluted lemon juice solution (1 tablespoon lemon juice to 1 cup water) before layering can help. Alternatively, you can use a fruit preserver specifically designed for cut fruit. Ensure your milk is very cold when mixing the instant pudding; this helps it set properly and quickly. For a truly decadent experience, consider making homemade vanilla pudding from scratch instead of using instant mix, though it will add to the preparation time. When folding in the whipped topping, do so gently to maintain its airy texture, which contributes to the pudding’s light and creamy consistency. Don’t be afraid to crush some vanilla wafers for a layer – this creates a delightful crumbly texture amidst the creamy layers.
The beauty of these banana pudding cups lies in their versatility. For a chocolate twist, you can use instant chocolate pudding mix or add a layer of chocolate shavings between the banana and pudding layers. A drizzle of caramel sauce or a sprinkle of toasted pecans would elevate the flavor profile, adding a nutty crunch and buttery sweetness. For a spiced version, a pinch of cinnamon or nutmeg can be added to the pudding mix. If you prefer a richer, more homemade whipped topping, whip heavy cream with a touch of powdered sugar and vanilla extract until stiff peaks form. For an adult-friendly version, a splash of banana liqueur or rum can be incorporated into the pudding mixture. You can also experiment with other types of cookies; shortbread or graham crackers can offer a different texture and flavor. Consider making mini versions in shot glasses for a bite-sized dessert perfect for tasting menus or large gatherings.
Storage and Reheating
Banana pudding cups are best enjoyed fresh, ideally within 1-2 days of preparation. The bananas will start to soften and potentially brown over time, even with lemon juice treatment. Store any leftover banana pudding cups in the refrigerator, covered tightly with plastic wrap, for up to 3 days. While the flavors will continue to meld, the texture of the bananas and wafers will change. The wafers will become very soft, almost cake-like, which many people prefer. However, beyond 3 days, the bananas may become too soft and the overall texture less appealing. Reheating is generally not recommended for banana pudding, as it is a chilled dessert. Heating it would alter the delicate texture of the pudding and whipped topping, and the bananas would become unpleasantly mushy. It’s designed to be served cold, straight from the refrigerator.
Frequently Asked Questions
Can I use real whipped cream instead of frozen whipped topping?
Absolutely! Freshly whipped cream made from heavy cream, a little powdered sugar, and vanilla extract will provide a richer, more luxurious flavor and texture. Just be aware that homemade whipped cream can sometimes weep (separate) if left too long, so it’s best to add it closer to serving time if possible, or use a stabilizer like a touch of cornstarch or cream of tartar when whipping.
How do I prevent the bananas from turning brown?
The most common and effective method is to gently toss the sliced bananas in a small amount of lemon juice. The citric acid helps to slow down the oxidation process that causes browning. You can also use a fruit preserver product designed for cut fruit, following the package instructions. While these methods help, bananas will still eventually brown, so it’s best to consume the pudding within a day or two for optimal appearance.
Can I make these banana pudding cups ahead of time for a party?
Yes, these are an excellent make-ahead dessert! In fact, they benefit from chilling for at least 4 hours, and ideally overnight, to allow the vanilla wafers to soften and the flavors to fully meld. If making them more than 24 hours in advance, be sure to use the lemon juice treatment for the bananas. Store them covered tightly in the refrigerator.