Instructions
- Prepare the Graham Cracker Crust: In a medium bowl, combine the graham cracker crumbs, melted butter, and ¼ cup granulated sugar. Mix well until all crumbs are moistened.
- Press the mixture evenly into the bottom and slightly up the sides of a 9-inch pie dish. Use the bottom of a glass or your fingers to press firmly, creating a compact crust.
- Place the crust in the refrigerator to chill for at least 30 minutes while you prepare the filling.
- Prepare the Strawberry Puree: In a food processor or blender, combine the 2 cups hulled and quartered strawberries, ½ cup granulated sugar, and lemon juice. Process until completely smooth.
- Pour the strawberry puree into a small saucepan. Bring to a gentle simmer over medium heat, stirring occasionally. Cook for 5-7 minutes, allowing it to thicken slightly and deepen in flavor. Remove from heat and let cool slightly.
- Prepare the Gelatin: While the puree cools, sprinkle the unflavored gelatin powder over ¼ cup cold water in a small, microwave-safe bowl. Let it sit for 5 minutes to bloom (soften).
- Microwave the gelatin mixture for 10-15 seconds, or until the gelatin is completely dissolved and clear. Stir well.
- Stir the dissolved gelatin into the warm (not hot) strawberry puree. Mix thoroughly to ensure no lumps. Set aside to cool to room temperature.
- Prepare the Cream Cheese Mixture: In a large mixing bowl, using an electric mixer, beat the softened cream cheese until smooth and creamy, about 2-3 minutes.
- Beat in the vanilla extract.
- Whip the Cream (for filling): In a separate, chilled bowl, combine 1 ½ cups heavy cream and ¼ cup powdered sugar. Beat with an electric mixer on medium-high speed until stiff peaks form. Be careful not to overbeat.
- Combine Filling Ingredients: Gently fold about one-third of the whipped cream into the cream cheese mixture until just combined. This lightens the cream cheese, making it easier to incorporate the rest.
- Pour the cooled strawberry-gelatin mixture into the cream cheese mixture. Mix on low speed until just combined, or fold gently with a spatula.
- Carefully fold in the remaining whipped cream until no streaks remain. Be gentle to maintain the airy texture.
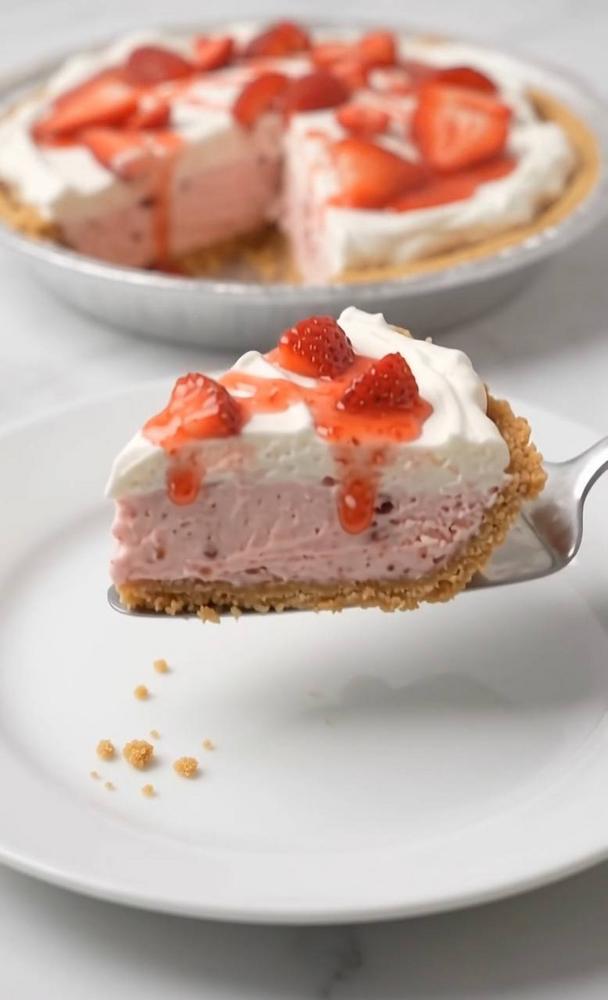
- Assemble the Pie: Pour the strawberry filling into the chilled graham cracker crust, spreading it evenly with a spatula.
- Cover the pie loosely with plastic wrap and refrigerate for at least 4-6 hours, or preferably overnight, until the filling is completely set.
- Prepare the Topping and Garnish (before serving): In a chilled bowl, combine the additional 1 cup heavy cream, 2 tablespoons powdered sugar, and ½ teaspoon vanilla extract. Beat with an electric mixer on medium-high speed until stiff peaks form.
- Remove the pie from the refrigerator. Spread the whipped cream topping over the set strawberry filling.
- Arrange the fresh strawberry slices decoratively on top of the whipped cream. If desired, drizzle with strawberry sauce or glaze.
- Slice and serve immediately.
Cooking Tips and Variations
For the best results with your No-Bake Strawberry Dream Pie, always ensure your cream cheese is truly softened to room temperature before beating. This prevents lumps and ensures a smooth, creamy filling. When whipping heavy cream, using a chilled bowl and beaters can significantly speed up the process and result in a more stable whipped cream. Be careful not to overbeat the cream, as it can quickly turn grainy or even into butter. For the graham cracker crust, pressing it firmly into the pie dish is crucial for a stable base that won’t crumble when sliced. If you find your crust is too dry, add a tiny bit more melted butter, a teaspoon at a time, until it holds together when pressed. Conversely, if it seems too wet, add a tablespoon of extra graham cracker crumbs.
When preparing the strawberry puree, taste it before adding all the sugar. The sweetness of strawberries can vary greatly, so adjust the sugar accordingly. Using fresh lemon juice in the puree not only brightens the strawberry flavor but also helps to balance the sweetness. Ensure the strawberry-gelatin mixture has cooled to room temperature before adding it to the cream cheese and whipped cream. Adding a warm mixture can melt the cream cheese and deflate the whipped cream, leading to a runny filling that won’t set properly. The chilling time is not just a suggestion; it’s essential. Allow the pie to chill for the recommended 4-6 hours, or even better, overnight. This gives the gelatin ample time to set the filling completely, ensuring clean slices and a firm texture.
This recipe is wonderfully versatile, allowing for several delicious variations. For a different fruit profile, you can easily swap strawberries for other berries like raspberries, blueberries, or a mixed berry blend. Just ensure to adjust the sugar content based on the sweetness of the fruit. For a chocolate lover’s twist, consider adding a layer of melted dark chocolate over the crust before adding the filling, or fold some mini chocolate chips into the strawberry filling. You could also experiment with different crusts; an Oreo cookie crust or a vanilla wafer crust would provide unique flavor combinations. To add an extra layer of texture, consider folding in some finely chopped nuts, like pecans or walnuts, into the graham cracker crust mixture. For an adults-only version, a splash of strawberry liqueur or a complementary fruit-flavored spirit can be added to the strawberry puree before chilling, enhancing the flavor complexity.
Another variation involves the topping: while classic whipped cream is delightful, you could also use a cream cheese frosting for a richer topping, or even a meringue for a toasted finish if you don’t mind a little oven time for browning. For an intensified strawberry flavor, you can make a simple strawberry reduction by simmering extra strawberry puree with a little sugar until it thickens into a syrup, then drizzle this over individual slices. Don’t be afraid to experiment with extracts; a touch of almond extract can complement the strawberry wonderfully, or a hint of rosewater for an elegant floral note. Remember, the key to a great no-bake pie is patience during the chilling phase and attention to detail during preparation. Enjoy customizing this dream pie to your heart’s content!
Storage and Reheating
Storing your No-Bake Strawberry Dream Pie properly is key to maintaining its delicious flavor and perfect texture. Once assembled and fully chilled, the pie should be kept in the refrigerator. To prevent it from absorbing refrigerator odors and to keep the whipped cream topping fresh, cover the pie loosely with plastic wrap or aluminum foil. If your pie dish comes with a lid, even better. The pie is best enjoyed within 3-4 days of preparation. Beyond this, the graham cracker crust may start to soften, and the fresh fruit garnish might begin to weep or lose its vibrant appearance. For the freshest taste and best presentation, it’s always recommended to add the fresh fruit garnish and the final dollop of whipped cream topping just before serving.
This is a dessert that is designed to be served cold, directly from the refrigerator. As a no-bake pie, it does not require or benefit from reheating. Attempting to reheat it would cause the gelatin in the filling to melt, resulting in a runny, unappealing texture, and the whipped cream topping would also melt. Therefore, always serve this pie chilled. If you are taking it to a potluck or picnic, keep it in a cooler with ice packs until just before serving to ensure it remains firm and refreshing. Leftover slices should also be returned to the refrigerator promptly after serving. If you anticipate having a lot of leftovers, you can cut the pie into individual slices and store them in airtight containers, which can help prolong their freshness slightly and make serving easier.
Frequently Asked Questions
Can I use frozen strawberries for this pie?
Yes, you can use frozen strawberries for the filling, but there are a few important considerations. Thaw them completely and drain any excess liquid before pureeing to prevent the filling from becoming too watery. Frozen strawberries tend to release more water than fresh ones. You might also need to adjust the amount of sugar, as thawed frozen strawberries can sometimes be less sweet than ripe fresh ones. For the garnish, however, fresh strawberries are highly recommended for their vibrant color, firm texture, and overall appeal.
My pie filling didn’t set. What went wrong?
There are a few common reasons why a no-bake pie filling might not set. The most frequent culprit is not allowing the gelatin to bloom properly or not dissolving it completely. Ensure you sprinkle the gelatin over cold water and let it sit for the full 5 minutes before gently warming it until clear. Another reason could be adding the strawberry-gelatin mixture while it was still too warm, which can prevent the gelatin from setting effectively once chilled. Lastly, not chilling the pie for long enough is a common mistake. Gelatin needs adequate time in the refrigerator (at least 4-6 hours, preferably overnight) to fully solidify and firm up the filling.
How can I get clean slices of the pie?
For perfectly clean slices, ensure your pie is thoroughly chilled and completely set before cutting. Before each cut, dip a sharp, thin-bladed knife into hot water, then wipe it dry. This warms the blade, allowing it to glide through the creamy filling and crust without sticking or dragging. Repeat this process for every slice. Wiping the knife clean between cuts also helps prevent residue from one slice from transferring to the next, ensuring a neat presentation.
Can I make this pie ahead of time for a party?
Absolutely! This No-Bake Strawberry Dream Pie is an excellent make-ahead dessert. You can prepare the entire pie, including the filling and crust, up to 2 days in advance. Store it covered in the refrigerator. For the best presentation, it’s recommended to add the final whipped cream topping and fresh strawberry garnish just a few hours before serving. This keeps the whipped cream looking fluffy and prevents the fresh strawberries from weeping or losing their vibrant appearance.