Instructions
- Prepare Your Workspace: Ensure your unsalted butter is genuinely at room temperature. This means it should be soft enough to easily indent with your finger but not melted or greasy. Cold heavy cream or milk is also essential for consistency. Sift your powdered sugar before measuring to prevent lumps and ensure the smoothest frosting possible.
- Cream the Butter: In the bowl of a stand mixer fitted with the paddle attachment, or using a large bowl with a hand mixer, beat the softened butter on medium speed for 3-5 minutes. You want to achieve a light, fluffy, and pale yellow consistency. This step is crucial for incorporating air and creating a light texture. Scrape down the sides of the bowl frequently to ensure even creaming.
- Gradually Add Powdered Sugar: With the mixer on low speed, begin adding the sifted powdered sugar, one cup at a time. Allow each addition to fully incorporate before adding the next. This slow addition prevents a sugar cloud and ensures the sugar is evenly distributed. Continue mixing on low until all the sugar has been added and the mixture is crumbly.
- Add Liquid and Flavoring: Pour in the cold heavy cream (or milk), vanilla extract, and salt. Start mixing on low speed until combined, then increase the speed to medium-high.
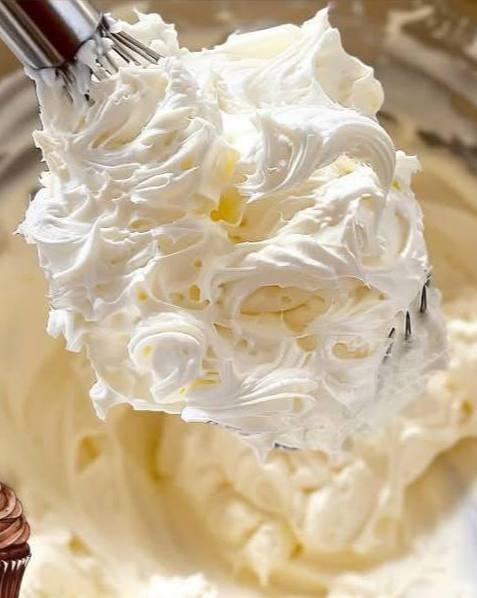
- Whip to Perfection: Beat the frosting on medium-high speed for another 5-8 minutes. This extended whipping time is key to achieving the “$300” texture – it incorporates a significant amount of air, making the frosting incredibly light, fluffy, and voluminous. The frosting should become noticeably paler, almost white, and increase significantly in volume. It should also be able to hold stiff peaks when the beater is lifted.
- Scrape and Final Check: Stop the mixer and scrape down the sides and bottom of the bowl one last time to ensure everything is thoroughly combined. Give it one final 30-second whip on medium speed. The frosting should be smooth, airy, and free of any butter lumps or sugar grains.
- Adjust Consistency (if needed): If the frosting appears too thick, add more heavy cream or milk, one teaspoon at a time, beating after each addition until the desired consistency is reached. If it’s too thin, add more sifted powdered sugar, one tablespoon at a time, until it thickens. Remember, a little goes a long way.
- Ready to Use: Your “$300 Foresting” is now ready to use for piping, spreading, or filling your favorite baked goods. Its stability and luxurious texture make it perfect for any decorating endeavor.
Cooking Tips and Variations
For the ultimate “$300 Frosting” experience, start with high-quality unsalted butter. European-style butter, with its higher fat content, can yield an even richer and silkier result. Always ensure your butter is at a true room temperature; if it’s too cold, it won’t cream properly, leading to a lumpy frosting. If it’s too warm, the frosting might become greasy. Sifting your powdered sugar is non-negotiable for a smooth, lump-free texture. Don’t skip the extended whipping time in step 5; this is where the magic happens, incorporating air for that signature light and fluffy consistency.
To vary the flavor of your “$300 Frosting,” the possibilities are endless. For a rich chocolate version, add 1/2 cup of unsweetened cocoa powder (sifted) during step 3 with the powdered sugar, and increase the heavy cream by 1-2 tablespoons as needed. For a citrusy twist, add 1-2 tablespoons of fresh lemon, lime, or orange zest along with 1 teaspoon of the corresponding extract. Coffee lovers can incorporate 1-2 teaspoons of espresso powder (dissolved in 1 tablespoon of hot water and cooled) for a mocha frosting. Fruit purees can also be folded in for natural fruit flavors; just ensure the puree is thick and well-strained to avoid making the frosting too thin. For a hint of almond, swap half of the vanilla extract for almond extract. You can also add food coloring gels (not liquid drops, which can thin the frosting) to achieve any desired hue for your decorations. Always add gel coloring sparingly until you reach the desired shade.
Storage and Reheating
The “$300 Frosting” stores beautifully, making it perfect for preparing ahead of time. Once made, transfer the frosting to an airtight container. It can be stored at room temperature for up to 2 days, though in warmer climates or if your kitchen is particularly warm, refrigeration is recommended. When refrigerating, it will keep for up to 1 week. If you need to store it for longer, this frosting freezes exceptionally well for up to 1 month. Make sure it’s in a freezer-safe, airtight container to prevent freezer burn.
To prepare refrigerated frosting for use, allow it to come to room temperature for several hours. Once softened, place it back in your stand mixer with the paddle attachment (or use a hand mixer) and beat it on medium speed for 3-5 minutes until it becomes light, fluffy, and smooth again. You may need to add a teaspoon or two of heavy cream or milk if it seems too stiff. For frozen frosting, transfer it to the refrigerator to thaw overnight, then follow the same steps to bring it back to its original fluffy consistency. Avoid microwaving or rapidly heating the frosting, as this can cause the butter to melt and separate, ruining the texture.
Frequently Asked Questions
Why is my frosting grainy?
A grainy frosting is almost always due to undissolved powdered sugar. Ensure you are sifting your powdered sugar before adding it to the butter. Also, make sure you are mixing the frosting for the full recommended time, especially after adding all the sugar and liquid. The prolonged beating helps to dissolve any remaining sugar crystals and incorporate air for a smoother texture.
My frosting is too thin/thick. How can I fix it?
If your frosting is too thin, it likely has too much liquid. Add more sifted powdered sugar, one tablespoon at a time, beating well after each addition until it reaches your desired consistency. If your frosting is too thick, it needs more liquid. Add heavy cream or milk, one teaspoon at a time, beating well after each addition until it’s spreadable and pipeable. Remember to go slowly with adjustments, as a little can make a big difference.
Can I make this frosting dairy-free?
While the classic “$300 Frosting” relies on real butter and cream for its signature richness and texture, you can attempt a dairy-free version. Substitute the unsalted butter with a high-quality, plant-based butter alternative that comes in sticks (not tubs) and has a similar fat content. For the heavy cream, use full-fat canned coconut milk (refrigerated overnight, scooping out only the thick cream on top) or a dairy-free heavy cream alternative. Be aware that the flavor and texture might be slightly different, but it can still yield a delicious result.
How long does this frosting take to set on a cake?
This “$300 Frosting” is quite stable and will begin to set relatively quickly, especially in cooler temperatures. On a cake or cupcakes, it will form a slight crust within 30-60 minutes at room temperature, making it easier to handle and transport without smudging. For full firmness, especially if stacking cakes, it’s best to refrigerate the frosted item for at least 1-2 hours.