Instructions
- In a large, heavy-duty gallon-sized zip-top bag, combine the warm water, granulated sugar, and active dry yeast. Gently mix by squeezing the bag to dissolve the sugar and yeast. Let stand for 5-10 minutes, or until the mixture becomes foamy. This indicates that your yeast is active.
- Once the yeast is foamy, add the olive oil (or melted butter) to the bag.
- Add 1 cup of the all-purpose flour and the salt to the bag. Seal the bag, pressing out as much air as possible.
- Gently massage the bag, squeezing and squishing the contents until the flour is fully incorporated and a shaggy dough forms.
- Add the remaining 2 cups of all-purpose flour, one cup at a time, sealing the bag and massaging after each addition, until all the flour is incorporated and a soft, slightly sticky dough ball forms.
- Once all the flour is incorporated, it’s time to knead! Keep the dough inside the sealed bag. Using your hands on the outside of the bag, push, fold, and press the dough against the bag and itself. Continue this “kneading in a bag” motion for 5-7 minutes. You’ll feel the dough become smoother and more elastic.
- Once kneaded, lightly grease the inside of the same zip-top bag with a little olive oil or cooking spray. Place the dough back inside the bag, ensuring it’s coated with the oil. Seal the bag, leaving a little air inside to allow for rising.
- Place the sealed bag in a warm, draft-free place (like a turned-off oven with the light on, or near a sunny window) for 1 to 1.5 hours, or until the dough has doubled in size.
- While the dough is rising, lightly grease a 9×5-inch loaf pan with olive oil or cooking spray.
- Once the dough has doubled, gently punch it down through the bag to release the air. Carefully remove the dough from the bag and place it on a lightly floured surface.
- Shape the dough into a loaf that fits your prepared loaf pan. You can do this by gently patting it into a rectangle and then rolling it up tightly from one of the longer sides, pinching the seam closed.
- Place the shaped dough seam-side down into the greased loaf pan.
- Cover the loaf pan loosely with a clean kitchen towel or plastic wrap and let it rise in a warm place for another 30-45 minutes, or until it has nearly doubled in size and rises above the rim of the pan.
- Preheat your oven to 375°F (190°C) during the last 15-20 minutes of the second rise.
- Bake the bread in the preheated oven for 25-35 minutes, or until the crust is golden brown and the internal temperature reaches 200-210°F (93-99°C). If you tap the bottom of the loaf, it should sound hollow.
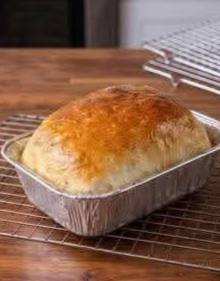
- Remove the loaf from the oven and immediately transfer it from the pan to a wire cooling rack. Let it cool completely before slicing and serving. This is crucial for the bread’s texture.
Cooking Tips and Variations
For the best results with your bread in a bag, start with fresh yeast. Active dry yeast should always be proofed in warm water and sugar first to ensure it’s alive and ready to work. The water temperature is key: too cold, and the yeast won’t activate; too hot, and you’ll kill it. Aim for 105-115°F (40-46°C), which is comfortably warm to the touch. When kneading in the bag, don’t be afraid to really work the dough. Push, fold, and press it against the sides of the bag for the full 5-7 minutes. This develops the gluten, which is essential for a good crumb structure. For proofing, a warm, draft-free spot is ideal. If your kitchen is cool, placing the bag in a turned-off oven with just the light on creates a perfect environment. Always let your bread cool completely on a wire rack before slicing; slicing hot bread can make it gummy.
Classic White Bread in a Bag
The recipe above provides a perfect foundation for a classic white loaf. For a slightly richer flavor, you can substitute milk for half of the water in the recipe. Ensure the milk is also warmed to the correct temperature. You can also brush the top of the loaf with melted butter or an egg wash (one egg whisked with a tablespoon of water) before baking for a shinier, softer crust.
Whole Wheat Bread in a Bag
To make a healthier whole wheat version, substitute 1 to 1.5 cups of the all-purpose flour with whole wheat flour. Whole wheat flour absorbs more liquid, so you might need to add an extra tablespoon or two of warm water if the dough feels too stiff. The texture will be denser, and the flavor nuttier. Whole wheat bread often takes a little longer to rise, so be patient.
Sweet Bread in a Bag (Cinnamon Raisin)
For a delicious sweet treat, add ½ cup of raisins and 1-2 teaspoons of ground cinnamon to the dough along with the last addition of flour. You can also increase the sugar to ¼ cup. After the second rise and before baking, you can brush the top with melted butter and sprinkle with a cinnamon-sugar mixture for an extra sweet crust. This is perfect for breakfast or a sweet snack.
Savory Bread in a Bag (Herb or Cheese)
To create a savory loaf, omit the sugar or reduce it to 1 tablespoon. Incorporate 2-3 tablespoons of dried herbs (like Italian seasoning, rosemary, or thyme) or ½ cup of shredded cheese (cheddar, Parmesan, or a blend) with the flour. For an extra burst of flavor, you can also add 1-2 cloves of minced garlic. This bread is excellent with soups, stews, or as a side with dinner. You can even sprinkle some extra cheese on top during the last 10 minutes of baking.
Storage and Reheating
Once your delicious bread in a bag has cooled completely, proper storage is key to keeping it fresh. For short-term storage (1-2 days), store the loaf at room temperature in an airtight container, a bread box, or a large zip-top bag. Avoid refrigerating homemade bread, as it tends to dry out and become stale more quickly in the fridge. If you plan to keep the bread for longer, freezing is your best option. Slice the cooled loaf, then place the slices in a freezer-safe bag or wrap them tightly in plastic wrap and then foil. Frozen bread can last for up to 3 months. When ready to eat, simply take out the desired number of slices and toast them directly from frozen, or let them thaw at room temperature. To reheat a whole loaf, you can wrap it in foil and warm it in a 350°F (175°C) oven for 10-15 minutes, or until warmed through. This can help revive a slightly stale loaf as well.
Frequently Asked Questions
Why isn’t my dough rising?
The most common reasons for dough not rising are inactive yeast or incorrect water temperature. Ensure your yeast is fresh and active by proofing it in warm water (105-115°F / 40-46°C) with sugar. If it doesn’t foam, your yeast might be old or the water was too hot or too cold. Also, make sure your proofing environment is warm and draft-free; cold temperatures will significantly slow down or halt the rising process.
My bread is too dense. What went wrong?
Dense bread can be caused by several factors. It might be due to not enough kneading, which means the gluten hasn’t fully developed to create a light, airy structure. Conversely, over-kneading can also lead to tough, dense bread, though this is less common with the bag method. Another reason could be insufficient rising time; if the dough doesn’t double in size during the first and second proofs, it won’t be airy. Finally, too much flour can make the dough stiff and dense, so measure carefully.
How can I prevent my bread from being too dry?
Dry bread often results from overbaking or not enough fat in the recipe. Ensure you’re baking for the recommended time and checking for doneness (golden brown crust, hollow sound when tapped, internal temperature of 200-210°F). If your oven runs hot, you might need to adjust baking time or temperature. Adding a little extra oil or butter (an additional tablespoon) to the dough can also contribute to a moister crumb. Additionally, storing the bread properly in an airtight container once cooled will help retain moisture.
Can I use self-rising flour for bread in a bag?
No, self-rising flour is not suitable for this yeast bread recipe. Self-rising flour contains baking powder and salt, which are chemical leavening agents that work differently than yeast. This recipe specifically calls for active dry yeast to create the classic texture and flavor of homemade yeast bread. Using self-rising flour would result in a very different, and likely unsatisfactory, outcome for this particular method.