Instructions
- Activate the Yeast: In a measuring cup or small bowl, combine the warm water, 2 tablespoons of granulated sugar, and the active dry yeast. Stir gently and let it sit for 5-10 minutes until the mixture becomes foamy. This indicates the yeast is active and ready to work. If it doesn’t foam, your water might have been too hot or too cold, or your yeast may be old. Start again with fresh yeast and correct water temperature.
- Prepare the Bag: Get a large, heavy-duty, gallon-sized zip-top plastic bag. Ensure it’s food-safe and doesn’t have any holes. This will be your mixing and kneading vessel.
- Combine Dry Ingredients: In the zip-top bag, combine the 3 cups of all-purpose flour and 1 teaspoon of salt. Seal the bag and shake it gently to mix the dry ingredients thoroughly.
- Add Wet Ingredients to Bag: Open the bag and pour in the activated yeast mixture and the 2 tablespoons of melted and slightly cooled butter.
- Mix the Dough in the Bag: Reseal the bag, making sure to press out as much air as possible. Now, get ready to mix! Squish and squeeze the bag with your hands, working the ingredients together until a shaggy dough forms. Continue to squish and mix for about 2-3 minutes until all the flour is incorporated and you have a cohesive, albeit sticky, dough ball. This is your “kneading” process!
- First Rise (Proofing): Leave the dough in the sealed bag. Place the bag in a warm, draft-free spot. A slightly warm oven (turned off, or just warmed by the pilot light) or a sunny spot on your counter works well. Let the dough rise for 1 to 1.5 hours, or until it has roughly doubled in size. The bag will puff up with the dough.
- Punch Down and Shape: Once the dough has risen, gently punch it down while it’s still inside the bag to release the air. Lightly flour a clean work surface. Carefully remove the dough from the bag and place it onto the floured surface. Divide the dough into 6 equal pieces.
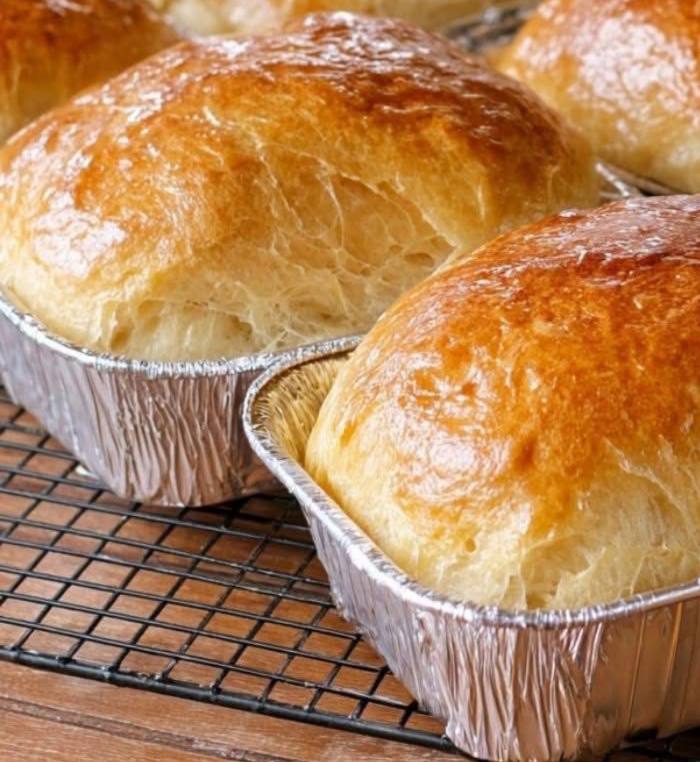
- Prepare Baking Loaf Pans: Take 6 small aluminum foil loaf pans (typically around 6×3 inches). Lightly grease each pan with butter or cooking spray.
- Form the Loaves: Take each piece of dough and gently shape it into a small loaf or roll. You can gently stretch and fold the edges underneath to create a smooth top. Place one shaped dough piece into each greased aluminum foil loaf pan.
- Second Rise: Cover the loaf pans loosely with plastic wrap or a clean kitchen towel. Place them back in a warm, draft-free spot for another 30-45 minutes, or until the dough has noticeably puffed up again and almost doubled in size.
- Preheat Oven: While the dough is on its second rise, preheat your oven to 375°F (190°C).
- Prepare Egg Wash: In a small bowl, whisk together the large egg and 1 tablespoon of water.
- Bake the Bread: Once the loaves have risen, gently brush the tops of each loaf with the egg wash. This will give them a beautiful golden-brown, shiny crust. Place the loaf pans on a baking sheet to make it easier to transfer them to and from the oven.
- Bake for 18-22 minutes, or until the tops are golden brown and the internal temperature reaches 200-210°F (93-99°C) when checked with an instant-read thermometer. If you don’t have a thermometer, tap the bottom of a loaf; it should sound hollow.
- Cool: Carefully remove the loaf pans from the oven. Let the bread cool in the pans for about 5-10 minutes before carefully transferring them to a wire rack to cool completely. This prevents the bottoms from becoming soggy.
- Serve: Enjoy your delicious “Bread in a Bag” warm or at room temperature!
Cooking Tips and Variations
Tips for Best Results:
- Yeast Temperature is Key: The most common reason for bread not rising is inactive yeast. Ensure your water is between 105-115°F (40-46°C). Too hot will kill the yeast; too cold won’t activate it.
- Heavy-Duty Bag: Invest in good quality, heavy-duty gallon-sized zip-top bags. A flimsy bag might tear during the mixing process, leading to a messy situation.
- Press Out Air: When sealing the bag for mixing and the first rise, press out as much excess air as possible. This helps to create a more compact space for the dough to develop and rise effectively.
- Warm Rising Spot: A consistently warm, draft-free environment is crucial for good rising. If your kitchen is cool, try placing the bag or pans in a slightly warmed (then turned off) oven, or even on top of your refrigerator.
- Don’t Over-Flour: When shaping the loaves, use just enough flour on your work surface to prevent sticking. Too much extra flour can make the bread dense and dry.
- Check for Doneness: The best way to tell if bread is cooked through is with an instant-read thermometer; 200-210°F (93-99°C) is ideal. If you don’t have one, a hollow sound when tapped on the bottom is a good indicator.
- Cool Completely: Resist the urge to slice into warm bread immediately. Cooling on a wire rack allows steam to escape and the internal structure to set, resulting in a better texture.
Variations to Try:
- Herb & Garlic: Before the second rise, mix 1 teaspoon of dried Italian herbs and ½ teaspoon of garlic powder into the dough. You can also sprinkle some on top before baking.
- Cheesy Goodness: Add ½ cup (50g) shredded cheddar or Parmesan cheese to the dough during the mixing stage in the bag.
- Sweet Cinnamon Rolls: For a sweeter treat, after the first rise, roll out the dough on a floured surface, spread with softened butter, sprinkle with cinnamon sugar, roll it up, and slice into 6 individual rolls before the second rise and baking. Adjust baking time as needed.
- Sesame Seed Topping: Instead of or in addition to the egg wash, sprinkle sesame seeds on top of the loaves before baking for a nutty flavor and crunchy texture.
- Whole Wheat Boost: Substitute ¼ to ½ cup of the all-purpose flour for whole wheat flour for a slightly heartier loaf. You might need a tiny bit more water if the dough feels too stiff.
- Honey Bread: Replace the granulated sugar with honey for a different depth of sweetness. Reduce the warm water slightly as honey is a liquid.
Storage and Reheating
Storage:
- Room Temperature: Once completely cooled, store your “Bread in a Bag” in an airtight container or a plastic bag at room temperature for up to 2-3 days. Make sure it’s fully cooled before storing to prevent condensation, which can make the bread soggy.
- Freezing: For longer storage, you can freeze the baked loaves. Once completely cooled, wrap each loaf tightly in plastic wrap, then an additional layer of aluminum foil. They can be frozen for up to 1-2 months. Thaw at room temperature when ready to enjoy.
Reheating:
- Oven: If reheating a whole loaf, preheat your oven to 350°F (175°C). Remove any plastic wrap or foil, and bake for 5-10 minutes, or until warmed through and the crust is crisp again.
- Microwave: For a quick reheat of individual slices or small loaves, wrap in a damp paper towel and microwave for 15-30 seconds. Be careful not to over-microwave, as it can make the bread tough.
- Toaster Oven/Toaster: Slices can be quickly toasted in a toaster or toaster oven for a crispy exterior.
Frequently Asked Questions
My dough didn’t rise. What went wrong?
The most common culprits for dough not rising are inactive yeast or incorrect water temperature. Ensure your yeast is fresh and the water is between 105-115°F (40-46°C). Also, make sure your rising spot is warm and draft-free. If your kitchen is cold, rising can take significantly longer.
Can I use bread flour instead of all-purpose flour?
Yes, you can! Bread flour has a higher protein content, which will result in a chewier bread with a slightly different texture. You might need to add a tiny bit more water if the dough feels too stiff, as bread flour absorbs more liquid.
Can I make this recipe for a larger loaf instead of small individual ones?
Absolutely! You can combine the dough into one larger loaf and bake it in a standard loaf pan (8.5×4.5 inches or 9×5 inches). The baking time will need to be adjusted, likely to 30-40 minutes, or until golden brown and cooked through. Ensure the internal temperature reaches 200-210°F (93-99°C).
Is this bread recipe suitable for making sandwiches?
Yes! These soft, slightly sweet rolls are perfect for sandwiches. Their tender crumb and mild flavor make them a great base for both savory and sweet fillings. They also make excellent dinner rolls.