Instructions
- Preheat your oven to 375°F (190°C). Line a large baking sheet with parchment paper or aluminum foil for easy cleanup. If using foil, you might want to lightly spray it with non-stick cooking spray to prevent sticking.
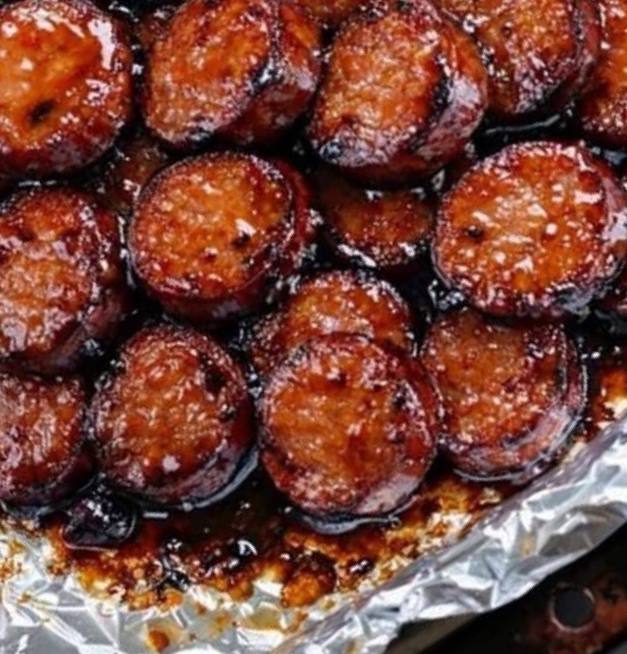
- Prepare the kielbasa: Remove the kielbasa from its packaging. Using a sharp knife, slice the kielbasa into 1/2-inch thick rounds. You can cut them in half again if you prefer smaller, bite-sized pieces, or leave them as rounds.
- Arrange the sliced kielbasa in a single layer on the prepared baking sheet. This initial bake helps render some of the fat and gives the kielbasa a nice texture before adding the glaze.
- Bake the kielbasa for 15-20 minutes, or until lightly browned and slightly crispy.
- While the kielbasa is baking, prepare the glaze: In a medium saucepan, combine the brown sugar, ketchup, apple cider vinegar, Worcestershire sauce, Dijon mustard, garlic powder, onion powder, black pepper, and optional red pepper flakes and liquid smoke.
- Whisk the glaze ingredients together until well combined. Place the saucepan over medium heat and bring the mixture to a gentle simmer, whisking occasionally.
- Once simmering, reduce the heat to low and continue to cook for 5-7 minutes, stirring occasionally, until the glaze has thickened slightly and all the sugar has dissolved. It should be syrupy but still pourable.
- Remove the baked kielbasa from the oven. Carefully transfer the kielbasa slices from the baking sheet to a large mixing bowl.
- Pour the prepared glaze over the kielbasa in the mixing bowl. Use a spatula or large spoon to gently toss the kielbasa, ensuring every piece is thoroughly coated with the sweet and sticky glaze.
- Return the glazed kielbasa to the same lined baking sheet, spreading them out in a single layer again.
- Place the baking sheet back into the oven and bake for another 15-20 minutes. During this time, the glaze will caramelize and become even stickier and more flavorful.
- For the last 5 minutes of baking, you can increase the oven temperature to 400°F (200°C) or switch to a low broiler setting (watch carefully!) to get extra caramelization and a beautiful sheen on the glaze, if desired. Be very careful not to burn them.
- Remove the Candied Kielbasa Bites from the oven. Let them cool on the baking sheet for a few minutes. The glaze will continue to thicken as it cools.
- Serve warm with toothpicks for easy handling. Enjoy your delicious, sweet, and savory appetizer!
Cooking Tips and Variations
For the absolute best Candied Kielbasa Bites, paying attention to a few key details can make all the difference. First, when slicing your kielbasa, aim for uniform 1/2-inch thick rounds. This ensures even cooking and consistent bites, preventing some pieces from drying out while others are still tender. If you prefer smaller pieces, you can halve the rounds, but try to keep the thickness consistent. Don’t skip the initial baking step for the kielbasa alone; this helps to render some of the fat and gives the sausage a head start on browning, creating a better texture before the glaze is added. Overcrowding the baking sheet, especially during the second bake with the glaze, is a common mistake. Make sure your kielbasa pieces are in a single layer with a little space between them. This allows the hot air to circulate, promoting even caramelization and preventing the bites from steaming instead of glazing. If you have too much kielbasa for one sheet, bake in batches.
When preparing the glaze, ensure that all the brown sugar fully dissolves. Simmering on low heat, stirring occasionally, helps achieve a smooth, consistent glaze that will coat the kielbasa beautifully without any grainy texture. If you want an extra layer of flavor and don’t mind a little extra effort, you can pan-fry the kielbasa slices in a skillet until browned before tossing them with the glaze and baking. This can create an even crispier exterior. For easier serving, especially at parties, consider inserting a toothpick into each candied bite as soon as they’re cool enough to handle. This makes them mess-free and simple for guests to pick up.
The beauty of this recipe lies in its adaptability. You can easily tweak the base glaze to suit your preferences. For a spicier kick, increase the red pepper flakes or add a dash of your favorite hot sauce to the glaze. A pinch of cayenne pepper also works wonderfully. If you enjoy a more pronounced smoky flavor, a tablespoon of liquid smoke added to the glaze can enhance that profile, especially if your chosen kielbasa isn’t heavily smoked. For a boozy twist, consider adding 1-2 tablespoons of bourbon, whiskey, or dark rum to the glaze while it simmers. The alcohol will cook off, leaving behind a rich, nuanced flavor. Citrus zest, like orange or lemon, can also brighten the glaze with a fresh, zesty note.
Don’t be afraid to experiment with different types of sausage. While kielbasa is traditional, other smoked sausages like fully cooked beef sausage, turkey sausage, or even a spicier Andouille sausage can be used. Just be mindful of the fat content and adjust baking times slightly if needed. For a touch of tang, a spoonful of apricot preserves or orange marmalade can be stirred into the glaze, adding a fruity depth that complements the savory sausage. You can also add a sprinkle of sesame seeds or chopped fresh parsley over the finished bites just before serving for an aesthetic touch and a subtle textural contrast. Finally, if you’re short on oven space or prefer a different cooking method, these can be made in a slow cooker. Simply brown the kielbasa in a skillet first, then combine with the glaze ingredients in the slow cooker and cook on low for 2-3 hours, stirring occasionally, until the glaze is thick and coats the sausage.
Storage and Reheating
Candied Kielbasa Bites are fantastic when served warm, but if you happen to have any leftovers (which is a rare occurrence!), they can be stored and reheated for later enjoyment. To store, first ensure the bites have cooled completely to room temperature. Transfer them to an airtight container. They can be kept in the refrigerator for up to 3-4 days. It’s best to separate them as much as possible to prevent them from sticking together too much, though some stickiness is inherent to the dish. You can place parchment paper between layers if desired.
For reheating, the oven is generally the best method to recapture that lovely caramelized texture and warm glaze. Preheat your oven to 300°F (150°C). Spread the leftover kielbasa bites in a single layer on a baking sheet lined with parchment paper. Reheat for 10-15 minutes, or until they are heated through and the glaze is bubbly and sticky again. Be careful not to overheat, as this can dry out the sausage. You can also reheat them in a skillet on the stovetop over medium-low heat. Add a tablespoon or two of water or chicken broth to the pan to help loosen the glaze and prevent sticking, stirring occasionally until heated through. The microwave is an option for quick reheating, but it may make the glaze less sticky and the kielbasa a bit softer in texture. If using a microwave, heat in 30-second intervals, stirring in between, until warm.
Frequently Asked Questions
What kind of kielbasa should I use for this recipe?
You should use fully cooked, smoked kielbasa sausage for this recipe. Traditional Polish kielbasa is excellent, but any good quality smoked sausage will work well. Avoid raw or uncooked sausages, as they require different cooking times and methods. Look for a robust, flavorful sausage that can stand up to the sweet glaze.
Can I make these Candied Kielbasa Bites ahead of time?
Absolutely! Candied Kielbasa Bites are a fantastic make-ahead appetizer, which is one of their many charms. You can prepare them entirely up to a day in advance and store them in an airtight container in the refrigerator. When you’re ready to serve, simply reheat them in the oven at 300°F (150°C) for 10-15 minutes, or until warmed through and the glaze is sticky again. They taste just as delicious, if not more so, the next day as the flavors have had more time to meld.
Can I make this recipe in a slow cooker?
Yes, you can adapt this recipe for a slow cooker. First, brown the sliced kielbasa in a skillet on the stovetop for a few minutes to develop some flavor and texture. Then, transfer the browned kielbasa to your slow cooker. In the same skillet (or a separate bowl), whisk together all the glaze ingredients and pour it over the kielbasa in the slow cooker. Cook on low for 2-3 hours, stirring occasionally, until the glaze has thickened and coats the sausage beautifully. This method is great for keeping them warm for a party.
What can I serve with Candied Kielbasa Bites?
These bites are typically served on their own as an appetizer, often with toothpicks for easy handling. However, if you want to offer a dipping sauce, a tangy mustard (like a whole grain or spicy brown mustard) or a creamy ranch dressing can provide a nice contrast to the sweet glaze. They also pair wonderfully with other classic party snacks like cheese and crackers, vegetable platters, or mini quiches. For a main course, they can be served alongside mashed potatoes or rice to soak up the extra glaze.