Instructions
- Prepare the Potatoes: Place the peeled and cubed Russet potatoes in a large pot. Cover with cold water by about an inch. Add a generous pinch of salt to the water. Bring to a boil over medium-high heat, then reduce heat and simmer until the potatoes are fork-tender, about 15-20 minutes.
- Mash the Potatoes: Drain the potatoes thoroughly in a colander. Return the hot potatoes to the empty pot or a large mixing bowl. Add the melted butter, warmed milk, garlic powder, onion powder, black pepper, and 1/2 teaspoon salt. Mash the potatoes until smooth, ensuring there are no lumps. Do not overmix, as this can make the potatoes gummy. Taste and adjust seasoning if needed.
- Chill the Potato Mixture: Spread the mashed potato mixture onto a baking sheet lined with parchment paper. This helps it cool down faster and prevents sticking. Refrigerate for at least 1-2 hours, or until completely chilled and firm. This step is crucial for easy shaping and preventing breakage during cooking.
- Prepare the Breading Station: Set up three shallow dishes. In the first, place the all-purpose flour. In the second, pour the beaten eggs mixed with 1 tablespoon of water. In the third, place the panko breadcrumbs.
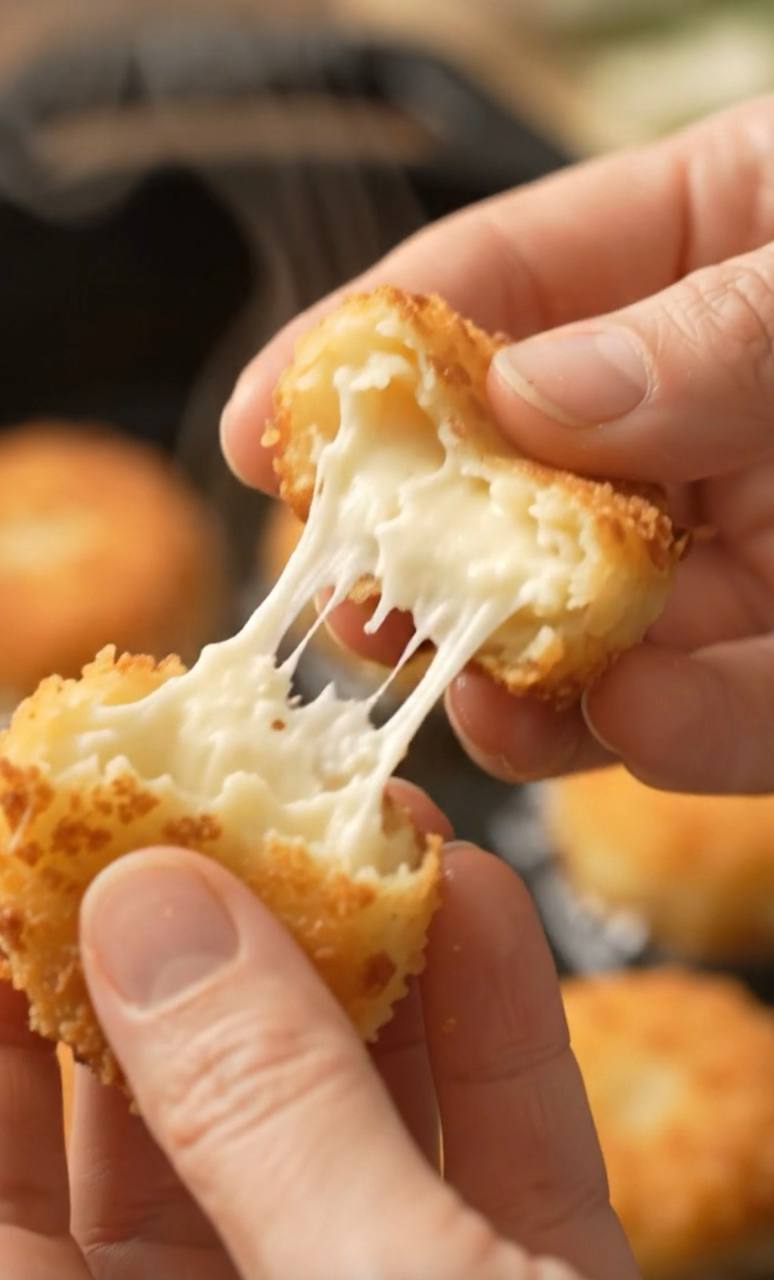
- Form the Croquettes: Take about 1-2 tablespoons of the chilled potato mixture and flatten it slightly in your palm. Place one mozzarella cheese cube in the center. Carefully mold the potato mixture around the cheese, shaping it into a uniform ball or oval, ensuring the cheese is completely enclosed. Repeat with the remaining potato mixture and cheese cubes. You should get about 20-24 croquettes.
- Bread the Croquettes: Working one at a time, roll each shaped croquette first in the flour, shaking off any excess. Then, dip it into the egg wash, allowing any excess to drip off. Finally, roll it thoroughly in the panko breadcrumbs, pressing gently to ensure an even and thick coating. Place the breaded croquettes on a clean plate or baking sheet.
- Chill Again (Optional but Recommended): For best results and to ensure the croquettes hold their shape and the breading adheres perfectly, refrigerate the breaded croquettes for at least 30 minutes. This helps set the breading and prevents them from falling apart during cooking.
- Choose Your Cooking Method:
- Deep Frying (Traditional Method): Pour vegetable oil into a heavy-bottomed pot or Dutch oven, to a depth of about 2-3 inches. Heat the oil over medium-high heat to 350°F (175°C). Use a kitchen thermometer to monitor the temperature. Carefully lower 3-4 croquettes into the hot oil, being careful not to overcrowd the pot. Fry for 3-5 minutes, turning occasionally, until golden brown and crispy on all sides. Remove with a slotted spoon and place on a wire rack lined with paper towels to drain excess oil.
- Air Frying: Preheat your air fryer to 375°F (190°C). Lightly spray the air fryer basket with cooking spray. Arrange the croquettes in a single layer in the basket, ensuring they are not touching. Lightly spray the tops of the croquettes with cooking spray. Air fry for 10-15 minutes, flipping halfway through, until golden brown and crispy. Cooking time may vary depending on your air fryer model.
- Baking: Preheat your oven to 400°F (200°C). Lightly grease a baking sheet or line with parchment paper. Arrange the croquettes in a single layer on the prepared baking sheet. Lightly spray the tops of the croquettes with cooking spray (this helps with browning). Bake for 20-25 minutes, flipping halfway through, until golden brown and crispy.
- Serve Immediately: Transfer the hot Cheesy Potato Croquettes to a serving platter. Garnish with fresh parsley or chives if desired. Serve immediately with your favorite dipping sauces to enjoy that incredible cheese pull and crispy texture.
Cooking Tips and Variations
To achieve the perfect Cheesy Potato Croquettes, pay attention to these details. For the ultimate cheese pull, choose a low-moisture mozzarella or a blend that includes provolone or fontina, as these cheeses melt beautifully without releasing too much water. Ensure your mashed potatoes are as dry as possible after draining; excess moisture can lead to a soggy interior or cause the croquettes to break apart. Starchy potatoes like Russets or Idaho varieties are ideal for mashing, as they create a fluffy, non-gummy texture.
Chilling the potato mixture thoroughly before shaping is non-negotiable. This firms up the potato base, making it easier to handle and less likely to fall apart during the breading and cooking process. Similarly, a second chill after breading helps the coating adhere firmly, creating a more robust and crispier crust. When breading, make sure each croquette is fully coated in flour, then egg, then breadcrumbs; this three-step process is key to a golden, crispy exterior and prevents the cheese from leaking out.
If deep frying, maintaining the correct oil temperature (350°F/175°C) is crucial. Oil that’s too cold will result in greasy croquettes, while oil that’s too hot will burn the exterior before the interior is heated through. Fry in small batches to avoid dropping the oil temperature. For air frying or baking, a light spray of cooking oil helps achieve that desirable golden-brown crispness.
Don’t be afraid to experiment with flavor variations! Incorporate different herbs like chives, dill, or rosemary into the potato mixture. A pinch of smoked paprika or a dash of cayenne pepper can add a subtle kick. You can also vary the cheese – try a smoked gouda, cheddar, or a spicy pepper jack for a different flavor profile. For a richer taste, mix in a tablespoon of grated Parmesan cheese into the potato base. You could even add finely diced cooked bacon bits or chopped jalapeños to the potato mixture for an extra layer of flavor and texture.
Storage and Reheating
Cheesy Potato Croquettes are best enjoyed fresh and hot, right out of the fryer or oven, to experience their peak crispiness and gooey cheese pull. However, if you have leftovers, they can be stored and reheated.
To store, allow the cooked croquettes to cool completely to room temperature. Place them in an airtight container and refrigerate for up to 3-4 days. For longer storage, cooked croquettes can be frozen for up to 1 month. To freeze, arrange the cooled croquettes in a single layer on a baking sheet and freeze until solid. Once frozen, transfer them to a freezer-safe bag or container, separating layers with parchment paper to prevent sticking.
For reheating, avoid the microwave if you want to retain any crispness, as it will make them soft and potentially soggy. The best methods for reheating are:
- Oven: Preheat your oven to 350°F (175°C). Place the croquettes on a baking sheet and bake for 10-15 minutes (if refrigerated) or 20-25 minutes (if frozen), until heated through and crispy.
- Air Fryer: Preheat your air fryer to 350°F (175°C). Place the croquettes in a single layer in the basket. Air fry for 5-8 minutes (if refrigerated) or 10-12 minutes (if frozen), shaking the basket halfway through, until hot and crispy.
- Toaster Oven: A toaster oven works similarly to a conventional oven for smaller batches.
Always ensure the croquettes are heated through to an internal temperature of 165°F (74°C).
Frequently Asked Questions
What kind of potatoes are best for croquettes?
Starchy potatoes like Russet or Idaho are highly recommended for croquettes. Their high starch content makes them fluffy and dry when mashed, which is essential for creating a smooth, non-gummy base that holds its shape well and won’t make your croquettes watery or fall apart during cooking.
Can I prepare the croquettes in advance?
Yes, you can definitely prepare Cheesy Potato Croquettes in advance! You can mash the potatoes and form the croquettes, then bread them. Once breaded, place them on a baking sheet and refrigerate for up to 24 hours before cooking. For longer storage, you can freeze the breaded (uncooked) croquettes on a baking sheet until solid, then transfer them to a freezer-safe bag. Cook from frozen, adding a few extra minutes to the cooking time.
How do I ensure a crispy exterior and prevent the cheese from leaking?
A few key steps ensure a crispy exterior and prevent cheese leakage. First, make sure your mashed potato mixture is well-chilled and firm before shaping. Second, execute the three-step breading process (flour, egg wash, panko breadcrumbs) thoroughly, ensuring a complete and even coating. Press the breadcrumbs gently to adhere well. Third, chill the breaded croquettes for at least 30 minutes before cooking to help the breading set. Finally, maintain the correct cooking temperature – whether deep frying, air frying, or baking – to achieve a golden, crispy crust quickly and seal in that delicious cheese.