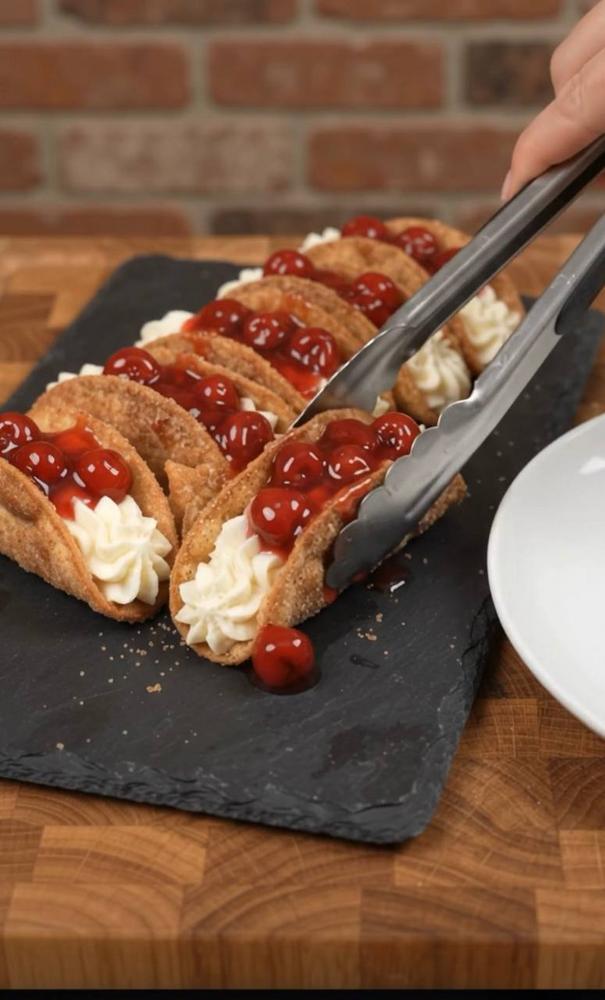
Instructions
- Prepare the Churro Dough: In a medium saucepan, combine the water, butter, and salt. Bring to a rolling boil over medium-high heat, stirring until the butter is melted.
- Once boiling, remove the saucepan from the heat and immediately add the flour all at once. Stir vigorously with a wooden spoon until the mixture forms a ball and pulls away from the sides of the pan.
- Return the saucepan to low heat and continue to stir for 1-2 minutes to dry out the dough slightly. This helps create a crispier churro.
- Transfer the dough to a large mixing bowl. Let it cool for 5 minutes, stirring occasionally, until it’s warm but not hot to the touch.
- Add the eggs one at a time, beating well with an electric mixer after each addition until fully incorporated and the dough is smooth and glossy. The dough will look separated and clumpy at first, but keep mixing until it comes together.
- Shape the Churro Shells: Heat the vegetable oil in a large, deep pot or Dutch oven over medium-high heat until it reaches 350°F (175°C). Use a candy thermometer to monitor the temperature.
- While the oil heats, prepare your cinnamon sugar coating. In a shallow dish, combine the 1/2 cup granulated sugar and 1 tablespoon ground cinnamon. Stir well.
- Transfer the churro dough to a piping bag fitted with a large star tip (like an Ateco 826 or Wilton 1M).
- Carefully pipe 4-5 inch long strips of dough directly into the hot oil. You may need to use kitchen shears to snip the dough at the desired length. Do not overcrowd the pot; fry in batches.
- Fry the churros for 2-3 minutes per side, or until golden brown and cooked through.
- Using a slotted spoon or tongs, carefully remove the churros from the oil. Immediately place them on a paper towel-lined plate to drain excess oil for about 30 seconds.
- While still warm, carefully drape each churro over a wooden spoon handle (propped over a bowl or baking rack) or a taco holder to cool and form the taco shape. You can also carefully bend them into a taco shape by hand.
- Once shaped and still warm, gently toss each churro shell in the cinnamon sugar mixture, ensuring it’s evenly coated. Set aside to cool completely. Repeat with remaining dough.
- Prepare the Cheesecake Filling: In a medium mixing bowl, beat the softened cream cheese with an electric mixer until smooth and creamy.
- Add the powdered sugar and vanilla extract, and beat until well combined and fluffy.
- Gradually add the heavy cream, beating on medium-high speed until the mixture is light, airy, and holds soft peaks. Do not overmix.
- Transfer the cheesecake filling to a piping bag fitted with a star tip (or a Ziploc bag with the corner snipped off).
- Assemble the Tacos: Once the churro shells are completely cooled and firm, take each shell and pipe a generous amount of the cheesecake filling along the inside.
- Spoon the cherry pie filling or homemade cherry compote over the cheesecake filling. Ensure some whole cherries are visible for an attractive presentation.
- Arrange the Cherry Cheesecake Churro Tacos on a serving platter and serve immediately.
Cooking Tips and Variations
For the crispiest churro shells, ensure your oil temperature remains consistent at 350°F (175°C). If the oil is too cool, the churros will absorb too much oil and be greasy; if it’s too hot, they’ll brown too quickly on the outside and be raw in the middle. A thermometer is your best friend here! When forming the churro shells, work quickly after frying. The churros are most pliable when warm, making them easier to shape without breaking. If you don’t have a taco holder, draping them over the handle of a wooden spoon (supported over a bowl) works perfectly to achieve that classic taco shape. Don’t overcrowd the frying pan; frying in batches ensures even cooking and prevents the oil temperature from dropping too much.
To prevent soggy churro shells, always wait until just before serving to fill them. The moisture from the cheesecake and cherry topping can soften the churro over time. For a truly elegant presentation, pipe the cheesecake filling using a decorative star tip. This creates beautiful ridges that hold the cherry topping well. You can also drizzle a little extra cherry syrup over the top for added gloss and flavor.
Get creative with your fillings and toppings! For variations, consider a different fruit topping like fresh strawberry compote, peach slices, or a mixed berry blend. A chocolate drizzle (dark, milk, or white) can add another layer of decadence, or sprinkle some toasted chopped nuts (like pecans or almonds) for an extra crunch. For a spiced churro, you can add a pinch of nutmeg or cardamom to the churro dough or the cinnamon sugar coating. If you’re looking for a lighter option, you can try baking the churro shells instead of frying them. While the texture won’t be identical to fried churros, they will still offer a delicious crunch. Bake at 400°F (200°C) for 15-20 minutes, or until golden brown and firm, flipping halfway through. The cheesecake filling can be flavored with citrus zest (lemon or orange) for a brighter taste, or even a touch of almond extract for a different dimension.
Storage and Reheating
These Cherry Cheesecake Churro Tacos are best enjoyed immediately after assembly to maintain the crispness of the churro shells. However, you can prepare the individual components ahead of time. The churro shells can be made up to 1-2 days in advance. Store them in an airtight container at room temperature. If they lose some of their crispness, you can briefly reheat them in an oven at 350°F (175°C) for 3-5 minutes, or in an air fryer for 1-2 minutes, just until crisp again, before coating in cinnamon sugar (if you haven’t already).
The cheesecake filling can be made 1-2 days in advance and stored in an airtight container in the refrigerator. The cherry pie filling (store-bought or homemade) can also be prepared ahead of time and kept refrigerated for up to 3-4 days. When you’re ready to serve, simply assemble the tacos with the pre-made components. Once assembled, these churro tacos do not store well for extended periods due to the filling softening the churro. If you have any leftover assembled tacos, they can be refrigerated for a few hours, but expect the churro to be soft. Reheating assembled tacos is not recommended as the filling will melt and the churro will become soggy.
Frequently Asked Questions
Can I make the churro dough ahead of time?
While the churro dough is best used immediately after preparation for the crispiest results, you can prepare it up to a few hours in advance and keep it covered in the refrigerator. Allow it to come to room temperature for about 15-20 minutes before piping and frying, as cold dough will be harder to pipe and may cook unevenly.
What if I don’t have a piping bag for the churros?
If you don’t have a piping bag and star tip, you can still make churros! You can spoon the dough into a sturdy Ziploc bag, snip off a corner (about 1/2 inch), and pipe strips that way. The churros won’t have the classic ridged texture, but they will still be delicious. Alternatively, you can use a cookie press with a star disc.
How can I make the cherry topping from scratch instead of using canned?
To make a homemade cherry topping, combine 2 cups of fresh or frozen pitted cherries (thawed if frozen), 1/4 cup granulated sugar (adjust to taste), 1 tablespoon cornstarch, 1/4 cup water or cherry juice, and 1/2 teaspoon vanilla extract in a saucepan. Cook over medium heat, stirring constantly, until the mixture thickens and comes to a gentle boil. Remove from heat and let cool completely before using. This allows the flavors to meld and the sauce to thicken further.