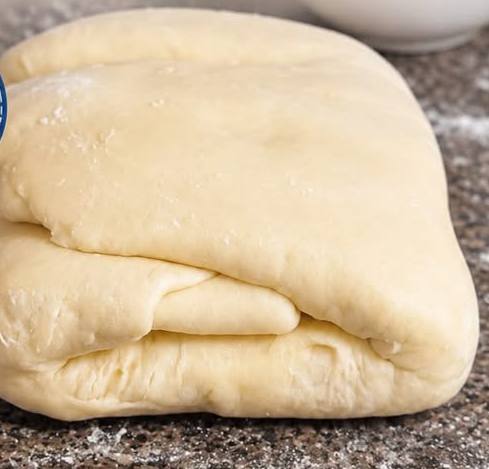
Instructions
- In a large bowl, whisk together the all-purpose flour and fine sea salt until well combined.
- Add the very cold, cubed or grated butter to the flour mixture. If using cubed butter, use a pastry blender or your fingertips to cut the butter into the flour until it resembles coarse meal with some pea-sized pieces of butter remaining. If using grated butter, gently toss to coat the butter evenly with the flour. The key is to keep the butter as cold as possible and not to overwork it.
- Gradually add ¾ cup of ice water to the flour and butter mixture, mixing with a fork or your hands until a shaggy dough forms. Be careful not to add all the water at once; you might not need the full amount, or you might need a tiny bit more. The dough should just come together and be slightly sticky, but not wet.
- Turn the dough out onto a lightly floured surface. Gently bring the dough together, forming it into a rough rectangle. Do not knead the dough; the goal is to keep the butter pieces intact.
- Roll the dough into a rectangle approximately 12×8 inches. Dust your work surface and rolling pin lightly with flour as needed to prevent sticking.
- Perform the first “turn” (fold): Fold the dough into thirds, like a letter. First, fold the bottom third up, then fold the top third down over it. You should now have a smaller, thicker rectangle.
- Rotate the dough 90 degrees (so the open edges are facing left and right).
- Roll the dough out again into a 12×8 inch rectangle.
- Perform the second “turn”: Fold the dough into thirds again.
- Wrap the dough tightly in plastic wrap and refrigerate for at least 30 minutes, or up to 2 hours. This chilling period is crucial for relaxing the gluten and firming up the butter.
- After chilling, unwrap the dough and place it on a lightly floured surface. Rotate it 90 degrees again.
- Roll the dough out for the third time into a 12×8 inch rectangle.
- Perform the third “turn”: Fold the dough into thirds.
- Wrap the dough tightly in plastic wrap and refrigerate for at least 1 hour, or preferably 2-3 hours, before using. This final chill ensures the butter is firm and the layers are well-defined.
- Your Cheryl Conner Quick Puff Pastry is now ready to be rolled out to your desired thickness and used in your favorite recipes!
Cooking Tips and Variations
The secret to truly spectacular puff pastry, even the quick kind, lies in temperature control. Always use very cold butter and ice water. If your kitchen is warm, consider chilling your mixing bowl and even your flour before you start. If at any point the butter feels like it’s softening too much, don’t hesitate to pop the dough back into the refrigerator for 10-15 minutes. This vigilance will prevent the butter from incorporating too fully into the dough, which would result in a less flaky pastry. For the butter, grating it directly into the flour can be an excellent shortcut, as it creates small, even pieces that are easy to distribute without overworking. If you prefer cubing, ensure the cubes are uniform for consistent results.
When rolling, use a light hand. Pressing too hard can cause the butter layers to tear or meld together, compromising the flake. Dust your work surface and rolling pin with just enough flour to prevent sticking; too much flour will make the dough tough. If you find the dough resisting, cover it and let it rest for 5-10 minutes. This allows the gluten to relax, making it easier to roll. Don’t skip the chilling steps between turns. These rests are vital for the gluten to relax and for the butter to firm up, ensuring distinct layers. If you’re short on time, you can even do one less turn, but you’ll get the best flakiness with all three turns.
For variations, you can experiment with different types of flour. While all-purpose is standard, a blend of all-purpose and pastry flour can yield an even more tender crumb. A pinch of sugar can be added to the flour for slightly sweeter applications, especially if you’re making fruit tarts or palmiers. For a richer flavor, you could substitute a small portion of the water with milk, though this will slightly alter the texture. If you’re feeling adventurous, try incorporating a touch of a flavorful fat, like a small amount of rendered duck fat, for savory applications – though this will move further from traditional puff pastry.
When baking, always start with a very hot oven, typically 400-425°F (200-220°C). The initial blast of heat causes the water in the butter layers to turn to steam, which is what creates the dramatic lift and separation of layers. Once the pastry has puffed and set, you can often reduce the temperature to finish baking and achieve a golden-brown color without burning. Always bake puff pastry on a cold baking sheet, or even a chilled one, to help prevent the butter from melting out too quickly. For sweet applications, a simple egg wash (egg yolk mixed with a splash of water or milk) will give a beautiful golden sheen. For savory, a sprinkle of flaky sea salt or herbs before baking adds extra flavor and visual appeal.
Storage and Reheating
Cheryl Conner’s Quick Puff Pastry is wonderfully versatile and can be prepared ahead of time, making it a fantastic addition to your baking arsenal. Once you’ve completed all the turns and the final chill, the dough can be stored in the refrigerator for up to 3 days. Ensure it’s tightly wrapped in plastic wrap to prevent it from drying out or absorbing any odors from the fridge. When you’re ready to use it, simply remove it from the refrigerator about 10-15 minutes before rolling to allow it to soften slightly, making it easier to work with. If it’s too cold, it will crack when rolled; if it’s too warm, the butter will melt. Find that sweet spot.
For longer storage, Quick Puff Pastry freezes exceptionally well. After the final chill, wrap the dough very tightly in several layers of plastic wrap, then an additional layer of aluminum foil to prevent freezer burn. It can be stored in the freezer for up to 2-3 months. To thaw, transfer the frozen dough to the refrigerator and let it thaw overnight. Avoid thawing at room temperature, as this can cause the butter to melt unevenly and compromise the layers. Once thawed, use it within 24 hours. You can also freeze unbaked pastry items, such as cut-out tart shells or turnovers, for future use. Arrange them on a baking sheet and freeze until solid, then transfer them to an airtight container or freezer bag. Bake from frozen, adding a few extra minutes to the baking time.
Reheating baked puff pastry items depends on the specific dish. For savory items like sausage rolls or quiches, preheat your oven to 350°F (175°C) and reheat for 10-15 minutes, or until warmed through and crisp again. For sweet pastries like turnovers or palmiers, a quick refresh in a 300°F (150°C) oven for 5-7 minutes can bring back some of their original crispness. Microwaving is generally not recommended for reheating puff pastry, as it can make the pastry soggy and lose its desirable flaky texture. If you have leftover baked items, store them in an airtight container at room temperature for a day or two, or in the refrigerator for up to 3-4 days. For optimal texture, it’s always best to consume puff pastry on the day it’s baked, but reheating can certainly extend its enjoyment.
Frequently Asked Questions
What’s the difference between “quick” puff pastry and traditional puff pastry?
The primary difference lies in the method of butter incorporation and the number of folds (turns). Traditional puff pastry involves encasing a large block of butter within the dough and then performing numerous precise folds (typically 4-6 “double” or “single” turns) with long chilling times in between. Quick puff pastry, like Cheryl Conner’s, often incorporates smaller pieces of cold butter (cubed or grated) directly into the flour, then performs fewer, simpler folds (usually 3-4 single turns). This significantly reduces the active preparation time while still achieving impressive flakiness, though traditional methods might yield an even more pronounced lamination.
Can I make this dough by hand, or do I need a stand mixer?
Cheryl Conner’s Quick Puff Pastry is ideally suited for hand mixing, especially for the initial dough formation. Using your hands or a pastry blender allows you to better feel the consistency of the dough and avoid overworking it, which is crucial for keeping the butter pieces intact. A stand mixer can be used with a paddle attachment for the initial mixing of flour and butter, but care must be taken not to overmix. The subsequent folding and rolling steps are always done by hand with a rolling pin.
My butter started melting during rolling. What should I do?
If you notice the butter becoming too soft or starting to melt out of the dough, immediately stop rolling. Wrap the dough tightly in plastic wrap and place it back in the refrigerator for at least 20-30 minutes, or even in the freezer for 10-15 minutes, until the butter firms up again. This is a critical step to prevent the butter from being absorbed into the dough, which would result in a less flaky pastry. Always work quickly and keep your dough and work surface as cool as possible.
Why is my puff pastry not rising as much as I expected?
Several factors can lead to less-than-ideal rise. The most common culprits are insufficient chilling between folds (which allows butter to melt), overworking the dough (which can develop too much gluten and break up butter layers), using butter that wasn’t cold enough to begin with, or not having a hot enough oven. The initial high heat of the oven is essential for creating steam from the water in the butter, which is what causes the layers to dramatically puff up. Ensure your oven is fully preheated and that your butter remains firm throughout the lamination process.