Instructions
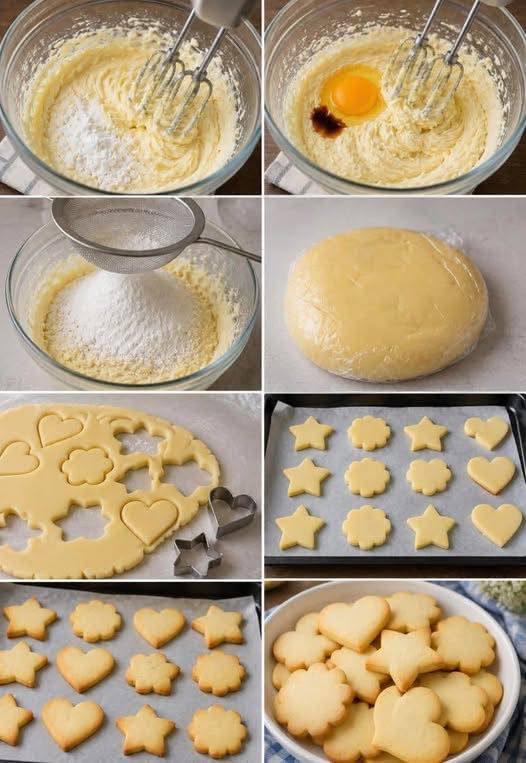
- Prepare Your Workspace: Ensure your butter and eggs are at room temperature. Line two large baking sheets with parchment paper and set them aside.
- Cream Butter and Sugar: In a large mixing bowl, using an electric hand mixer or a stand mixer fitted with the paddle attachment, cream together the softened butter and granulated sugar on medium speed until light, fluffy, and pale in color. This usually takes about 3-5 minutes. Make sure to scrape down the sides of the bowl occasionally to ensure everything is well combined.
- Add Wet Ingredients: Crack the two large eggs into the creamed butter mixture, one at a time, beating well after each addition until fully incorporated. Stir in the pure vanilla extract. Continue to beat until the mixture is smooth and cohesive.
- Combine Dry Ingredients: In a separate medium bowl, whisk together the all-purpose flour, baking powder, and salt. For best results and to prevent lumps, sift the dry ingredients into the wet ingredients using a fine-mesh sieve.
- Incorporate Dry into Wet: Gradually add the dry ingredients to the wet ingredients, mixing on low speed until just combined. Be careful not to overmix the dough, as this can develop the gluten and result in tough cookies. Stop mixing as soon as no streaks of flour remain. The dough will be soft and slightly sticky.
- Chill the Dough: Divide the dough into two equal portions. Flatten each portion into a disc, wrap tightly in plastic wrap, and refrigerate for at least 1 hour, or preferably 2-3 hours. Chilling is crucial as it firms up the butter, making the dough easier to handle, preventing spreading during baking, and ensuring your cookies hold their cut-out shapes.
- Preheat Oven and Prepare for Rolling: Once the dough is thoroughly chilled, preheat your oven to 375°F (190°C). Lightly flour a clean, flat surface and your rolling pin.
- Roll Out the Dough: Take one disc of chilled dough from the refrigerator. Place it on the lightly floured surface and roll it out evenly to about ¼-inch thickness. Try to maintain an even thickness across the entire sheet of dough for consistent baking.
- Cut Out Shapes: Using your favorite cookie cutters (hearts, stars, flowers, etc.), press firmly into the dough to cut out shapes. Carefully transfer the cut-out cookies to the prepared baking sheets, leaving about 1 inch of space between each cookie. Re-roll any dough scraps, chill briefly if it becomes too warm, and cut out more shapes until all the dough is used.
- Bake the Cookies: Bake one sheet at a time in the preheated oven for 8-12 minutes, or until the edges are lightly golden and the centers are just set. Baking times can vary depending on your oven and the size/thickness of your cookies. Keep a close eye on them to prevent over-baking.
- Cool Completely: Remove the baking sheets from the oven and let the cookies cool on the sheets for 5 minutes before carefully transferring them to a wire rack to cool completely. Cooling on the rack allows air to circulate, preventing the bottoms from becoming soggy and ensuring a crisp texture.
- Serve or Decorate: Once completely cooled, your classic butter sugar cookies are ready to be enjoyed as is, or you can decorate them with icing, sprinkles, or other embellishments.
Cooking Tips and Variations
For the best classic butter sugar cookies, always start with room temperature ingredients, especially your butter and eggs. This allows them to cream together properly, creating an emulsified, airy base that leads to tender cookies. If your butter isn’t soft enough, you can cut it into smaller pieces and let it sit for 15-20 minutes, or gently microwave it on very low power for a few seconds, being careful not to melt it. When adding the flour mixture, mix only until just combined. Overmixing develops gluten, which can make your cookies tough instead of tender and crumbly. A good rule of thumb is to stop mixing as soon as you no longer see streaks of dry flour.
Chilling the dough is a non-negotiable step for perfect cut-out sugar cookies. It firms up the butter, which prevents the cookies from spreading excessively in the oven, helping them maintain their intricate shapes. It also makes the dough much easier to handle and roll out without sticking. If your kitchen is warm, or if you’re working with the dough for an extended period, don’t hesitate to pop the dough back into the fridge for 10-15 minutes if it starts to become too soft or sticky. Rolling the dough to an even ¼-inch thickness is also key for uniform baking. If some cookies are thicker than others, they will bake unevenly, with some potentially being undercooked while others are overcooked.
To add a twist to this classic recipe, consider some flavor variations. Instead of or in addition to vanilla extract, try almond extract for a marzipan-like flavor, lemon zest and extract for a bright citrusy note, or a pinch of ground cinnamon or nutmeg for a warming spice profile. You can also experiment with different sugars; a mix of granulated and light brown sugar can add a subtle chewiness and deeper flavor. For decorating, once the cookies are completely cool, they are a perfect canvas for royal icing, simple glazes made from powdered sugar and milk, or just a dusting of colored sprinkles before baking for a simpler touch. When transferring cut cookies to the baking sheet, use a thin metal spatula to gently lift them, especially delicate shapes, to prevent distortion.
Storage and Reheating
Once your classic butter sugar cookies have completely cooled, they can be stored in an airtight container at room temperature for up to 5-7 days. If you’ve decorated them with royal icing, ensure the icing is completely dry and set before stacking them to prevent sticking or smudging. For longer storage, sugar cookies freeze beautifully. Place the cooled cookies in a single layer on a baking sheet and freeze for about an hour until solid. Then, transfer the frozen cookies to a freezer-safe airtight container or heavy-duty freezer bag, separating layers with parchment paper to prevent them from sticking together. They can be stored in the freezer for up to 2-3 months.
When you’re ready to enjoy frozen cookies, simply remove them from the freezer and let them thaw at room temperature for 15-30 minutes, or until soft. There’s no need to reheat them, as they are best enjoyed at room temperature. If you prefer a slightly warm cookie, you can gently warm them in a preheated oven at 250°F (120°C) for 3-5 minutes, but be careful not to overbake them, as this can dry them out.
Frequently Asked Questions
Why do my sugar cookies spread too much when baking?
Cookie spreading is a common issue often caused by warm butter, insufficient chilling of the dough, or too much leavening agent (like baking powder). Ensure your butter is softened but not melted, and always chill your dough for at least 1-2 hours. Also, accurately measure your baking powder to avoid excessive spread. If your kitchen is warm, the dough might soften too quickly; consider chilling your cut-out cookies on the baking sheet for 10-15 minutes before baking.
Can I make the dough ahead of time?
Absolutely! Sugar cookie dough is excellent for making ahead. You can prepare the dough, wrap it tightly in plastic wrap, and refrigerate it for up to 3-4 days. You can also freeze the dough for up to 2-3 months. If freezing, thaw it overnight in the refrigerator before rolling and cutting. This makes holiday baking much less stressful.
What’s the best way to roll out the dough evenly?
To achieve an even thickness, which is crucial for uniform baking, use a lightly floured surface and a rolling pin. Some bakers use rolling pins with adjustable rings on the ends, or place two rulers or wooden dowels of the desired thickness on either side of the dough as guides. This ensures that your rolling pin glides over the guides, creating a perfectly even sheet of dough.
My cookies are tough, what did I do wrong?
Tough cookies are usually a sign of overmixing the dough. When flour is mixed too much, the gluten develops excessively, leading to a chewy, tough texture rather than a tender, crumbly one. Mix the dry ingredients into the wet ingredients only until just combined, stopping as soon as no streaks of flour are visible.