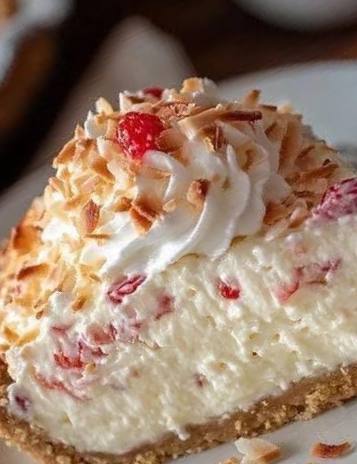
Instructions
- Prepare the Crust: In a medium bowl, combine the almond flour, melted butter, 2 tablespoons erythritol, cinnamon, and salt. Mix well until the mixture resembles wet sand.
- Press the crust mixture evenly into the bottom of a 9-inch pie dish or springform pan. Use the back of a spoon or your fingers to create a firm, even layer.
- Place the crust in the refrigerator to chill while you prepare the filling, for at least 15-20 minutes.
- Prepare the Creamy Filling: In a large mixing bowl, using an electric mixer, beat the softened cream cheese until smooth and creamy, about 2-3 minutes.
- Add the Greek yogurt, ½ cup erythritol, vanilla extract, and lemon zest (if using) to the cream cheese. Beat on medium speed until thoroughly combined and smooth, scraping down the sides of the bowl as needed.
- Gently fold in the chopped strawberries or raspberries into the cream cheese mixture. Be careful not to overmix, as this can break down the berries too much.
- Assemble the Pie: Pour the creamy filling over the chilled crust in the pie dish. Spread the filling evenly with a spatula.
- Cover the pie dish loosely with plastic wrap and refrigerate for at least 4-6 hours, or preferably overnight, to allow the pie to set completely.
- Prepare the Topping and Garnish: Once the pie is set, prepare the whipped topping. In a clean, cold mixing bowl, combine the very cold heavy whipping cream, 2 tablespoons erythritol (or powdered sweetener), and ½ teaspoon vanilla extract.
- Using an electric mixer, beat on high speed until stiff peaks form. Be careful not to overbeat, or the cream will turn grainy.
- Spread or pipe the whipped topping over the chilled pie.
- Sprinkle the toasted coconut flakes generously over the whipped topping.
- If desired, garnish with a few fresh berries or a sugar-free maraschino cherry.
- Slice and serve immediately. Enjoy your “Melts in Your Mouth” diabetic-friendly delight!
Cooking Tips and Variations
Achieving the perfect “melts in your mouth” texture and ensuring your diabetic-friendly pie is a success comes down to a few key techniques and thoughtful variations. For the creamiest filling, it’s crucial to use full-fat cream cheese and ensure it’s at room temperature before beating. This prevents lumps and helps it incorporate smoothly with the other ingredients. Similarly, cold heavy cream is essential for light and fluffy whipped topping; chilling your mixing bowl and beaters for 10-15 minutes beforehand can further enhance its volume. Don’t rush the chilling time for the pie; allowing it to set for the recommended 4-6 hours (or overnight) is vital for a firm, sliceable dessert.
When it comes to sweeteners, the world of sugar-free options offers flexibility. Erythritol is a popular choice for its clean taste and minimal impact on blood sugar, but you can experiment with other granular or powdered sugar-free sweeteners like stevia blends or monk fruit blends. Remember that different sweeteners have varying levels of sweetness, so adjust to your personal preference. For the crust, while almond flour provides a fantastic low-carb base, you can also use crushed sugar-free graham crackers or sugar-free shortbread cookies for a slightly different flavor profile. If you prefer a nut-free option, consider a coconut flour crust, though you may need to adjust the butter quantity as coconut flour absorbs more liquid.
The beauty of this recipe also lies in its versatility with fruit. While strawberries and raspberries offer a lovely tart-sweet balance, feel free to experiment with other low-glycemic fruits. Blueberries or blackberries would be delicious, or for a citrusy twist, consider adding a layer of sugar-free lemon curd. For a more intense fruit flavor without added sugar, you can gently cook down some frozen berries with a touch of sweetener to create a sugar-free compote to swirl into the filling or drizzle on top. Finally, don’t be afraid to play with garnishes. A dusting of sugar-free cocoa powder, a sprinkle of chopped sugar-free dark chocolate, or a few fresh mint leaves can elevate both the visual appeal and the flavor of your pie.
Storage and Reheating
Proper storage is essential to maintain the freshness and integrity of your Diabetic-Friendly Cream Pie. Once prepared and set, the pie should be stored in an airtight container in the refrigerator. This helps prevent it from absorbing odors from other foods and keeps the crust from becoming soggy. It will keep well for up to 3-4 days. If you’ve added fresh berries to the top as a garnish, it’s often best to add them just before serving, as they can soften and release moisture over time, potentially affecting the whipped topping’s texture.
Due to its no-bake nature and creamy filling, this pie is not suitable for reheating. It is designed to be enjoyed chilled, straight from the refrigerator. Reheating would cause the filling to melt and separate, compromising its delicate texture and appearance. For the best experience, simply remove a slice from the refrigerator a few minutes before serving to allow it to slightly come to temperature, enhancing its “melts in your mouth” quality.
If you have an abundance of leftovers, consider pre-slicing the pie and storing individual portions in small airtight containers. This makes it easy to grab a single serving without disturbing the rest of the pie, and helps with portion control. Freezing is generally not recommended for this type of pie, as the cream cheese and whipped cream can change texture upon thawing, becoming watery or grainy. However, if you are determined to freeze it, wrap individual slices tightly in plastic wrap and then aluminum foil. Thaw overnight in the refrigerator before serving, but be prepared for a slight alteration in texture.
Frequently Asked Questions
Can I make this pie ahead of time for a special occasion?
Absolutely! This pie is an excellent make-ahead dessert. In fact, making it the day before you plan to serve it is ideal, as it allows plenty of time for the filling to set completely, resulting in a firmer, more sliceable texture and enhanced flavors. Just be sure to cover it well and store it in the refrigerator. If you plan to add fresh fruit or toasted coconut to the top, it’s best to do that right before serving for optimal freshness and crunch.
What if I don’t have almond flour for the crust?
If almond flour isn’t available or you have a nut allergy, you have a couple of good alternatives. You can use crushed sugar-free graham crackers or sugar-free shortbread cookies mixed with melted butter for a classic crumb crust. Another option is a coconut flour crust, though you’ll need to adjust the liquid (butter) amount as coconut flour is very absorbent. Start with less butter and add more if needed until the mixture resembles wet sand.
How can I ensure my whipped topping is light and fluffy?
For the best whipped topping, ensure your heavy whipping cream is very cold. Chilling your mixing bowl and whisk attachment in the freezer for 10-15 minutes before you start can also make a big difference. Beat the cream on high speed until stiff peaks form, but be careful not to overbeat, as it can quickly turn into a grainy texture or even butter. If you prefer, a sugar-free whipped topping from a tub can be a convenient substitute.
Is this pie suitable for other dietary restrictions?
This pie is naturally low-carb and gluten-free due to the almond flour crust and sugar-free ingredients. To make it dairy-free, you would need to use dairy-free cream cheese, dairy-free unsweetened yogurt, and a dairy-free whipped topping (such as coconut cream whipped topping). For a vegan version, ensure all components are plant-based, including your crust binder. Always double-check ingredient labels to ensure they meet your specific dietary needs.