Instructions
- In a large bowl, whisk together the dry ingredients: flour, granulated sugar, baking powder, baking soda, and salt. Make sure there are no lumps and everything is well combined.
- In a separate medium bowl, whisk together the wet ingredients: egg, buttermilk, melted butter, and vanilla extract. If you don’t have buttermilk, you can make your own by adding 1 tablespoon of lemon juice or white vinegar to regular milk and letting it sit for 5-10 minutes until it slightly curdles.
- Pour the wet ingredients into the dry ingredients. Mix gently with a whisk or a spatula until just combined. It’s okay if there are a few small lumps; overmixing will result in tough pancakes. Let the batter rest for 5-10 minutes. This allows the baking powder and baking soda to activate, leading to fluffier pancakes.
- While the batter rests, heat a non-stick frying pan or griddle over medium-low heat. You want the pan to be hot enough to cook the pancakes through without burning them, but not so hot that they cook too quickly on the outside. Lightly grease the pan with a small amount of butter or cooking spray.
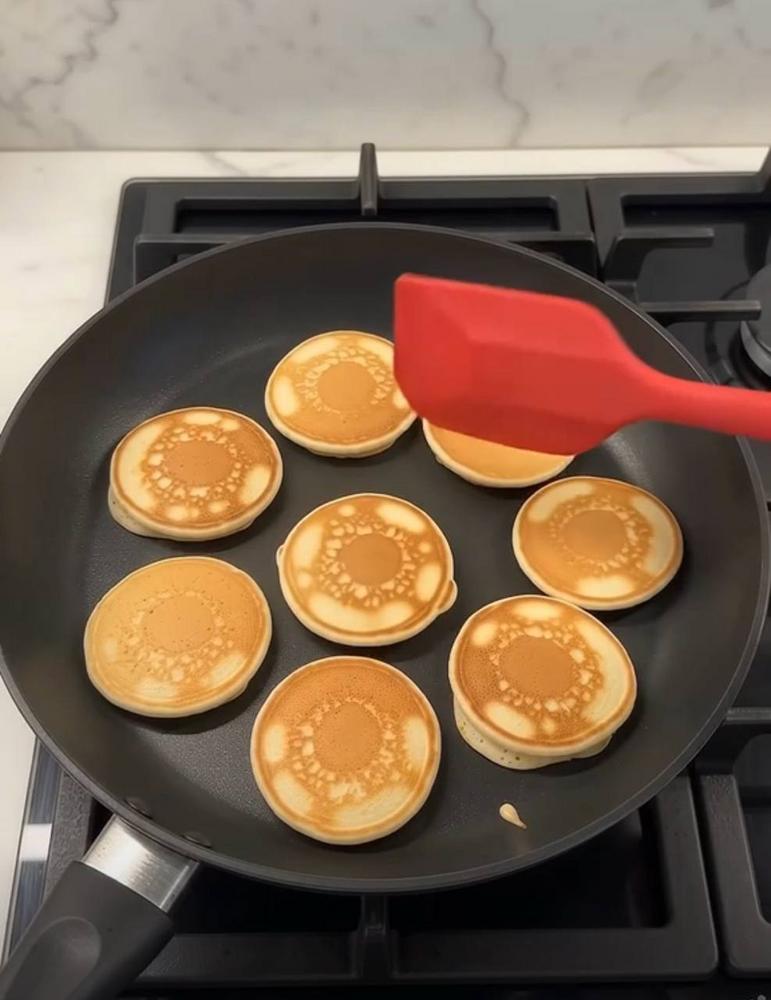
- Once the pan is heated, use a small scoop, a tablespoon, or a squeeze bottle to drop small portions of batter onto the pan. Aim for about 1-1 ½ tablespoons of batter per mini pancake to create uniform, silver dollar-sized pancakes. Don’t overcrowd the pan; cook in batches if necessary.
- Cook for 1-2 minutes, or until you see small bubbles forming on the surface of the pancakes and the edges look set. The underside should be golden brown.
- Using a thin spatula, carefully flip each mini pancake. Cook for another 1-2 minutes on the second side, or until golden brown and cooked through.
- Transfer the cooked mini pancakes to a plate. If you’re cooking multiple batches, you can keep the cooked pancakes warm by placing them on a baking sheet in a preheated oven at 200°F (90°C) while you finish cooking the rest.
- Serve immediately with your favorite toppings such as maple syrup, fresh berries, whipped cream, or chocolate chips.
Cooking Tips and Variations
Achieving pancake perfection, especially with mini pancakes, is all about a few key techniques and knowing how to customize your batch. Here are some tips and variations to help you master this delightful breakfast staple.
Tips for Perfection
- Don’t Overmix the Batter: This is perhaps the most crucial tip for fluffy pancakes. Mix the wet and dry ingredients just until combined. Lumps are perfectly fine, even desirable. Overmixing develops the gluten in the flour, leading to tough, chewy pancakes instead of light, airy ones.
- Let the Batter Rest: Allowing the batter to rest for 5-10 minutes after mixing gives the baking powder and baking soda time to activate, creating more air bubbles and contributing significantly to that coveted fluffy texture.
- Proper Pan Temperature is Key: Medium-low heat is generally ideal for mini pancakes. If the pan is too hot, the pancakes will brown too quickly on the outside and remain raw in the middle. If it’s too cool, they won’t brown properly and can become tough. Test the heat by dropping a tiny bit of batter or a few drops of water; it should sizzle gently.
- Grease Lightly Between Batches: A very thin layer of butter or oil is all you need. Too much fat will make the pancakes greasy and prevent proper browning. Use a paper towel to wipe off excess if necessary.
- Watch for Bubbles: The best indicator that your mini pancake is ready to flip is when bubbles appear on the surface and start to pop, and the edges look dry and slightly set. This usually takes 1-2 minutes.
- Use a Consistent Amount of Batter: For uniformly sized mini pancakes, use a small ice cream scoop, a measuring spoon (like a tablespoon), or even a squeeze bottle. This makes cooking and presentation much easier.
- Keep Them Warm: As you cook in batches, place the finished pancakes on a baking sheet in a warm oven (around 200°F or 90°C) to keep them warm and soft until all are cooked and ready to serve.
Variations
- Chocolate Chip Mini Pancakes: Stir in ½ cup of mini chocolate chips into the batter before cooking. For extra melty chocolate, sprinkle a few chips on top of each pancake right after you drop the batter onto the griddle, before flipping.
- Blueberry Mini Pancakes: Gently fold in ½ cup of fresh or frozen blueberries into the batter. If using frozen, don’t thaw them first to prevent the batter from turning purple.
- Lemon Ricotta Mini Pancakes: Add ¼ cup of ricotta cheese and 1 tablespoon of lemon zest to the wet ingredients for an incredibly moist and flavorful pancake with a slight tang.
- Cinnamon Spice Mini Pancakes: Add ½ teaspoon of ground cinnamon and a pinch of nutmeg to the dry ingredients for a warm, comforting flavor.
- Banana Mini Pancakes: Mash one ripe banana and add it to the wet ingredients. You might need to slightly reduce the buttermilk by a tablespoon or two depending on the banana’s moisture content.
- Whole Wheat Mini Pancakes: Substitute half of the all-purpose flour with whole wheat flour for a slightly nuttier flavor and added fiber. You might need a tiny bit more liquid.
- Savory Mini Pancakes: Omit the sugar and vanilla, and add finely chopped chives, a pinch of black pepper, and maybe some grated cheese (like cheddar or Parmesan) for a savory version perfect with smoked salmon or crème fraîche.
Serving Suggestions
- Classic Maple Syrup: A timeless favorite. Warm your syrup for an extra touch of luxury.
- Fresh Berries and Whipped Cream: A colorful and refreshing combination.
- Fruit Compote: Homemade or store-bought, a warm fruit compote (like berry or apple) is delicious.
- Nutella or Chocolate Sauce: A decadent treat, especially good with bananas.
- Powdered Sugar: A simple dusting is often all you need.
- Yogurt and Granola: For a healthier, textured topping.
- Peanut Butter or Almond Butter: A protein-packed option.
Storage and Reheating
Mini pancakes are not just for immediate enjoyment; they’re also fantastic for meal prepping or making ahead. Knowing how to properly store and reheat them means you can enjoy fluffy pancakes any day of the week!
Storage
- Cool Completely: Before storing, ensure your mini pancakes have cooled completely to room temperature. Storing them while warm will create condensation, leading to soggy pancakes.
- Airtight Container/Bag: Place the cooled pancakes in an airtight container or a freezer-safe zip-top bag.
- Layering (Optional): If you have many pancakes, you can layer them between sheets of parchment paper to prevent them from sticking together, especially if you plan to grab just a few at a time.
- Refrigeration: Stored in the refrigerator, mini pancakes will stay fresh for up to 3-4 days.
- Freezing: For longer storage, mini pancakes freeze beautifully for up to 2-3 months. Lay them in a single layer on a baking sheet and freeze until solid (this prevents them from sticking together). Once frozen, transfer them to a freezer-safe bag or container.
Reheating
The key to reheating is to warm them through without drying them out or making them rubbery. Avoid reheating for too long.
- Microwave (Quickest Method): Place a few mini pancakes on a microwave-safe plate. Heat on high for 15-30 seconds, or until warmed through. Be careful not to overheat, as they can become rubbery. This method is best for a small batch.
- Toaster Oven/Oven (Best for Crispness): Preheat your toaster oven or conventional oven to 350°F (175°C). Place the mini pancakes in a single layer on a baking sheet. Heat for 5-10 minutes (from refrigerated) or 10-15 minutes (from frozen), or until warmed through and slightly crispy on the edges. This method is excellent for larger batches and helps restore some of their original texture.
- Frying Pan (For a Freshly Cooked Feel): Heat a non-stick frying pan over medium-low heat. Add a tiny pat of butter or a spray of cooking oil if desired. Place the mini pancakes in the pan and heat for 1-2 minutes per side, or until warmed through and lightly golden. This method works well for a few pancakes and can give them a nice crisp exterior.
- Toaster (For Frozen Pancakes): Frozen mini pancakes can often be popped directly into a toaster on a low setting for 1-2 cycles, similar to frozen waffles. Keep an eye on them to prevent burning. This works best if they are not too thick.
Frequently Asked Questions
What makes mini pancakes so fluffy?
The fluffiness in these mini pancakes comes primarily from a combination of leavening agents: baking powder and baking soda. When these react with the buttermilk (or milk + acid), they produce carbon dioxide bubbles within the batter. Resting the batter allows these reactions to fully take place, and not overmixing ensures that the gluten doesn’t develop too much, keeping the pancakes tender and light. The egg also contributes to the structure and richness, helping to trap those air bubbles.
Can I make the batter ahead of time?
While it’s best to cook the pancakes shortly after mixing for maximum fluffiness, you can prepare the dry ingredients and wet ingredients separately and store them in the refrigerator. Mix them together just before cooking. If you must mix the full batter ahead, it can be stored in an airtight container in the refrigerator for up to 12-24 hours. However, the leavening agents will lose some of their potency, so the pancakes might not be quite as fluffy. You can try adding an extra pinch of baking powder right before cooking if storing overnight.
Why are my mini pancakes sticking to the pan?
Several factors can cause pancakes to stick. The most common reasons are: 1) The pan isn’t hot enough. Make sure your pan is properly preheated before adding batter. 2) Not enough fat in the pan. Even with a non-stick pan, a very light greasing with butter or oil between batches is usually necessary. 3) The pan itself is no longer truly non-stick. If your pan is old or scratched, it might be time for a new one. Also, ensure you’re not flipping them too early; they should release easily when ready.