Instructions
- Prepare the Vegetables: Begin by thoroughly washing all your chosen vegetables under cold running water. For cucumbers, slice them into 1/4-inch thick rounds or spears. Peel carrots and slice them into 1/4-inch thick rounds or julienne strips. Peel and thinly slice the red onion into rings or half-moons. For cabbage, shred it finely. Ensure all vegetables are uniformly cut for even pickling.
- Sterilize Jars (if canning for shelf stability): If you plan to process your pickles in a hot water bath for long-term shelf stability, sterilize your jars. Wash jars, lids, and bands in hot, soapy water, rinse well. Place clean jars right-side up on a rack in a large pot. Fill the pot and jars with hot water, ensuring water covers the jars by at least an inch. Bring to a boil and boil for 10 minutes. Keep jars in hot water until ready to fill. Set lids aside; they do not need to be boiled but should be hot when applied. If making refrigerator pickles, simply wash jars and lids thoroughly with hot, soapy water and rinse well.
- Prepare the Brine: In a medium non-reactive saucepan, combine the white vinegar, water, pickling salt, and granulated sugar (if using). Bring the mixture to a rolling boil over medium-high heat, stirring occasionally to dissolve the salt and sugar completely. Once boiling, reduce the heat to low and keep the brine hot while you pack the jars.
- Pack the Jars: Carefully remove one hot, sterilized jar from the pot (if canning) or take a clean jar (for refrigerator pickles). Place 1-2 sliced garlic cloves, 1/2 teaspoon mustard seeds, 1/4 teaspoon dill seeds, a few black peppercorns, and a pinch of red pepper flakes (if using) at the bottom of each pint jar. If using fresh dill sprigs, add one to each jar.
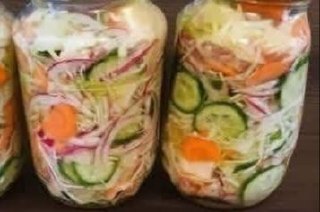
- Begin tightly packing the prepared vegetables into the jars. Alternate layers of different vegetables for visual appeal and to ensure an even mix. Pack them as snugly as possible without crushing them, leaving about 1/2-inch of headspace from the rim of the jar.
- Fill with Brine: Carefully pour the hot brine over the packed vegetables in each jar, ensuring all vegetables are completely submerged. Maintain the 1/2-inch headspace.
- Remove Air Bubbles: Use a non-metallic utensil (like a chopstick or plastic knife) to gently dislodge any trapped air bubbles from around the vegetables. Press down gently on the vegetables if needed to release bubbles. Add more hot brine if the liquid level drops below the 1/2-inch headspace.
- Seal the Jars: Wipe the rims of the jars clean with a damp cloth to ensure a good seal. Center a hot lid on each jar, then screw on the band until fingertip tight (just until resistance is met, do not overtighten).
- Process (for shelf-stable canning): If processing for shelf-stability, carefully place the filled, sealed jars back into the canning pot, ensuring they are covered by at least 1-2 inches of hot water. Bring the water back to a rolling boil. Once boiling, process pint jars for 10 minutes. Adjust processing time for altitude if necessary.
- Cool and Store: After processing (or after sealing for refrigerator pickles), carefully remove the jars from the canner (if applicable) and place them on a towel-lined counter, spaced apart, to cool completely for 12-24 hours. You should hear a “pop” as the lids seal. Once cooled, check the seals by pressing on the center of each lid; if it doesn’t flex, the jar is sealed.
- For shelf-stable pickles, store sealed jars in a cool, dark place. For refrigerator pickles, store them in the refrigerator immediately. Wait at least 3-5 days before opening and enjoying your homemade pickled vegetables to allow the flavors to fully develop.
Cooking Tips and Variations
For the crispiest pickles, always start with the freshest possible vegetables. Older vegetables tend to become softer during the pickling process. You can also add a grape leaf or a small pinch of black tea leaves to each jar; the tannins in these ingredients can help maintain crispness. Another excellent trick is to soak sliced cucumbers or other soft vegetables in an ice bath for 30 minutes before pickling. This firms them up considerably.
Don’t be afraid to experiment with your vegetable choices! Beyond the classic cucumbers, carrots, red onions, and cabbage, try pickling green beans, asparagus spears, cauliflower florets, bell pepper strips, or even thinly sliced radishes. For a vibrant, earthy pickle, consider thinly sliced beets, but be aware they will color everything else in the jar.
The brine is your canvas for flavor. While this recipe provides a solid foundation, feel free to customize the spices. For an aromatic twist, add whole coriander seeds, fennel seeds, or star anise. A bay leaf or a sprig of fresh thyme can also infuse subtle herbal notes. For those who love heat, increase the red pepper flakes or add a small whole dried chili pepper to each jar. For a slightly sweeter pickle, you can increase the sugar by another tablespoon or two, or try using brown sugar for a deeper, molasses-like undertone. Conversely, if you prefer a sharper, more vinegary pickle, reduce the sugar or omit it entirely. Always ensure your vinegar-to-water ratio remains at least 1:1 for food safety, especially if you are canning for shelf stability.
When packing your jars, try to get the vegetables as tightly packed as possible without mashing them. This ensures more vegetables per jar and helps them stay submerged in the brine. Using a jar funnel can make pouring the hot brine much easier and prevent spills. If you notice a cloudy brine after a few days, don’t panic immediately; this can sometimes be caused by minerals in your water or certain spices. However, if the pickles have an off smell, show signs of mold, or the lids are bulging, discard them immediately. Always prioritize food safety.
Storage and Reheating
Homemade pickled vegetables are generally stored in two ways: as refrigerator pickles or as shelf-stable canned pickles. Refrigerator pickles, which are not processed in a hot water bath, must be stored in the refrigerator immediately after cooling. They will last for about 2-3 months in the refrigerator, maintaining their crispness and flavor. Always ensure the lid is tightly sealed after each use to prevent spoilage.
Shelf-stable canned pickles, properly processed in a hot water bath, can be stored in a cool, dark pantry or cupboard for up to one year. Once a jar of shelf-stable pickles is opened, it must be refrigerated and consumed within 2-3 weeks, just like refrigerator pickles. Always check the seal of shelf-stable jars before opening; if the lid is bulging or the seal is broken, discard the contents. There is no “reheating” required for pickled vegetables as they are typically enjoyed cold or at room temperature. Their refreshing tang is best appreciated chilled.
Frequently Asked Questions
What kind of salt should I use for pickling?
It is crucial to use pickling salt (also known as canning salt) for this recipe. Pickling salt is a fine-grained, pure salt without anti-caking agents or iodine. Regular table salt, which often contains iodine and anti-caking agents, can cause your brine to become cloudy and may affect the color and texture of your pickled vegetables.
Can I use different types of vinegar?
While white vinegar is recommended for its clear color and consistent acidity (5%), you can experiment with other vinegars. Apple cider vinegar can be used for a fruitier, slightly mellower flavor, but it may slightly darken the vegetables. Ensure any vinegar you use has at least 5% acidity for proper preservation, especially if you are canning for shelf stability.
Why are my pickles not crisp?
Several factors can contribute to soft pickles. The most common reasons include using older or less fresh vegetables, not packing them tightly enough, or over-processing them if you are using a hot water bath. To ensure crispness, always start with very fresh, firm vegetables, soak harder vegetables like carrots in ice water before pickling, and consider adding a grape leaf or a small amount of calcium chloride (pickle crisp) to each jar.
How long do I need to wait before eating my homemade pickles?
While you can technically eat them after 24 hours, the flavors of your homemade pickled vegetables will significantly improve and deepen after at least 3-5 days of resting. This allows the vegetables to fully absorb the brine and spices. For optimal flavor development, some people prefer to wait a week or even two before enjoying their first jar.