Instructions
- Activate the Yeast: In a large mixing bowl, combine the warm water, granulated sugar (or honey), and active dry yeast. Stir gently and let it sit for 5-10 minutes, or until the mixture becomes foamy. This indicates that the yeast is active and ready to work.
- Combine Dry Ingredients: To the yeast mixture, add the salt and the melted butter. Gradually add the bread flour, one cup at a time, mixing with a wooden spoon or a stand mixer with a dough hook on low speed until a shaggy dough forms.
- Knead the Dough: Turn the dough out onto a lightly floured surface. Knead by hand for 8-10 minutes, or with a stand mixer on medium-low speed for 6-8 minutes, until the dough is smooth, elastic, and no longer sticky. It should pass the “windowpane test” – you should be able to stretch a small piece of dough thinly enough to see light through it without it tearing.
- First Rise (Bulk Fermentation): Lightly grease a clean large bowl with a little oil. Place the kneaded dough in the bowl, turning it once to coat the top. Cover the bowl with plastic wrap or a clean kitchen towel and let it rise in a warm, draft-free place for 1 to 1.5 hours, or until it has doubled in size.
- Shape the Loaf: Once the dough has doubled, gently punch it down to release the air. Turn the dough out onto a lightly floured surface. Flatten the dough into a rectangle roughly 9×12 inches. Starting from one of the shorter sides, tightly roll the dough into a log. Pinch the seam closed along the bottom and tuck the ends under to create a neat loaf shape.
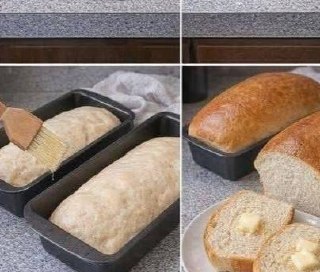
- Second Rise (Proofing): Lightly grease a 9×5-inch loaf pan. Carefully place the shaped dough seam-side down into the prepared loaf pan. Cover the loaf pan loosely with plastic wrap or a kitchen towel and let it rise again in a warm, draft-free place for another 30-45 minutes, or until it has nearly doubled in size and looks puffy.
- Preheat Oven and Prepare for Baking: While the dough is on its second rise, preheat your oven to 375°F (190°C). If desired, brush the top of the risen dough with a little melted butter or milk for a softer crust and golden color.
- Bake the Bread: Place the loaf pan in the preheated oven. Bake for 30-35 minutes, or until the crust is golden brown and the internal temperature of the bread reaches 200-210°F (93-99°C) when measured with an instant-read thermometer. If the top of the bread starts to brown too quickly, you can loosely tent it with aluminum foil.
- Cool the Bread: Once baked, remove the loaf pan from the oven. Let the bread cool in the pan for about 5-10 minutes before carefully transferring it to a wire rack to cool completely. This step is crucial; slicing hot bread can result in a gummy texture. Allow it to cool for at least 1-2 hours before slicing and serving.
Cooking Tips and Variations
For the best results, always use fresh yeast. If you’re unsure about your yeast’s viability, activate it in warm water and sugar first; if it doesn’t foam, your yeast is likely dead, and you’ll need to get new yeast. Water temperature is also critical for yeast activation – too hot will kill it, too cold will inhibit it. Aim for a temperature that feels like a warm bath.
When kneading, resist the urge to add too much extra flour, even if the dough feels a bit sticky at first. A slightly sticky dough will often become more manageable as gluten develops. If it’s truly unworkable, add flour one tablespoon at a time. The “windowpane test” is your best friend for knowing when kneading is complete; it ensures proper gluten development for a light and airy crumb.
For a softer crust, brush the top of the loaf with melted butter or milk before baking. For a chewier, crispier crust, you can spray the oven with water or place a pan of hot water on the bottom rack during the first 10-15 minutes of baking to create steam. If you prefer a richer flavor, you can substitute some of the water with milk or add an extra tablespoon of sugar to the dough.
Variations:
- Whole Wheat Sandwich Bread: Substitute up to half of the bread flour with whole wheat flour. You may need to add a little extra water as whole wheat flour absorbs more liquid.
- Honey Oat Bread: Add 1/2 cup old-fashioned rolled oats and replace granulated sugar with honey.
- Herb Bread: Incorporate 1-2 tablespoons of dried herbs like rosemary, thyme, or oregano into the dough during the mixing stage.
- Cheese Bread: Fold in 1/2 cup shredded cheddar or Parmesan cheese during the last minute of kneading.
An oven thermometer is a small investment that can make a big difference, as many ovens can be inaccurate. This ensures your bread bakes at the correct temperature for consistent results. Finally, patience during the cooling process is key. Slicing too early can release steam too quickly, leading to a gummy texture, especially in the center of the loaf.
Storage and Reheating
To maintain the freshness of your homemade sandwich bread, allow it to cool completely on a wire rack before storing. Once fully cooled, store the loaf in an airtight container, a bread box, or a large resealable plastic bag at room temperature. It will stay fresh for 3-5 days. Avoid refrigerating homemade bread, as it tends to dry out and become stale more quickly in the fridge.
If you won’t be consuming the entire loaf within a few days, freezing is an excellent option. For best results, slice the cooled bread first, then place the slices in a single layer on a baking sheet and freeze until firm. Once frozen, transfer the slices to a freezer-safe bag or container. This way, you can easily grab a few slices as needed. Frozen bread can last for up to 2-3 months. You can also freeze the entire loaf, wrapped tightly in plastic wrap and then foil, for longer storage.
To reheat individual slices, simply pop them into a toaster or toaster oven until warmed through and lightly toasted. For a whole loaf that has been frozen, you can thaw it at room temperature, then warm it in a preheated oven at 350°F (175°C) for 10-15 minutes, or until soft and fragrant. If reheating a whole loaf that was stored at room temperature, a few minutes in a warm oven will refresh it beautifully, bringing back that wonderful fresh-baked aroma and soft texture.
Frequently Asked Questions
Why is my homemade bread dense and heavy?
Several factors can contribute to dense bread. The most common reasons include insufficient kneading (which means gluten hasn’t developed properly to trap gases), using old or inactive yeast, not allowing enough time for the dough to rise (first or second proofing), or adding too much flour, which makes the dough too stiff. Ensure your yeast is active, knead until the dough is elastic, and let it rise in a warm environment until visibly doubled in size.
How can I tell if my bread is fully baked?
The best way to tell if your bread is fully baked is by checking its internal temperature with an instant-read thermometer. It should read between 200-210°F (93-99°C). Visually, the crust should be a beautiful golden brown, and when you tap the bottom of the loaf, it should sound hollow. If the crust is browning too quickly, loosely tent the loaf with aluminum foil to prevent burning while the inside finishes baking.
Can I make this bread without a stand mixer?
Absolutely! This recipe can be easily made by hand. The kneading process will take a bit longer, typically 8-10 minutes of vigorous kneading on a lightly floured surface, compared to 6-8 minutes with a stand mixer. The key is to keep kneading until the dough is smooth, elastic, and passes the windowpane test, regardless of the method you use.
What is the best way to slice fresh bread evenly?
For even slices, ensure your bread has cooled completely before attempting to slice it. A serrated bread knife is essential for cutting through the crust and crumb without tearing or squishing the loaf. Use a gentle sawing motion rather than pressing down hard. If you have trouble getting even slices, a bread slicing guide can be a helpful tool.