Instructions
- In a medium saucepan, whisk together the granulated sugar, cornstarch, and salt until well combined. This prevents lumps when the liquid is added.
- Gradually whisk in the milk or coconut milk into the dry ingredients until the mixture is smooth and lump-free.
- Place the saucepan over medium heat. Cook, stirring constantly with a whisk, until the mixture thickens significantly and comes to a boil. It’s crucial to stir continuously, especially at the bottom of the pan, to prevent scorching and ensure even thickening.
- Once the mixture reaches a boil, continue to cook and stir for another 1-2 minutes. This ensures the cornstarch is fully cooked out and the dessert will have a stable, creamy texture. The mixture should be very thick, like a pudding.
- Remove the saucepan from the heat. Stir in the vanilla extract and the unsalted butter until the butter is completely melted and incorporated, making the pudding extra smooth and glossy.
- Pour the creamy mixture into individual serving dishes, ramekins, or a larger serving bowl.
- To prevent a skin from forming on top, press a piece of plastic wrap directly onto the surface of the pudding.
- Refrigerate for at least 3-4 hours, or until thoroughly chilled and set. For the best texture, an overnight chill is recommended.
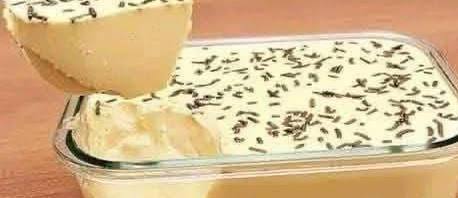
- Once chilled, remove the plastic wrap. Garnish with your favorite toppings, such as chocolate sprinkles, fresh berries, a dollop of whipped cream, chocolate shavings, or chopped nuts, just before serving.
- Serve cold and enjoy your creamy, everyday treat!
Cooking Tips and Variations
To achieve the absolute best results with this creamy treat, here are some essential tips and exciting variations to keep things fresh and flavorful:
- Preventing Lumps: Always whisk your dry ingredients (sugar, cornstarch, salt) together thoroughly before adding any liquid. When incorporating the milk, add it gradually while continuously whisking. This creates a smooth paste first, then a smooth liquid mixture, which is key to preventing lumps in your final product.
- Constant Stirring is Key: Once the pan is on the heat, do not stop stirring! Especially once the mixture starts to warm up and thicken. Use a whisk to reach all corners and the bottom of the pan to prevent scorching and ensure even cooking of the cornstarch. If you stop stirring, lumps can form, and the bottom can burn.
- Cooking Cornstarch Thoroughly: After the mixture comes to a boil and visibly thickens, continue to cook and stir for at least 1-2 minutes. This is vital for two reasons: it ensures the cornstarch is fully activated for maximum thickening power, and it cooks out any starchy flavor, leaving you with a clean, smooth taste.
- High-Quality Vanilla: Since vanilla is a primary flavor, use a good quality vanilla extract or even vanilla bean paste for a more intense and complex vanilla profile.
- The Butter Boost: Don’t skip the butter at the end. It adds a touch of richness, a silky mouthfeel, and a beautiful sheen to the finished dessert.
- Plastic Wrap Trick: Pressing plastic wrap directly onto the surface of the warm pudding before chilling is crucial to prevent a rubbery “skin” from forming.
- Chill Time is Non-Negotiable: While it might be tempting to dig in earlier, allow the pudding to chill for the full recommended time, ideally overnight. This allows it to set properly and develop its full creamy texture and flavor.
- Flavor Variations:
- Chocolate Dream: Add 1/2 cup (85g) of semi-sweet or dark chocolate chips along with the butter and vanilla. Stir until melted and smooth.
- Coffee Kick: Dissolve 1-2 teaspoons of instant espresso powder or coffee granules in a tablespoon of hot milk before adding it to the mixture with the vanilla.
- Lemon Zest: Add 1-2 teaspoons of fresh lemon zest along with the vanilla for a bright, citrusy twist.
- Nutty Delight: Stir in 1/4 cup of finely chopped toasted nuts (like pecans or walnuts) with the butter, or sprinkle on top.
- Fruit Puree Swirl: Swirl in a few tablespoons of your favorite fruit puree (raspberry, strawberry, mango) after the pudding has cooled slightly but before chilling.
- Topping Ideas: Beyond sprinkles, consider fresh berries, sliced bananas, a dollop of homemade whipped cream, chocolate shavings, a drizzle of caramel or chocolate sauce, crushed cookies, granola, or toasted coconut flakes.
- Dairy-Free Option: Using full-fat coconut milk (from a can, not a carton) will yield a rich, creamy, and delicious dairy-free version. Ensure it’s full-fat for the best texture.
- Serving Suggestions: Serve this creamy treat in small, elegant glasses for individual portions, or layer it with fruit and granola in a parfait for a more substantial breakfast or snack.
Storage and Reheating
This creamy treat is best enjoyed chilled, and thankfully, it stores wonderfully, making it perfect for meal prepping or having a quick dessert ready on demand.
Storage:
- Once the creamy dessert has fully chilled and set in its individual serving dishes or a larger bowl, it should be covered tightly with plastic wrap or an airtight lid.
- Store in the refrigerator for up to 3-4 days. While it might last a little longer, the texture and freshness are best within this timeframe.
- Ensure the plastic wrap is pressed directly onto the surface of the pudding if storing in a larger container to prevent a skin from forming and to keep it fresh.
Reheating:
- This dessert is designed to be served cold, so reheating is generally not recommended as it will lose its set texture and creamy consistency.
- If you were to gently warm it (e.g., in a microwave on low heat, stirring frequently), it would revert to a thicker sauce-like consistency, more akin to a warm custard, which is still delicious but no longer the intended “set” dessert.
- Therefore, it’s best to enjoy it straight from the refrigerator.
Frequently Asked Questions
What can I use instead of cornstarch if I don’t have any?
You can substitute cornstarch with an equal amount of all-purpose flour, but be aware that flour can sometimes impart a slightly different, more “floury” taste if not cooked out sufficiently. Another option is arrowroot powder, which you would use in a 1:1 ratio with cornstarch, but it should be added off the heat, as prolonged boiling can break down its thickening power. For a similar texture, you could also use 1 teaspoon of agar-agar powder per cup of liquid, blooming it first, then boiling it for 1-2 minutes to activate.
Can I make this dessert dairy-free or vegan?
Absolutely! To make this dessert dairy-free and vegan, simply substitute the whole milk with full-fat canned coconut milk (not the refrigerated carton kind, as it’s too thin) or your favorite plant-based milk like almond or soy milk. For the butter, use a good quality vegan butter alternative. The rest of the ingredients are typically plant-based. The texture will be just as creamy and delightful!
Why did my pudding turn out lumpy?
Lumps usually occur for two main reasons. First, the dry ingredients (sugar, cornstarch, salt) were not thoroughly whisked together before adding the liquid, causing the cornstarch to clump. Second, the mixture wasn’t stirred constantly and vigorously enough while cooking over the heat, allowing parts of the cornstarch to cook and thicken unevenly. To avoid this, always whisk dry ingredients first, then gradually add milk while whisking, and stir continuously until the mixture is thick and smooth.
How can I prevent a skin from forming on top of my pudding?
The best way to prevent a skin from forming on top of your pudding as it cools and chills is to press a piece of plastic wrap directly onto the surface of the warm pudding. This creates an airtight seal that traps moisture and prevents the top layer from drying out and forming a firm, rubbery skin. If you’re using individual serving dishes, cover each one this way.