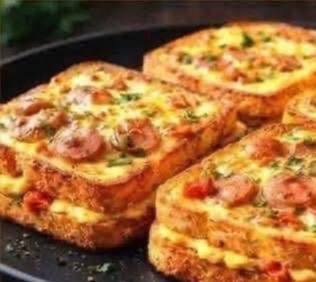
Instructions
- In a shallow dish wide enough to fit a slice of bread, whisk together the eggs, milk, Italian seasoning, garlic powder, salt, and pepper until well combined. This will be your egg wash.
- Lay out four slices of bread on a clean surface. On each of these slices, spread about 2 tablespoons of pizza sauce, leaving a small border around the edges.
- Evenly distribute 1/4 cup of mozzarella cheese over the sauce on each of the four sauced bread slices.
- Sprinkle half of the mini pepperoni or sliced sausage and half of the diced red bell pepper over the cheese on each slice.
- Top with the remaining 1/4 cup of mozzarella cheese and 1/4 cup of cheddar cheese on each of the four slices.
- Place the remaining four slices of bread on top of the loaded slices, gently pressing down to form four sandwiches.
- Heat 1 tablespoon of butter or olive oil in a large non-stick skillet or on a griddle over medium heat.
- Carefully pick up one sandwich and dip both sides into the egg wash, ensuring it’s fully coated but not overly saturated. Let any excess egg drip off.
- Place the egg-washed sandwich directly into the preheated skillet. Repeat with another sandwich if your skillet is large enough, being careful not to overcrowd the pan.
- Cook for 3-5 minutes per side, or until the bread is golden brown and crispy, and the cheese inside is melted and gooey. You may need to reduce the heat slightly to medium-low if the bread browns too quickly before the cheese melts. For extra melty cheese, you can cover the pan with a lid for the last minute or two of cooking.
- Once cooked, remove the pizza toasties from the skillet and place them on a cutting board. Repeat the process with the remaining butter/oil and sandwiches.
- Let the toasties rest for a minute or two before slicing them in half diagonally. Garnish with fresh parsley or chives, and serve immediately with extra pizza sauce for dipping, if desired.
Cooking Tips and Variations
For the ultimate crispy crust and gooey interior, the right bread is key. Thick-cut bread, whether it’s classic white, brioche, or sourdough, holds up best to the egg wash and provides a satisfying contrast to the melted fillings. If using thinner bread, be mindful not to over-soak it in the egg wash, or it might become too soft. A good tip is to briefly dip each side rather than letting it sit. To ensure your cheese melts perfectly without burning the bread, maintain a consistent medium-low to medium heat. If you notice the bread browning too quickly, slightly lower the heat. Covering the pan with a lid for the last few minutes of cooking creates a steamy environment that helps the cheese melt beautifully and evenly.
Don’t be afraid to get creative with your toppings! For a vegetarian option, swap out the sausage for sautéed mushrooms, black olives, or spinach. You could also add finely chopped onions, green bell peppers, or even a sprinkle of red pepper flakes for a little heat. Experiment with different cheese combinations – a blend of smoked provolone and mozzarella can add a wonderful depth of flavor. For an extra layer of richness, spread a thin layer of softened cream cheese or ricotta on one side of the bread before adding the sauce and other fillings. To boost the savory profile, consider adding a pinch of garlic powder or onion powder directly to the pizza sauce or even into the egg wash. For a truly decadent experience, sprinkle a little grated Parmesan cheese on the outside of the toastie just before cooking for an extra crispy, cheesy crust.
If you’re making these for a crowd, you can prep the sandwiches (without dipping them in egg wash) ahead of time and store them in the refrigerator for up to an hour. When ready to cook, proceed with the egg wash and pan-frying steps. Alternatively, you can cook them all and keep them warm in a low oven (around 200°F or 95°C) on a wire rack set over a baking sheet for up to 15-20 minutes, though they are always best served fresh. For an even more intense flavor, try brushing the outside of the bread with garlic butter instead of plain butter or oil before dipping in the egg wash. This adds an extra layer of savory goodness that complements the pizza flavors perfectly.
Storage and Reheating
While Loaded Pizza Toasties are undeniably best enjoyed immediately after cooking, you can store leftovers, though they won’t retain their initial crispness. Allow any leftover toasties to cool completely. Wrap them individually in aluminum foil or place them in an airtight container. Store them in the refrigerator for up to 2-3 days. To reheat, the best method to regain some crispness is using an oven or an air fryer. Preheat your oven to 350°F (175°C) or your air fryer to 325°F (160°C). Place the toasties directly on a baking sheet or in the air fryer basket. Heat for 8-12 minutes in the oven, or 5-8 minutes in the air fryer, flipping halfway through, until heated through and slightly crispy. Avoid using a microwave for reheating, as it will make the toasties soggy and dull the flavors.
Frequently Asked Questions
What kind of bread is best for Loaded Pizza Toasties?
Thick-cut bread works best because it can hold up to the egg wash and the generous fillings without becoming soggy. White bread, brioche, or sourdough are excellent choices, offering a good balance of texture and flavor that complements the pizza elements.
Can I make these vegetarian or gluten-free?
Absolutely! To make them vegetarian, simply omit any meat toppings and load them up with your favorite vegetables like mushrooms, onions, bell peppers, or olives. For a gluten-free version, use your preferred brand of thick-cut gluten-free bread. Ensure all other ingredients, especially sauces, are certified gluten-free.
What are some other topping ideas for customization?
The possibilities are endless! Consider adding caramelized onions, sautéed spinach, cooked and crumbled bacon, sliced black olives, finely diced jalapeños for a kick, or even a sprinkle of feta cheese for a Mediterranean twist. Just make sure any meat toppings are pre-cooked and vegetables are finely diced to ensure they heat through properly.