Instructions
- Activate the Yeast: In a large mixing bowl (or the bowl of a stand mixer), combine the warm water and 1 teaspoon of granulated sugar. Sprinkle the active dry yeast over the top. Let it sit for 5-10 minutes, or until the mixture becomes foamy and bubbly, indicating the yeast is active. If it doesn’t foam, your yeast may be old or the water too hot/cold, and you should start again.
- Combine Wet Ingredients: To the activated yeast mixture, add the warm milk, the remaining 1/2 cup of granulated sugar, the 1/4 cup of melted butter, and the salt. Stir well to combine all the wet ingredients thoroughly.
- Add Flour Gradually: Begin adding the all-purpose flour, one cup at a time, mixing well after each addition. If using a stand mixer, use the dough hook attachment on low speed. If mixing by hand, use a sturdy spoon. The dough will become shaggy and sticky at first.
- Knead the Dough: Once about 4 cups of flour have been incorporated and the dough starts to come together, turn it out onto a lightly floured surface. Begin kneading. If using a stand mixer, continue kneading with the dough hook on medium-low speed for 7-10 minutes. If kneading by hand, push the dough away from you with the heels of your hands, fold it back over, turn it a quarter turn, and repeat. Continue kneading for 8-12 minutes, adding small amounts of flour as needed (up to the remaining 1/2 cup) until the dough is smooth, elastic, and no longer sticky. It should spring back when gently poked.
- First Rise (Bulk Fermentation): Lightly grease a large clean bowl with a little oil or non-stick spray. Place the kneaded dough into the bowl, turning it once to coat the top with oil. Cover the bowl tightly with plastic wrap or a clean kitchen towel. Place the bowl in a warm, draft-free place (like a turned-off oven with the light on) and let it rise for 1 to 1.5 hours, or until it has doubled in size.
- Prepare Loaf Pans: While the dough is rising, grease two 9×5 inch loaf pans thoroughly with butter or non-stick spray.
- Punch Down and Divide: Once the dough has doubled, gently punch it down to release the air. Turn the dough out onto a lightly floured surface and divide it in half.
- Shape the Loaves: For each half, gently flatten the dough into a rectangle. Fold the two longer sides towards the center, then roll the dough up tightly from one of the shorter ends, creating a log. Pinch the seam closed at the bottom and tuck the ends under to create a smooth, even loaf shape.
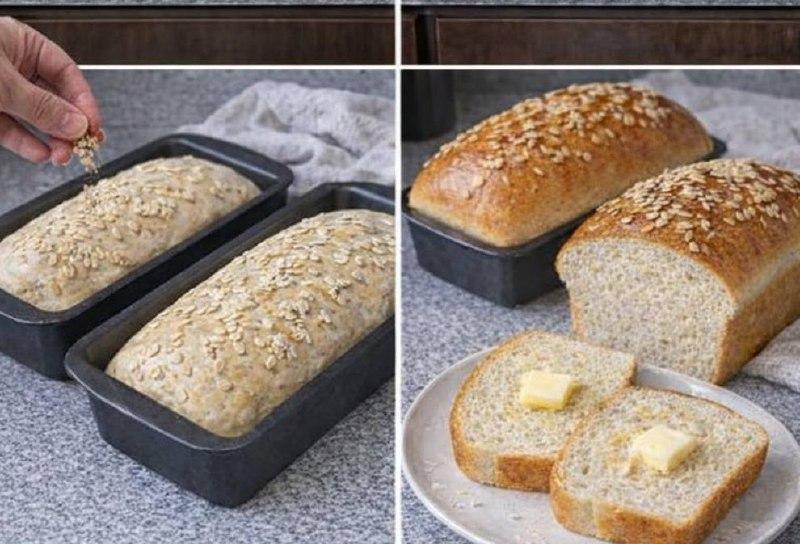
- Second Rise (Proofing): Place each shaped loaf into its prepared loaf pan, seam-side down. If desired, lightly brush the tops of the loaves with a little water or milk and sprinkle evenly with rolled oats. Cover the pans loosely with plastic wrap or a clean kitchen towel and let them rise in a warm, draft-free place for another 30-45 minutes, or until they have nearly doubled in size and look puffy.
- Preheat Oven: About 15 minutes before the end of the second rise, preheat your oven to 375°F (190°C).
- Bake the Bread: Place the loaf pans in the preheated oven. Bake for 30-35 minutes, or until the crust is golden brown and the internal temperature of the bread reaches 200-210°F (93-99°C) when measured with an instant-read thermometer. If the tops are browning too quickly, you can loosely tent them with aluminum foil.
- Cooling: Once baked, remove the loaves from the oven. Immediately turn them out of their pans onto a wire rack to cool completely. If you desire a softer crust, you can brush the tops with a tablespoon of melted butter while they are still warm. Cooling completely is crucial for the texture and to prevent a gummy interior. Allow at least 1-2 hours before slicing.
Cooking Tips and Variations
Achieving bakery-quality Amish White Bread is all about attention to detail. First, always ensure your yeast is fresh and active. The foamy proofing step is your best indicator. If your yeast doesn’t foam, discard it and start with new yeast; otherwise, your bread won’t rise. When it comes to kneading, don’t rush it. Proper kneading develops the gluten, which gives the bread its structure and chewy yet tender texture. You’ll know it’s ready when it passes the “windowpane test” – you can stretch a small piece of dough thin enough to see light through it without it tearing. If kneading by hand feels daunting, a stand mixer with a dough hook is a fantastic investment.
For the first rise, a warm, draft-free spot is key. If your kitchen is cool, try placing the bowl in a turned-off oven with just the light on, or in a microwave with a cup of hot water next to it. Over-proofing can lead to a collapsed loaf, so keep an eye on it; it should double, not triple. Similarly, for the second rise, the dough should look puffy and almost doubled. An under-proofed loaf will be dense, while an over-proofed one might collapse in the oven. To check if it’s ready, gently poke the dough with a floured finger; if the indentation slowly springs back, it’s ready to bake. If it springs back immediately, it needs more time. If it stays indented, it’s likely over-proofed.
To achieve that beautiful golden-brown crust, ensure your oven is fully preheated. An oven thermometer can help verify accuracy. If your crust is browning too quickly, a loose tent of aluminum foil can prevent over-browning. For an extra soft crust, brush the hot loaves with melted butter immediately after they come out of the oven. This also adds a lovely sheen and flavor. Always cool your bread completely on a wire rack. Slicing hot bread can result in a gummy texture because the internal starches haven’t fully set.
Variations can add a personal touch to this classic. For a richer flavor, substitute some of the water with buttermilk. If you prefer a slightly whole-grain texture, replace up to 1 cup of all-purpose flour with whole wheat flour, though you might need a touch more liquid. For a touch of sweetness and a different texture, you can add 1/2 cup of raisins or dried cranberries during the last few minutes of kneading. For a savory twist, omit the oats and sprinkle the top with sesame seeds, poppy seeds, or a mix of dried herbs before baking. You can also experiment with different sweeteners; honey or maple syrup can replace some of the granulated sugar for a distinct flavor profile, though this might slightly alter the dough’s hydration.
Storage and Reheating
Proper storage is essential to keep your homemade Amish White Bread fresh and delicious. Once completely cooled, the bread can be stored at room temperature for 3-5 days. The best way to store it is in an airtight container, a bread box, or a large resealable plastic bag. Avoid refrigerating homemade bread, as it tends to dry out and become stale much faster in the fridge. If you won’t be consuming the entire loaf within a few days, freezing is an excellent option.
To freeze, ensure the bread is completely cool. You can freeze it whole, in halves, or sliced. For sliced bread, it’s helpful to place parchment paper between slices to prevent them from sticking together, making it easier to grab just a few slices at a time. Wrap the bread tightly in plastic wrap, then in aluminum foil, or place it in a freezer-safe bag, removing as much air as possible. Frozen bread will maintain its quality for up to 3 months. To thaw, simply remove it from the freezer and let it sit at room temperature for a few hours, or overnight for a whole loaf. You can also toast frozen slices directly.
Reheating this bread can bring back some of its fresh-baked glory. For a whole loaf or large pieces, wrap it loosely in aluminum foil and warm it in a preheated oven at 300°F (150°C) for 10-15 minutes, or until warmed through. This method helps to re-soften the crust and warm the interior without drying it out. Individual slices are best reheated in a toaster, toaster oven, or a lightly buttered pan on the stovetop until golden and warm. This is perfect for making toast or grilled sandwiches, giving you that delightful crunch and soft interior once again.
Frequently Asked Questions
Why is my bread dense and not fluffy?
A dense loaf can be caused by several factors. The most common reasons are inactive yeast, insufficient kneading (which means gluten hasn’t developed enough to trap gases), or under-proofing. Ensure your yeast is fresh and active, knead the dough until it’s smooth and elastic, and allow it to rise in a warm, draft-free place until it has doubled in size for both the first and second rises. Over-kneading can also sometimes lead to a dense texture, but under-kneading is more common for home bakers.
Can I make this bread without a stand mixer?
Absolutely! While a stand mixer makes the kneading process easier, this bread can certainly be made by hand. The kneading time will be slightly longer, typically 8-12 minutes, and it requires a bit more arm work. Just ensure you knead until the dough is smooth, elastic, and passes the windowpane test, adding flour sparingly to prevent it from becoming too stiff. The satisfaction of kneading by hand is also a wonderful part of the bread-making experience.
What if my dough isn’t rising?
If your dough isn’t rising, the most likely culprit is inactive yeast. This could be because the yeast was expired, the liquid used to activate it was too hot (killing the yeast) or too cold (not activating it), or the environment for rising is too cool. Always check the temperature of your liquids (105-115°F is ideal) and ensure your yeast is fresh. If your yeast doesn’t foam after 5-10 minutes in warm, sugary water, it’s best to start over with new yeast.
Can I substitute other flours?
While this recipe is designed for all-purpose flour for its classic soft texture, you can experiment with substitutions. For a slightly healthier loaf, you can substitute up to 1 cup of the all-purpose flour with whole wheat flour. Keep in mind that whole wheat flour absorbs more liquid, so you might need to add a tablespoon or two more milk or water to achieve the right dough consistency. Bread flour can also be used; it has a higher protein content, which will result in a slightly chewier crumb and a sturdier loaf. Avoid using self-rising flour, as it contains leavening agents that conflict with the yeast in this recipe.