Instructions
- Activating the Yeast: In a large mixing bowl (or the bowl of a stand mixer), combine the warm water and 1 tablespoon of the granulated sugar. Sprinkle the active dry yeast over the mixture. Let it sit for 5-10 minutes, until the mixture is foamy and bubbly, indicating the yeast is active. If it doesn’t foam, your yeast may be old or the water not warm enough; discard and start again.
- Mixing the Dough: To the activated yeast mixture, add the warm milk, the remaining ½ cup minus 1 tablespoon of granulated sugar, melted butter, and salt. Stir well to combine. Gradually add 3 cups of the all-purpose flour, mixing with a wooden spoon or a dough hook on low speed until just combined.
- Kneading for Perfection: Continue adding the remaining flour, ½ cup at a time, until the dough comes together and starts to pull away from the sides of the bowl. The dough should be soft and slightly tacky, but not sticky. If using a stand mixer, knead on medium-low speed with the dough hook for 6-8 minutes, until the dough is smooth and elastic. If kneading by hand, turn the dough out onto a lightly floured surface and knead for 8-10 minutes, using a push-fold-turn motion, until it is smooth and elastic. To test for proper kneading, perform the “windowpane test”: pinch off a small piece of dough and gently stretch it into a thin membrane; if it stretches without tearing and you can almost see light through it, it’s ready.
- First Rise (Bulk Fermentation): Lightly grease a large bowl with a little oil. Place the kneaded dough in the bowl, turning it once to coat the top. Cover the bowl tightly with plastic wrap or a clean kitchen towel. Place the bowl in a warm, draft-free place (like a turned-off oven with the light on) for 1 to 1 ½ hours, or until the dough has doubled in size. This bulk fermentation is crucial for developing flavor and creating that airy texture.
- Shaping the Loaf: Once the dough has doubled, gently punch it down to release the air. Turn the dough out onto a lightly floured surface. Divide the dough in half. For each half, gently flatten it into a rectangle, about 9×12 inches. Starting from one of the longer sides, tightly roll the dough into a cylinder. Pinch the seam firmly along the bottom and tuck the ends under to create a neat loaf shape. Repeat with the second half of the dough.
- Second Rise (Proofing): Lightly grease two standard 9×5-inch loaf pans. Place one shaped loaf seam-side down into each prepared pan. Cover the pans loosely with plastic wrap or a clean kitchen towel. Let the loaves rise in a warm, draft-free place for another 30-45 minutes, or until they have nearly doubled in size and look puffy. This final ascent before baking ensures a light and airy crumb.
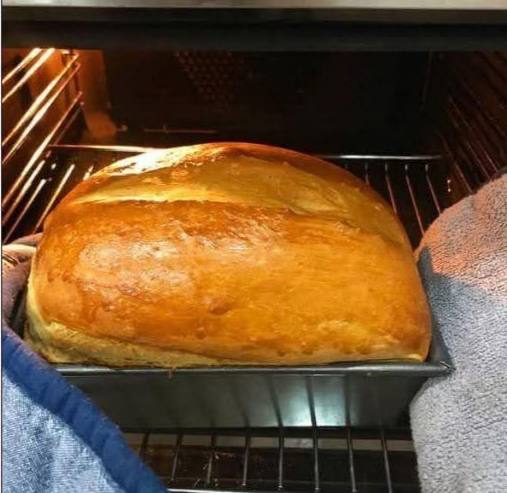
- Baking to Golden Perfection: Preheat your oven to 375°F (190°C) during the last 15 minutes of the second rise. Once the oven is preheated and the loaves have risen, carefully place the pans in the preheated oven. Bake for 30-35 minutes, or until the crust is a beautiful golden-brown and the internal temperature reaches 200-210°F (93-99°C) when measured with an instant-read thermometer. The loaf should also sound hollow when tapped on the bottom. The image perfectly captures this golden-brown perfection, a sign of proper baking and caramelization of sugars.
- Cooling: Remove the loaves from the oven. If desired, immediately brush the tops with 1 tablespoon of melted butter for an extra soft crust and shine. Let the loaves cool in their pans for 10-15 minutes before carefully removing them and transferring them to a wire rack to cool completely. Cooling completely is crucial for preventing a gummy interior and allowing the texture to set.
Cooking Tips and Variations
- Importance of Warm Liquids: Ensure your water and milk are between 105-115°F (40-46°C). Too cold, and the yeast won’t activate; too hot, and it will kill the yeast. A thermometer is your best friend here.
- Don’t Rush the Rises: Patience is truly a virtue when it comes to yeast bread. Allowing the dough to rise fully, both times, is essential for a light, airy, and flavorful loaf. If your kitchen is cool, finding a warm spot (like a slightly warmed, turned-off oven with the light on) can help.
- Proper Kneading: Developing gluten through proper kneading is key to the bread’s structure and elasticity. An under-kneaded dough will result in a dense, crumbly loaf, while an over-kneaded dough can become tough. Aim for that smooth, elastic dough that passes the windowpane test.
- Measuring Flour Correctly: Always spoon your flour into the measuring cup and then level it off with a straight edge. Scooping directly from the bag can compact the flour, leading to too much flour and a dry, dense dough.
- Checking for Doneness: Beyond the visual cues of a golden-brown crust, tapping the bottom of the loaf to hear a hollow sound is a good indicator. For absolute certainty, an internal temperature of 200-210°F (93-99°C) confirms it’s baked through.
- Cooling Completely: Resist the urge to slice into your warm bread immediately. Cooling on a wire rack allows steam to escape and the internal structure to set, preventing a gummy texture.
- Oven Temperature Calibration: Ovens can vary. If you find your bread consistently bakes too fast or too slow, consider investing in an oven thermometer to ensure your oven is truly at the temperature it claims.
- Brush with Butter After Baking: For an irresistibly soft crust and a beautiful sheen, brush the warm loaves with a tablespoon of melted butter immediately after taking them out of the oven.
- Variations:
- Herb Bread: Add 1-2 tablespoons of dried herbs (like rosemary or thyme) to the dough during the mixing stage for a savory twist.
- Honey Wheat: Substitute ¼ cup of the all-purpose flour with whole wheat flour and replace some of the granulated sugar with honey for a slightly different flavor and texture.
- Cinnamon Swirl: After shaping the dough into a rectangle, spread a mixture of cinnamon and sugar before rolling it up.
- Dinner Rolls: Instead of shaping into loaves, divide the dough into 12-16 equal pieces after the first rise, shape into rolls, and place them in a greased 9×13-inch baking pan. Reduce baking time to 18-22 minutes.
Storage and Reheating
To maintain the freshness and softness of your Amish White Bread, proper storage is key. Once completely cooled, store the loaf in an airtight container or a large, sealable plastic bag at room temperature. It will stay fresh and soft for 3-4 days. For longer storage, you can freeze the bread. Wrap the cooled loaf tightly in plastic wrap, then again in aluminum foil, and place it in a freezer-safe bag. It can be frozen for up to 3 months. To thaw, simply remove from the freezer and let it sit at room temperature for several hours or overnight.
To reheat slices of bread, you can lightly toast them in a toaster or toaster oven. For a whole loaf, if you want to revive its “fresh from the oven” feel, preheat your oven to 350°F (175°C), lightly mist the loaf with water, and bake for 10-15 minutes until warmed through. Be careful not to overbake, or it will dry out.
Frequently Asked Questions
Why is my homemade bread dense and heavy?
Density in homemade bread is often caused by a few factors. It could be that your yeast wasn’t active enough (check the temperature of your liquids and the freshness of your yeast), the dough wasn’t kneaded sufficiently to develop gluten, or you didn’t allow for enough rising time. Make sure your dough doubles in size during both rises and passes the windowpane test after kneading.
Can I use instant yeast instead of active dry yeast?
Yes, you can typically substitute instant yeast for active dry yeast in equal amounts. The main difference is that instant yeast doesn’t require proofing in warm water first; you can mix it directly with the dry ingredients. However, for this recipe, proofing the active dry yeast helps confirm its viability before you commit to the rest of the ingredients.
How do I know if my dough has risen enough?
For the first rise, the dough should visually double in size. For the second rise in the loaf pan, it should also look significantly puffy and nearly doubled. A good test for the second rise is the “poke test”: gently press two fingers into the dough about half an inch deep. If the indentation slowly springs back halfway, it’s ready. If it springs back immediately, it needs more time. If it doesn’t spring back at all, it’s over-proofed.
My crust is too hard, what went wrong?
A hard crust can be due to overbaking, not enough fat in the dough (which this recipe addresses), or a dry oven environment. Ensure you’re not baking for too long, and consider brushing the baked loaf with melted butter immediately after it comes out of the oven to soften the crust and add a beautiful sheen.