Instructions
- Line an 8×8 inch baking dish with parchment paper, leaving an overhang on the sides to easily lift the bars out later. Lightly grease the parchment paper if desired, though it’s often not necessary.
- In a large mixing bowl, combine the rolled oats, chopped peanuts, chopped sliced almonds, raisins, and dried cranberries. Stir well to ensure all the dry ingredients are evenly distributed.
- In a separate microwave-safe bowl, combine the natural peanut butter, honey (or maple syrup), vanilla extract, and salt. Microwave on high for 30-60 seconds, or until the mixture is warm and runny enough to stir smoothly. Alternatively, you can heat this mixture gently in a small saucepan over low heat until combined and warm.
- Pour the warm peanut butter mixture over the dry oat and nut mixture in the large bowl. Stir thoroughly with a sturdy spoon or spatula until all the dry ingredients are well coated and a sticky, cohesive mixture forms. It might seem a bit crumbly at first, but keep mixing until everything is incorporated.
- Transfer the entire mixture into the prepared 8×8 inch baking dish. Using the back of a spoon, a flat-bottomed glass, or your clean hands, press the mixture down very firmly and evenly into the pan. Compacting it well is crucial for the bars to hold their shape once cut. Make sure the surface is as flat and uniform as possible.
- Place the baking dish in the refrigerator for at least 30 minutes to allow the base to firm up and set. This step helps prevent the chocolate topping from melting into the base.
- While the base is chilling, prepare the chocolate topping. In a microwave-safe bowl, combine the chocolate chips and coconut oil (if using). Microwave on high in 30-second intervals, stirring well after each interval, until the chocolate is completely melted and smooth. Be careful not to overheat the chocolate, as it can seize. Alternatively, you can melt the chocolate and coconut oil in a double boiler over simmering water.
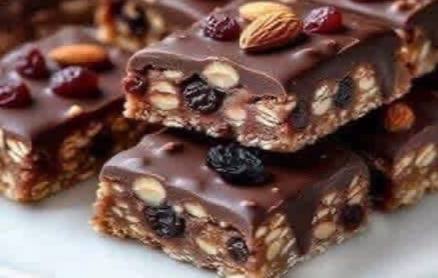
- Once the oat base is firm, remove the baking dish from the refrigerator. Pour the melted chocolate evenly over the chilled base, spreading it with an offset spatula or the back of a spoon to create a smooth, consistent layer that covers the entire surface.
- Immediately after spreading the chocolate (while it’s still wet), sprinkle the optional whole almonds and additional dried cranberries over the top. Gently press them down slightly so they adhere to the chocolate. This step adds both visual appeal and extra texture.
- Return the baking dish to the refrigerator for at least 1-2 hours, or until the chocolate topping is completely set and firm to the touch. This chilling time is essential for easy cutting and for the bars to hold their shape.
- Once fully chilled and set, use the parchment paper overhang to carefully lift the entire slab of bars out of the baking dish and onto a cutting board.
- Using a sharp knife that has been warmed under hot water (and then wiped dry), cut the slab into 16 equal bars (4 rows by 4 rows). Warming the knife helps create clean cuts through the chocolate layer. Wipe the knife clean between cuts for the neatest results.
- Serve immediately, or store these delicious No-Bake Chocolate Nut & Fruit Bars as directed below. Enjoy your homemade, wholesome treat!
Cooking Tips and Variations
For the best No-Bake Chocolate Nut & Fruit Bars, always use fresh, good-quality ingredients. Rolled oats provide the best texture; instant oats can make the bars too mushy. When pressing the base into the pan, really put some muscle into it! The firmer you press, the better your bars will hold together. If your peanut butter mixture seems too thick to combine with the dry ingredients, warm it slightly more until it’s pourable but not hot. For the chocolate topping, if you don’t have coconut oil, a teaspoon of neutral oil like grapeseed or vegetable oil can also help create a smoother, more spreadable consistency.
The beauty of this recipe lies in its adaptability. Don’t have peanuts? Swap them for walnuts, pecans, cashews, or a mix of your favorite nuts. For the dried fruit, feel free to experiment with chopped dried apricots, figs, dates, or even dried cherries. If you prefer a different sweetener, agave nectar or brown rice syrup can be used in place of honey or maple syrup. For a richer, more intense chocolate flavor, opt for dark chocolate chips. White chocolate can also be used for a sweeter, creamier topping.
To enhance the flavor profile, consider adding a tablespoon of your favorite nut butter directly into the oat mixture for an extra creamy texture and nutty depth. A pinch of cinnamon, nutmeg, or even a tiny amount of cayenne pepper (for a hint of spice) can elevate the taste. For a citrusy twist, add some orange or lemon zest to the base mixture. If you’re looking to make these bars vegan, ensure your chocolate chips are dairy-free and use maple syrup or agave nectar as your binder. For a gluten-free option, simply use certified gluten-free rolled oats.
When cutting the bars, a hot, sharp knife is your best friend. Run it under hot water, wipe it dry, and then slice. This prevents the chocolate from cracking and gives you clean, professional-looking edges. Repeat this process for each cut. If your bars seem too crumbly, it might be due to insufficient binding liquid or not pressing the base firmly enough. If they are too soft, they likely need more chilling time. These bars are quite forgiving, so don’t be afraid to experiment and make them your own!
Storage and Reheating
These No-Bake Chocolate Nut & Fruit Bars are fantastic for meal prep and store very well, making them a convenient snack to have on hand throughout the week. To maintain their freshness and texture, store the bars in an airtight container in the refrigerator. Layer them between sheets of parchment paper if stacking to prevent them from sticking together. Stored this way, they will remain fresh and delicious for up to 1 week.
For longer storage, these bars can also be frozen. Once the bars are completely set and cut, arrange them in a single layer on a baking sheet and freeze for about 1-2 hours, or until solid. This prevents them from sticking together when stored in a larger container. Once individually frozen, transfer them to a freezer-safe airtight container or a heavy-duty freezer bag, again layering with parchment paper if needed. They can be stored in the freezer for up to 3 months.
There is no need to reheat these bars as they are designed to be enjoyed chilled or at room temperature. If serving from the refrigerator, you can let them sit out for 5-10 minutes before eating to allow the chocolate to soften slightly, enhancing the texture. If serving from the freezer, simply remove a bar and let it thaw at room temperature for about 15-20 minutes, or until it reaches your desired consistency. They are particularly delightful when slightly chilled, offering a firm bite and a refreshing coolness.
Frequently Asked Questions
Can I use instant oats instead of rolled oats?
While you technically can, it’s not recommended for the best texture. Instant oats are more processed and will absorb liquids faster, potentially leading to a mushier bar that lacks the hearty chewiness of rolled oats. For optimal results and structure, stick to old-fashioned rolled oats.
My bars are too crumbly and won’t hold together. What went wrong?
There are a couple of common reasons for crumbly bars. First, ensure you used enough binding agent (peanut butter and honey/maple syrup). If the mixture seems too dry, you might need to add a little more of the liquid binder. Second, and crucially, make sure you pressed the mixture into the pan very firmly. Compacting the base is essential for the bars to set and hold their shape properly. Also, ensure adequate chilling time.
How can I make these bars vegan?
To make these bars vegan, you’ll need to make two main substitutions. First, ensure your chocolate chips are certified dairy-free and vegan. Many brands now offer excellent vegan chocolate options. Second, if using honey as a binder, replace it with an equal amount of maple syrup or agave nectar, as honey is not considered vegan. All other ingredients in the recipe are typically plant-based.
Can I add protein powder to these bars?
Yes, you can absolutely add protein powder to boost the protein content! We recommend stirring 1-2 scoops of your favorite unflavored or vanilla-flavored protein powder into the dry oat and nut mixture. You might find that adding protein powder makes the mixture a little drier, so be prepared to add an extra tablespoon or two of peanut butter or the liquid sweetener to maintain the desired sticky consistency.