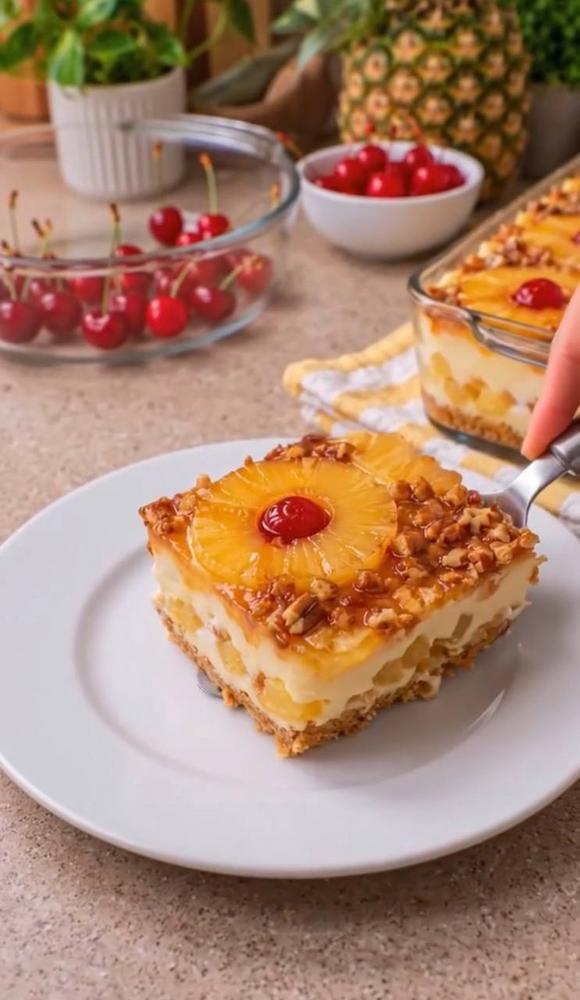
Instructions
- Prepare the Crust: In a medium bowl, combine the graham cracker crumbs, melted butter, and ¼ cup granulated sugar. Mix until the crumbs are evenly moistened. Press the mixture firmly and evenly into the bottom of a 9×13-inch baking dish. You can use the bottom of a glass or a flat measuring cup to help compact the crust. Place the crust in the refrigerator to chill for at least 30 minutes while you prepare the filling.
- Prepare the Cream Cheese Filling: In a large mixing bowl, using an electric mixer on medium speed, beat the softened cream cheese until smooth and creamy, about 2-3 minutes.
- Add the powdered sugar and vanilla extract to the cream cheese. Beat on low speed until combined, then increase to medium speed and beat until light and fluffy, scraping down the sides of the bowl as needed.
- Gently fold in the thawed whipped topping until no streaks remain and the mixture is uniformly combined. Be careful not to overmix, as this can deflate the whipped topping.
- Incorporate Crushed Pineapple: Gently fold the well-drained crushed pineapple into the cream cheese mixture. Ensure the pineapple is very well-drained to prevent the filling from becoming watery. You can press it in a sieve or squeeze it in a clean kitchen towel to remove excess liquid.
- Assemble the Layers: Spread the cream cheese and pineapple filling evenly over the chilled graham cracker crust. Use an offset spatula or the back of a spoon to create a smooth, level surface.
- Arrange Topping: Arrange the well-drained pineapple rings over the cream cheese layer. You can place them in rows or a decorative pattern. Place the drained maraschino cherries in the centers of the pineapple rings or scatter them decoratively over the top.
- Prepare the Glaze (Optional but Recommended): In a small saucepan, whisk together the reserved 2 tablespoons of pineapple syrup and 1 tablespoon of cornstarch until smooth. Heat over medium-low heat, stirring constantly, until the mixture thickens and becomes translucent, about 2-3 minutes. Remove from heat and let cool slightly. If desired, stir in 1-2 drops of red food coloring for a vibrant hue.
- Finish with Nuts and Glaze: Drizzle the slightly cooled glaze evenly over the pineapple rings and cherries. Sprinkle the toasted chopped pecans or walnuts over the entire dessert.
- Chill Thoroughly: Cover the baking dish tightly with plastic wrap and refrigerate for at least 4-6 hours, or preferably overnight, to allow the dessert to set completely and the flavors to meld.
- Serve: Once thoroughly chilled, use a sharp knife to cut the dessert into squares or bars. For clean slices, run the knife under hot water and wipe it clean between each cut. Serve cold and enjoy!
Cooking Tips and Variations
Draining Pineapple is Key: This cannot be stressed enough! Whether you’re using crushed pineapple or rings, ensure they are thoroughly drained. Excess moisture will make your dessert watery and prevent it from setting properly. Press crushed pineapple in a fine-mesh sieve or use paper towels to pat the rings dry. For maraschino cherries, drain them well and pat them dry to prevent color bleeding into the white cream cheese layer.
Softened Cream Cheese: Always use cream cheese that is at room temperature. This ensures a smooth, lump-free filling that incorporates easily with the other ingredients. If your cream cheese is cold, microwave it in 10-second intervals until slightly softened, but not melted.
Don’t Overmix the Filling: When folding in the whipped topping, use a gentle hand. Overmixing can deflate the whipped topping, resulting in a less airy and fluffy texture for your cream cheese layer.
Toasted Nuts for Flavor: While optional, lightly toasting your pecans or walnuts before sprinkling them on top significantly enhances their flavor and adds a wonderful aromatic crunch. Spread them on a baking sheet and toast in a 350°F (175°C) oven for 5-7 minutes, watching carefully to prevent burning.
Achieving Clean Slices: For a picture-perfect presentation, dip your knife in hot water and wipe it clean between each slice. This will prevent the layers from sticking and create smooth, defined edges.
Make Ahead for Best Results: This dessert is a fantastic make-ahead option. Preparing it the day before you plan to serve allows ample time for it to chill and set, resulting in a firmer texture and more developed flavors.
Crust Variations: Instead of graham crackers, consider using vanilla wafers, shortbread cookies, or even gingersnaps for a different flavor profile. Adjust the amount of melted butter as needed to achieve a crumbly, pressable mixture.
Fruit Swaps: While pineapple and cherry are a classic combination, feel free to experiment! You could use mandarin orange segments (well-drained), peaches, or even a mix of berries (fresh or frozen, thawed and drained) for the topping. If using berries, a simple berry glaze can be made by simmering berries with a little sugar and cornstarch.
Add Coconut: For an even more tropical twist, sprinkle toasted shredded coconut over the top along with or in place of the nuts. You can also mix a small amount into the crust.
Cream Cheese Layer Enhancements: For an extra rich filling, you could add a small amount of sour cream or Greek yogurt (plain, full-fat) to the cream cheese mixture. This adds a subtle tanginess and creaminess. Ensure to reduce the liquid slightly if adding extra wet ingredients.
Individual Servings: For a fancier presentation, prepare this dessert in individual serving glasses or small ramekins. Layer the crust, filling, and toppings, then chill. This is perfect for portion control and elegant entertaining.
Storage and Reheating
Storage: This Pineapple Cherry Cream Cheese Dessert must be stored in the refrigerator due to its dairy-based filling. Cover the baking dish tightly with plastic wrap or transfer individual slices to an airtight container. Stored properly, it will remain fresh and delicious for up to 3-4 days.
Freezing: While technically possible, freezing this dessert is not recommended. The texture of the cream cheese filling and whipped topping can become grainy or watery upon thawing, and the fruit may lose its firm texture. It’s best enjoyed fresh and chilled from the refrigerator.
Reheating: This is a chilled, no-bake dessert and is not meant to be reheated. It should always be served cold directly from the refrigerator for the best taste and texture.
Frequently Asked Questions
Can I use fresh pineapple instead of canned?
While fresh pineapple offers a wonderful flavor, it contains enzymes that can break down the proteins in dairy products, potentially making the cream cheese filling runny or bitter over time. For this no-bake recipe, it’s highly recommended to stick with canned pineapple, which has been heat-treated to neutralize these enzymes. If you absolutely want to use fresh, you would need to cook it first to deactivate the enzymes, then cool and drain thoroughly.
My cream cheese filling is lumpy. What went wrong?
A lumpy filling usually occurs when the cream cheese wasn’t softened enough before mixing. Cold cream cheese doesn’t blend smoothly. Ensure your cream cheese is at room temperature before you start. If you’re in a hurry, you can carefully soften it in the microwave for 10-15 second intervals, but be careful not to melt it.
How can I make sure my graham cracker crust doesn’t fall apart?
The key to a firm crust is to really press it down firmly into the baking dish. Use the bottom of a flat-bottomed glass or a measuring cup to compact it tightly. Also, chilling the crust before adding the filling helps it set and become more stable. Adding a little extra melted butter (up to 1-2 tablespoons) if your crumbs seem too dry can also help bind them together.