Instructions
- In a large mixing bowl, combine the flour, salt, and instant yeast. If using active dry yeast, proof it first by dissolving it in the lukewarm water with a pinch of sugar for 5-10 minutes until foamy, then add to the dry ingredients.
- Add the lukewarm water and chopped fresh rosemary to the dry ingredients. Using a wooden spoon or a sturdy spatula, mix until a shaggy, wet dough forms. There’s no need to knead; just ensure all the flour is incorporated and no dry spots remain. The dough will be very sticky.
- Cover the bowl tightly with plastic wrap or a clean kitchen towel. Let the dough rise at room temperature (ideally 70-75°F or 21-24°C) for a minimum of 12 hours, or up to 18 hours. During this long rise, the dough will become bubbly and almost double in size, developing its characteristic flavor.
- After the first rise, generously flour a clean work surface. Gently scrape the dough out of the bowl onto the floured surface. Avoid deflating it too much.
- With floured hands, gently fold the edges of the dough towards the center to form a rough ball. Try not to overwork it.
- Place a piece of parchment paper (about 12×12 inches) into a bowl or a proofing basket (banneton). Lightly flour the parchment paper. Carefully transfer the shaped dough onto the floured parchment paper, seam-side down.
- Loosely cover the dough with plastic wrap or a kitchen towel and let it rest for a second rise for 30-60 minutes, while you preheat your oven and Dutch oven.
- About 30 minutes before the second rise is complete, place a 5-6 quart Dutch oven with its lid into your cold oven. Preheat the oven to 450°F (232°C). Allow the Dutch oven to preheat for at least 30 minutes once the oven reaches temperature.
- Once the oven and Dutch oven are fully preheated, carefully remove the hot Dutch oven from the oven using oven mitts. Take off the lid and set it aside.
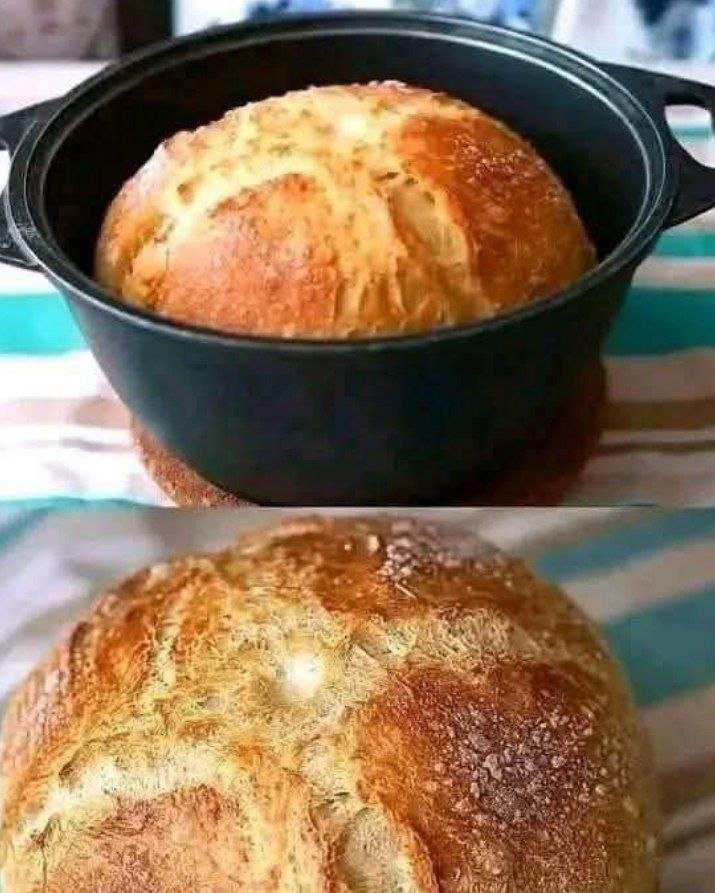
- Carefully lift the dough by the parchment paper and gently transfer it into the hot Dutch oven.
- If desired, use a sharp knife or a bread lame to score the top of the dough. A simple “X” or a few parallel slashes work well. This allows the bread to expand properly during baking.
- Place the lid back on the Dutch oven and return it to the hot oven. Bake for 30 minutes with the lid on.
- After 30 minutes, carefully remove the lid from the Dutch oven. The bread should be lightly golden and well-risen.
- Continue baking uncovered for another 15-20 minutes, or until the crust is deeply golden brown and sounds hollow when tapped on the bottom. An internal temperature of 200-210°F (93-99°C) indicates it’s fully baked.
- Carefully remove the Dutch oven from the oven. Using the parchment paper, lift the bread out of the Dutch oven and transfer it to a wire cooling rack.
- Allow the bread to cool completely for at least 1-2 hours before slicing. This is crucial for the internal structure to set and for the crust to remain crisp. Slicing too early can result in a gummy interior.
Cooking Tips and Variations
For the best results with your Rustic Rosemary Artisan Bread, consider these tips. A higher rise can often be achieved by ensuring your yeast is fresh and active. If your dough isn’t getting bubbly during the first rise, your kitchen might be too cold; try placing the covered bowl in a slightly warmer spot, like inside a turned-off oven with the light on, or near a sunny window. To tell when your bread is done, beyond the visual cues of deep golden brown and the hollow sound when tapped, an instant-read thermometer inserted into the center should register between 200-210°F (93-99°C). This ensures the interior is fully cooked and not doughy. Always allow the bread to cool completely on a wire rack before slicing; this prevents the steam from making the crust soggy and allows the crumb to set properly, giving you that perfect texture.
Don’t be afraid to experiment with variations to make this recipe your own. For different aromatic profiles, swap out the rosemary for other fresh herbs like thyme, oregano, or a mix of “herbes de Provence.” If you love garlic, consider adding 1-2 cloves of minced fresh garlic to the dough along with the rosemary; the flavor will mellow beautifully during baking. For a cheesy twist, you could fold in ½ cup of shredded Parmesan or Gruyère cheese during the initial mixing stage. For a slightly sweeter and heartier loaf, you can substitute up to ½ cup of the all-purpose flour with whole wheat flour. Just be aware that whole wheat flour absorbs more water, so you might need to add an extra tablespoon or two of water to maintain the dough’s wet consistency. You can also add a handful of chopped olives or sun-dried tomatoes for a Mediterranean-inspired loaf. The possibilities are endless once you master the basic no-knead technique!
Storage and Reheating
Proper storage is key to keeping your Rustic Rosemary Artisan Bread fresh and delicious. Once completely cooled, store the bread at room temperature. For the first day, you can simply keep it cut-side down on a cutting board to protect the exposed crumb. For longer storage, wrap the bread tightly in plastic wrap, aluminum foil, or place it in a large, airtight bag. Stored this way, it will remain fresh for 3-4 days. Avoid refrigerating bread, as it tends to dry out and become stale faster due to a process called retrogradation of starch.
If you won’t be finishing the loaf within a few days, artisan bread freezes exceptionally well. Slice the cooled bread first, or freeze it as a whole loaf. Wrap individual slices or the entire loaf tightly in plastic wrap, then an additional layer of aluminum foil, or place in a freezer-safe bag. It can be stored in the freezer for up to 3 months. To reheat a whole frozen loaf, unwrap it and bake in a preheated oven at 350°F (175°C) for 20-30 minutes, or until warmed through and the crust is crisp again. For individual slices, you can toast them directly from frozen in a toaster or toaster oven, or warm them in a regular oven for a few minutes until soft and fragrant.
Frequently Asked Questions
What kind of flour is best for no-knead bread?
While all-purpose flour works wonderfully for a tender crumb, bread flour, with its higher protein content, can yield a chewier texture and a slightly better rise. Feel free to use either based on your preference and what you have on hand.
Can I use dried rosemary instead of fresh?
Yes, you can. If using dried rosemary, use about 1 tablespoon instead of 2 tablespoons of fresh, as dried herbs are more concentrated in flavor. However, fresh rosemary provides a more vibrant aroma and flavor that is highly recommended for this recipe.
Why is a Dutch oven necessary for this recipe?
A Dutch oven creates a steamy environment around the dough, trapping moisture during the initial baking phase. This steam helps the bread rise dramatically (known as “oven spring”) and prevents the crust from forming too quickly, resulting in a thin, crackly crust and a soft, airy interior, much like a professional baker’s oven.
My dough didn’t rise much. What went wrong?
Several factors can affect the rise. Ensure your yeast isn’t expired; old yeast loses its potency. The water temperature is also crucial – too hot will kill the yeast, too cold will inhibit its activity. Lukewarm water (105-115°F) is ideal. Finally, ensure your kitchen isn’t too cold, as yeast thrives in warmer temperatures. A longer rise time can also compensate for a cooler environment.