Instructions
- Prepare the Strawberry Puree: In a medium saucepan, combine the hulled and quartered strawberries with 1/4 cup (50g) of granulated sugar and 1/4 cup (60ml) of water. Bring to a simmer over medium heat, stirring occasionally, until the strawberries soften, about 5-7 minutes.
- Blend Strawberry Mixture: Remove from heat. Carefully transfer the strawberry mixture to a blender or use an immersion blender to puree until smooth. Strain the puree through a fine-mesh sieve into a clean bowl to remove seeds, pressing down on the solids. You should have about 1.5 cups of smooth strawberry puree. Set aside to cool slightly.
- Bloom Gelatin: In a small bowl, sprinkle 1 envelope (7g) of gelatin powder over 1/4 cup (60ml) cold water. Let it sit for 5 minutes to bloom (thicken).
- Dissolve Gelatin for Strawberry Layer: Once bloomed, heat the gelatin mixture gently in the microwave for 10-15 seconds, or over a double boiler, until completely dissolved and clear. Do not boil.
- Combine Strawberry Layer Ingredients: Stir the dissolved gelatin into the cooled strawberry puree. In a separate bowl, whisk 1/2 cup (120ml) heavy cream until soft peaks form. Gently fold the whipped cream into the strawberry puree mixture until well combined.
- Assemble First Layer: Pour the strawberry mixture evenly into a 9×5 inch (23×13 cm) loaf pan or an 8×8 inch (20×20 cm) square dish. Refrigerate for at least 2-3 hours, or until completely set and firm to the touch. The layer must be fully set before proceeding.
- Prepare the Pineapple Mixture: While the strawberry layer is chilling, ensure your crushed pineapple is very well drained. You can press it in a sieve or squeeze it in a clean kitchen towel to remove as much liquid as possible. In a medium bowl, combine the well-drained crushed pineapple with the remaining 1/4 cup (50g) of granulated sugar, 1/2 cup (120g) Greek yogurt (or sour cream), vanilla extract, and lemon juice. Stir well to combine.
- Bloom Second Gelatin: In another small bowl, sprinkle the second envelope (7g) of gelatin powder over 1/4 cup (60ml) cold water. Let it sit for 5 minutes to bloom.
- Dissolve Gelatin for Pineapple Layer: Heat this bloomed gelatin gently in the microwave for 10-15 seconds, or over a double boiler, until completely dissolved and clear. Do not boil.
- Combine Pineapple Layer Ingredients: Stir the dissolved gelatin into the pineapple mixture. In a separate bowl, whisk the remaining 1/2 cup (120ml) heavy cream until soft peaks form. Gently fold the whipped cream into the pineapple mixture until well combined.
- Assemble Second Layer: Once the strawberry layer is completely set, carefully and evenly pour the pineapple mixture over the strawberry layer. Gently spread it to create an even layer.
- Chill and Set: Return the dessert to the refrigerator and chill for another 4-6 hours, or preferably overnight, until the pineapple layer is completely firm and set.
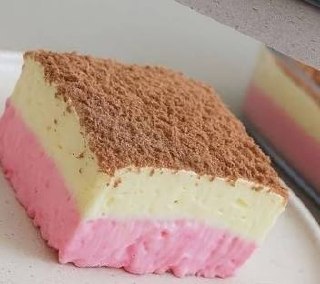
- Garnish and Serve: Once fully set, remove the dessert from the refrigerator. Just before serving, finely grate the dark chocolate over the top of the dessert. If using a loaf pan, you can carefully run a thin knife around the edges and invert it onto a serving plate, then slice. Or, slice directly from the dish. Serve chilled.
Cooking Tips and Variations
For the best results, always ensure each layer is thoroughly set before adding the next. This is crucial for achieving those beautiful, distinct lines. A quick test is to gently touch the surface; if it feels firm and doesn’t stick to your finger, it’s ready. If time is short, you can pop the dessert into the freezer for 30-45 minutes between layers to speed up the setting process, but be careful not to freeze it solid. When straining the strawberry puree, pressing firmly helps extract maximum flavor and ensures a silky-smooth texture. For the pineapple layer, draining the crushed pineapple thoroughly is key; excess moisture can dilute the flavor and affect the setting of the gelatin.
Feel free to experiment with different fruits! A mango-raspberry or peach-blueberry combination would be equally delicious. For an added textural element, consider adding a thin base layer of crushed shortbread or graham cracker mixed with melted butter before pouring the first fruit layer. You could also swirl in a tablespoon of coconut cream into the pineapple layer for an even more tropical twist. Instead of grated chocolate, try toasted coconut flakes, a sprig of fresh mint, or a few whole berries for garnish. For a slightly less sweet version, reduce the sugar by a tablespoon or two in each fruit layer, adjusting to your taste preferences. If you prefer a dairy-free option, use full-fat coconut cream (chilled overnight) instead of heavy cream and a plant-based yogurt. Just be sure to check that your gelatin is plant-based or use agar-agar as an alternative setting agent, following package instructions for conversion.
Storage and Reheating
This Strawberry & Pineapple Layered Dessert is best enjoyed chilled. Store any leftovers in an airtight container in the refrigerator for up to 3-4 days. While the flavors will remain delightful, the texture may soften slightly over time. It does not reheat well, as it is a chilled, set dessert. Freezing is not recommended as it can alter the texture of the gelatin and dairy components, making it watery upon thawing. Always keep it refrigerated until ready to serve to maintain its firm texture and refreshing appeal.
Frequently Asked Questions
What if my gelatin doesn’t set properly?
Gelatin not setting is often due to not using enough gelatin, not dissolving it completely, or adding it to a mixture that is too hot (which can degrade the gelatin’s setting power) or too cold (which can cause it to seize). Ensure you follow the package instructions precisely for blooming and dissolving, and always check that your gelatin is fresh and not expired. If it’s still not setting, try chilling it for a longer period, even overnight, or gently re-warming a small portion with a bit more dissolved gelatin (if it’s not already too cold).
Can I make this dessert ahead of time?
Absolutely! This layered dessert is an excellent make-ahead option. In fact, it needs ample chilling time, so preparing it the day before you plan to serve it is ideal. This allows all the layers to fully set and the flavors to meld beautifully. Just be sure to cover it loosely with plastic wrap to prevent it from absorbing refrigerator odors and to keep the surface from drying out.
What kind of dish should I use for layering?
You can use a variety of dishes. A 9×5 inch (23×13 cm) loaf pan is classic for creating tall, impressive slices. An 8×8 inch (20×20 cm) square dish or a round springform pan (8-inch or 9-inch) also works well, yielding slightly thinner layers. Clear glass dishes are great for showcasing the beautiful layers. For easier removal and cleaner slices, you can lightly grease the dish with a neutral oil or line it with plastic wrap, leaving an overhang to lift the dessert out.