Instructions
- Prepare the Onions: Carefully peel the two large sweet onions. Trim off the very top and bottom, but leave enough of the root end to help hold the layers together. Using a small paring knife, cut around the core of each onion, leaving about 3-4 outer layers intact to form a sturdy cup. Gently scoop out the inner layers and core. Finely chop about 1/4 cup of the scooped-out onion and set aside for the filling; reserve any remaining onion for another use.
- Blanch the Onions (Optional but Recommended): For more tender onions and easier handling, bring a large pot of salted water to a boil. Carefully place the hollowed-out onion shells into the boiling water and blanch for 5-7 minutes, or until slightly softened but still holding their shape. Remove with a slotted spoon and immediately plunge into an ice bath to stop the cooking. Drain thoroughly and pat dry. This step makes the onions more pliable and ensures they cook through evenly.
- Prepare the Filling: In a large skillet, heat 1 tablespoon of olive oil over medium-high heat. Add the ground beef and cook, breaking it up with a spoon, until browned. Drain off any excess grease.
- Add the finely diced carrots, green bell pepper, and the reserved 1/4 cup of chopped onion to the skillet with the cooked ground beef. Sauté for 5-7 minutes, or until the vegetables have softened. Add the minced garlic and cook for another minute until fragrant. Remove from heat and let cool slightly.
- Transfer the meat and vegetable mixture to a large mixing bowl. Add the breadcrumbs, egg, Worcestershire sauce, smoked paprika, dried thyme, salt, and black pepper. Mix thoroughly with your hands until all ingredients are well combined.
- Stuff the Onions: Preheat your oven to 375°F (190°C). Lightly grease a baking dish large enough to hold the stuffed onions snugly.
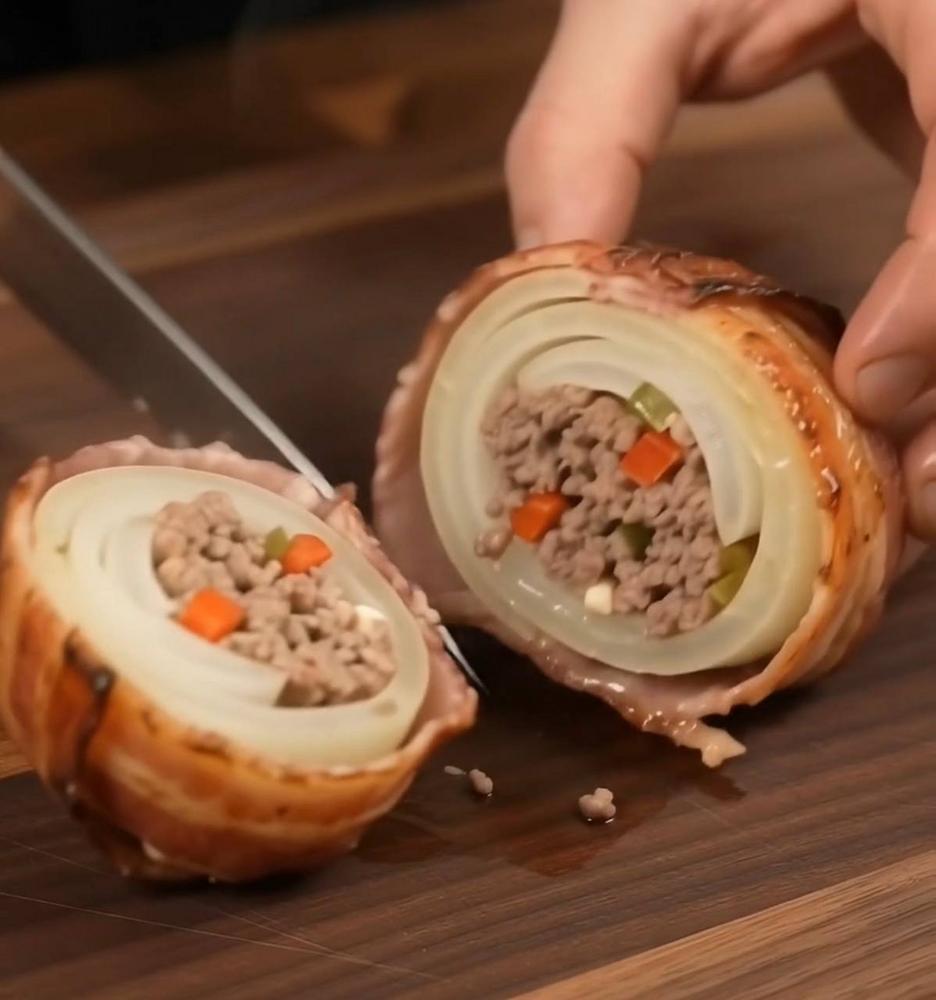
- Carefully spoon the ground meat filling into each hollowed-out onion shell, pressing it firmly to ensure it’s compact and fills the cavity completely. Mound the filling slightly on top.
- Wrap with Bacon: Take 6 pieces of the halved bacon strips and carefully wrap them around each stuffed onion, starting from the bottom and working your way up, overlapping slightly. You should use 3 pieces per onion, ensuring the bacon covers the filling and holds the onion layers together. Secure the bacon ends with wooden toothpicks if necessary.
- Bake the Stuffed Onions: Place the bacon-wrapped stuffed onions seam-side down in the prepared baking dish. Pour the beef broth or water into the bottom of the dish (this helps create steam and keeps the onions moist).
- Bake for 45-60 minutes, or until the bacon is crispy and golden brown, and the onions are tender when pierced with a fork.
- Optional Glaze: If desired, during the last 10-15 minutes of baking, brush the bacon with BBQ sauce or maple syrup for an extra layer of flavor and shine.
- Rest and Serve: Once cooked, remove the onions from the oven and let them rest for 5-10 minutes before serving. This allows the juices to redistribute. Carefully remove any toothpicks. Garnish with fresh chopped parsley if desired. Serve whole or sliced in half to reveal the beautiful interior.
Cooking Tips and Variations
For the best Bacon-Wrapped Stuffed Onions, selecting the right onion is key. Opt for large, firm sweet onions like Vidalia, Walla Walla, or even a large yellow onion. Their natural sweetness balances the savory filling and bacon beautifully, and their size makes them easier to hollow out and stuff. When hollowing, use a small, sharp paring knife and be gentle to avoid breaking the outer layers. A melon baller can also be helpful for scooping out the inner core.
Don’t skip the blanching step! Briefly boiling the hollowed-out onions not only makes them more pliable and easier to work with but also kick-starts the cooking process, ensuring they become wonderfully tender by the time the bacon is crispy. Make sure to plunge them into an ice bath immediately after blanching to prevent them from becoming too soft. Patting them dry is crucial for crispy bacon.
When it comes to the bacon, thick-cut bacon is preferred as it holds up better during cooking and provides a more satisfying crisp texture. Arrange the bacon strips snugly around the onion, ensuring good coverage, especially over the filling. If you find the bacon struggling to stay put, a few wooden toothpicks can be your best friend. Just remember to remove them before serving!
The filling is where you can truly unleash your creativity. While ground beef is classic, consider variations like ground pork, ground turkey, or even a savory Italian sausage for a different flavor profile. For a vegetarian option, a mixture of finely chopped mushrooms, cooked lentils, rice, breadcrumbs, and cheese can make a fantastic plant-based filling. Experiment with different seasonings too: a pinch of cayenne pepper for heat, a dash of soy sauce for umami, or a sprinkle of shredded cheddar or mozzarella cheese mixed into the filling will elevate the taste even further.
For an extra layer of flavor and a beautiful glaze, brush the bacon with your favorite BBQ sauce, maple syrup, or even a mixture of soy sauce and honey during the last 10-15 minutes of baking. This creates a caramelized, slightly sticky finish that is simply irresistible. To ensure the bacon gets extra crispy, you can finish the onions under the broiler for a minute or two, keeping a very close eye on them to prevent burning.
These Bacon-Wrapped Stuffed Onions are incredibly versatile in how they can be served. They make a fantastic standalone appetizer, cut into wedges for easy sharing. As a side dish, they pair wonderfully with roasted chicken, grilled steak, or pork chops. For a lighter meal, serve them alongside a fresh green salad. Don’t forget that resting time after cooking; it allows the juices in the meat filling to redistribute, resulting in a more succulent and flavorful bite.
Storage and Reheating
To store any leftover Bacon-Wrapped Stuffed Onions, allow them to cool completely to room temperature. Once cooled, place them in an airtight container. They can be stored in the refrigerator for up to 3-4 days. For longer storage, you can freeze individual stuffed onions. Wrap each cooked and cooled onion tightly in plastic wrap, then aluminum foil, and place them in a freezer-safe bag or container. They can be frozen for up to 2-3 months. Thaw in the refrigerator overnight before reheating.
For reheating, the oven is the best method to maintain the crispy bacon and tender onion texture. Preheat your oven to 350°F (175°C). Place the stuffed onions on a baking sheet and heat for 15-20 minutes, or until heated through and the bacon crisps up again. If reheating from frozen, it may take 30-40 minutes. You can also reheat them in an air fryer at 350°F (175°C) for 8-12 minutes for an even crispier result. While possible, reheating in a microwave is not recommended as it will make the bacon soggy and the onion less firm. If you must use a microwave, heat in short intervals until warm, then consider a quick crisping in a pan or under the broiler.
Frequently Asked Questions
Can I prepare Bacon-Wrapped Stuffed Onions ahead of time?
Absolutely! You can prepare the stuffed onions, wrap them in bacon, and then cover them tightly and refrigerate them for up to 24 hours before baking. This makes them a fantastic make-ahead option for parties or busy weeknights. Just add about 5-10 minutes to the baking time when cooking from chilled.
What type of onion is best for this recipe?
Large sweet onions like Vidalia, Walla Walla, or other large yellow onions are ideal. Their size makes them easy to hollow, and their natural sweetness complements the savory filling and bacon beautifully. Avoid very pungent onions, as their strong flavor might overpower the other ingredients.
How do I prevent the bacon from becoming soggy?
Several tips help keep the bacon crispy. First, ensure the blanched onions are thoroughly patted dry before stuffing and wrapping. Second, using thick-cut bacon tends to yield crispier results. Third, cooking at a slightly higher temperature (like 375°F) helps render the fat and crisp the bacon. If your bacon isn’t crisping up enough, you can finish the onions under a broiler for a minute or two, watching them closely to prevent burning.
Can I use a different type of ground meat for the filling?
Yes, the filling is very versatile! You can easily substitute ground beef with ground pork, ground turkey, or a mixture of ground meats. For a richer flavor, consider using Italian sausage (mild or hot). Just ensure that whatever meat you choose is cooked through before stuffing and that you drain any excess fat.