Instructions
- Preheat your oven to 375°F (190°C).
- Heat the olive oil in a large oven-safe Dutch oven or a large, deep skillet over medium-high heat.
- Add the ground beef to the hot pan and break it up with a spoon. Cook, stirring occasionally, until the beef is thoroughly browned and no pink remains.
- Once browned, carefully drain any excess grease from the pan. This step is crucial for preventing a greasy casserole.
- Add the chopped yellow onion to the pan with the browned beef. Cook, stirring occasionally, for 5-7 minutes, or until the onion softens and becomes translucent.
- Stir in the minced garlic and cook for another 1 minute until fragrant. Be careful not to burn the garlic.
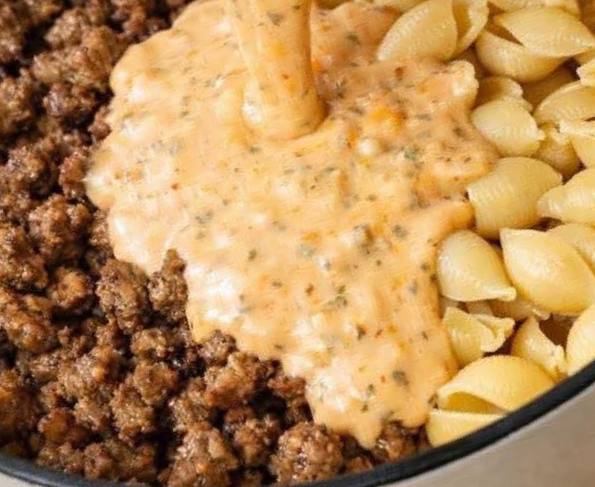
- Pour in the diced tomatoes (undrained) and the tomato sauce. Stir well to combine all ingredients.
- Add the beef broth, heavy cream, dried Italian seasoning, dried basil, and red pepper flakes (if using). Stir everything together until well combined.
- Bring the mixture to a gentle simmer, then reduce the heat to low and let it simmer for 5 minutes, allowing the flavors to meld.
- Season the sauce generously with salt and freshly ground black pepper to taste. Remember that the pasta will absorb some of the salt, so don’t be shy.
- Carefully stir in the uncooked pasta shells. Make sure the pasta is submerged in the liquid as much as possible.
- Remove the pan from the heat. Stir in 1.5 cups of the shredded cheddar cheese and all of the grated Parmesan cheese until melted and incorporated into the sauce. Reserve the remaining 1/2 cup of cheddar cheese for the topping.
- If your skillet is oven-safe, proceed. If not, transfer the entire mixture to a 9×13 inch baking dish.
- Cover the skillet or baking dish tightly with aluminum foil.
- Bake for 20 minutes.
- After 20 minutes, remove the foil. Stir the casserole gently to ensure the pasta isn’t sticking and is cooking evenly.
- Sprinkle the remaining 1/2 cup of shredded cheddar cheese evenly over the top of the casserole.
- Return the uncovered casserole to the oven and bake for another 15-20 minutes, or until the pasta is tender, the sauce is bubbly, and the cheese topping is melted and golden brown.
- Once baked, remove the casserole from the oven and let it rest for 5-10 minutes before serving. This allows the sauce to thicken slightly and prevents it from being too runny.
- Garnish with fresh chopped parsley, if desired, and serve hot.
Cooking Tips and Variations
Achieving the perfect creamy, beefy pasta casserole is all about technique and a little creativity. Here are some tips to ensure your dish turns out delicious every time, along with some exciting variations to keep things fresh.
Browning the Beef: Don’t rush this step! Properly browning your ground beef is essential for developing deep, rich flavor. Make sure to break up the beef into small crumbles and cook until it’s deeply browned all over. Draining excess grease is equally important; too much grease can make your casserole oily and heavy. You can pat it dry with paper towels after draining for an even leaner result.
Pasta Doneness: The key to this one-pan method is ensuring the pasta cooks through without becoming mushy or drying out. Make sure the pasta shells are mostly submerged in the liquid when they go into the oven. If your sauce seems too thick or dry when you check it halfway through baking, you can add a splash more beef broth or cream to ensure the pasta has enough liquid to cook properly. Different brands and shapes of pasta can absorb liquid at different rates, so trust your judgment.
Cheese Melting: For that irresistible, gooey cheese topping, ensure your oven is at the correct temperature and give the casserole enough time uncovered. You want the cheese to be fully melted and bubbly, with some golden-brown spots for added texture and flavor. If you like an extra crispy topping, you can briefly place the casserole under the broiler for 1-2 minutes, but watch it very carefully to prevent burning.
Resting Time: This step is often overlooked but crucial for casseroles. Allowing the dish to rest for 5-10 minutes after baking allows the sauce to set and thicken slightly, preventing it from being watery when you serve it. It also helps the flavors meld even further.
Seasoning: Taste your sauce before adding the pasta. Adjust salt, pepper, and herbs as needed. Remember that cheese also adds saltiness, so factor that in. If you prefer a bolder flavor, a pinch of smoked paprika or a dash of Worcestershire sauce can add depth.
Vegetable Boost: This casserole is a fantastic canvas for adding more vegetables. You can sauté diced bell peppers (any color), mushrooms, or shredded carrots along with the onion. A handful of fresh spinach or frozen peas (thawed) can be stirred in during the last 5-10 minutes of baking for a fresh burst of color and nutrition.
Different Cheeses: While cheddar is a classic, feel free to experiment with other cheeses. Monterey Jack, Colby Jack, or even a blend of mozzarella and provolone would be delicious. For a sharper flavor, a mix of sharp cheddar and Gruyere works wonderfully. A sprinkle of crumbled feta or goat cheese at the end can add a tangy twist.
Alternative Meats: Not a fan of ground beef? You can easily substitute it with ground turkey, ground chicken, or even a combination of ground pork and beef. Adjust cooking times slightly as needed, ensuring the meat is fully cooked.
Spice Level: If you love heat, increase the red pepper flakes or add a dash of your favorite hot sauce to the sauce. For a milder version, omit the red pepper flakes entirely.
Creaminess Factor: For an even richer, creamier sauce, you can add 4 ounces of cream cheese (cut into cubes) to the sauce along with the heavy cream. Stir until completely melted and smooth. If you prefer a slightly lighter version, use half-and-half or even milk instead of heavy cream, though the sauce will be less rich.
Herb Variations: Change up the dried herbs. Instead of Italian seasoning and basil, try dried oregano, thyme, or a pinch of marjoram. Fresh herbs like rosemary or sage can also be added, but use them sparingly as they are quite potent.
Storage and Reheating
This creamy beef and pasta casserole makes for fantastic leftovers, often tasting even better the next day as the flavors have more time to meld. Proper storage and reheating will ensure you can enjoy it for days.
Storage:
- Cool Down: Allow the casserole to cool completely to room temperature before storing. This prevents condensation from forming and keeps the texture from becoming soggy.
- Airtight Container: Transfer the cooled casserole to an airtight container. This helps maintain freshness and prevents it from absorbing odors from other foods in the refrigerator.
- Refrigeration: Store the casserole in the refrigerator for up to 3-4 days.
- Freezing: This casserole freezes well! Once completely cooled, transfer individual portions or the entire casserole (if using a freezer-safe dish) to an airtight, freezer-safe container or wrap tightly with plastic wrap and then aluminum foil. It can be frozen for up to 2-3 months. Thaw overnight in the refrigerator before reheating.
Reheating:
- Microwave: For individual servings, place a portion in a microwave-safe dish. Add a splash of milk or broth (about 1-2 tablespoons) to help rehydrate the sauce and prevent it from drying out. Cover loosely with a microwave-safe lid or plastic wrap and heat on high for 2-4 minutes, stirring halfway through, until heated through.
- Oven (Recommended for larger portions or best quality): Preheat your oven to 300-325°F (150-160°C). Transfer the casserole to an oven-safe dish (if it’s not already in one). Add a splash of milk or broth over the top (about 1/4 cup for a full casserole) and cover loosely with aluminum foil. Bake for 20-30 minutes, or until heated through and bubbling. If you like a crispy top, remove the foil for the last 5-10 minutes.
- Stovetop (for smaller portions): Place a portion of the casserole in a saucepan over medium-low heat. Add a splash of milk or broth. Stir occasionally, breaking up the pieces gently, until heated through. This method works best for single servings to prevent sticking and burning.
When reheating, always ensure the food reaches an internal temperature of 165°F (74°C) for food safety.
Frequently Asked Questions
What kind of pasta shells should I use?
Medium pasta shells (often labeled “conchiglie”) work best for this recipe as they hold the creamy sauce beautifully and cook evenly within the casserole. You can also use other medium-sized pasta shapes like elbow macaroni, cavatappi, or rotini, but avoid very large or very small shapes, as they might not cook as consistently or absorb the sauce as well.
Can I make this casserole ahead of time?
Yes, you can! To prepare ahead, follow all the steps up to adding the uncooked pasta and cheese. Instead of baking, cover the dish tightly and refrigerate for up to 24 hours. When you’re ready to bake, you might need to add an extra 1/4 to 1/2 cup of beef broth or cream and increase the baking time by about 10-15 minutes, as the pasta will start cooking from a colder temperature and the sauce may have thickened slightly.
Why is my sauce too thin/too thick?
The consistency of your sauce can depend on a few factors. If it’s too thin, it might be that your beef broth had a higher water content, or your heavy cream wasn’t as thick. You can try simmering the sauce uncovered for a few extra minutes before adding the pasta to allow some liquid to evaporate. If it’s too thick, especially after adding the cheese, you can gradually stir in a little more beef broth or milk until you reach your desired consistency. Remember that the pasta will absorb a lot of liquid during baking, so it’s better for the sauce to be slightly looser before baking than too thick.
Can I use fresh herbs instead of dried?
Absolutely! Fresh herbs will provide a brighter, more vibrant flavor. As a general rule, use about three times the amount of fresh herbs compared to dried herbs. So, for 1 teaspoon of dried Italian seasoning, you’d use about 1 tablespoon of fresh chopped Italian herbs (like oregano, basil, thyme). Add fresh herbs towards the end of the simmering process or as a garnish after baking for best results.