Instructions
- Preheat your oven to 350°F (175°C). Grease and flour a 9×5-inch loaf pan, or for easier removal, line it with parchment paper, leaving an overhang on the longer sides to create a “sling.” This parchment paper sling is a game-changer for getting your beautiful cake out of the pan intact.
- In a medium bowl, whisk together the all-purpose flour, Dutch-processed cocoa powder, baking soda, and salt. Ensure there are no lumps in the cocoa powder for a smooth batter. Set aside.
- In a large bowl, using an electric mixer on medium speed, cream together the softened unsalted butter and granulated sugar until the mixture is light and fluffy, about 3-5 minutes. Scrape down the sides of the bowl as needed to ensure everything is well incorporated.
- Add the large eggs one at a time, beating well after each addition until fully combined. Stir in the vanilla extract. The mixture might look a little curdled at this point, but don’t worry; it will come together.
- With the mixer on low speed, gradually add the dry ingredients to the wet ingredients in three additions, alternating with the buttermilk in two additions. Begin and end with the dry ingredients. Mix until just combined after each addition; do not overmix. Overmixing can lead to a tough cake.
- Carefully pour the hot strong brewed coffee (or hot water) into the batter and mix on low speed until just incorporated. The batter will be quite thin, which is perfectly normal and contributes to the cake’s incredible moisture.
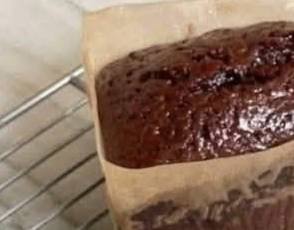
- Pour the batter evenly into the prepared loaf pan. Gently tap the pan on the counter a few times to release any large air bubbles and ensure an even top.
- Bake for 50-65 minutes, or until a wooden skewer or toothpick inserted into the center of the cake comes out with a few moist crumbs attached, but not wet batter. Avoid overbaking, as this is the key to a truly moist chocolate cake.
- Once baked, remove the loaf pan from the oven and let the cake cool in the pan on a wire rack for 15-20 minutes. This allows the cake to set and prevents it from breaking when you remove it.
- After 15-20 minutes, use the parchment paper overhang to carefully lift the cake out of the pan and transfer it to the wire rack to cool completely. Slicing the cake while it’s still warm can cause it to crumble, so patience is a virtue here.
- Once completely cooled, slice and serve your “Delish Chocolate Cake.” Enjoy!
Cooking Tips and Variations
For the best results with your Delish Chocolate Cake, remember that the quality of your ingredients truly matters. Using high-quality Dutch-processed cocoa powder will yield a richer, darker chocolate flavor than natural cocoa, as it has been treated to reduce its acidity. Always ensure your eggs and buttermilk are at room temperature; this helps them emulsify better with the other ingredients, resulting in a smoother, more uniform batter and a finer crumb in your finished cake. When it comes to mixing, resist the urge to overmix the batter once the flour is added. Overmixing develops the gluten in the flour, which can lead to a tough and dry cake. Mix only until the ingredients are just combined and no streaks of flour remain.
The hot coffee in this recipe isn’t just for flavor; it also helps to bloom the cocoa powder, intensifying its chocolatey notes, and contributes to the cake’s moist texture. If you don’t drink coffee, hot water works just as well. Don’t skip lining your loaf pan with parchment paper, leaving an overhang on the sides. This creates a convenient “sling” that makes it incredibly easy to lift the cooled cake out of the pan without any sticking or breakage, ensuring a perfectly intact loaf every time. Checking for doneness with a toothpick is crucial; it should come out with moist crumbs, not wet batter. A clean toothpick means it’s likely overbaked, which will result in a drier cake.
To vary this recipe, consider adding 1 cup of semi-sweet chocolate chips to the batter for an extra burst of chocolate in every slice; simply fold them in with the last addition of dry ingredients. For a subtle crunch and nutty flavor, you could also fold in ½ cup of chopped walnuts or pecans. If you’re looking for a special occasion upgrade, a simple chocolate ganache poured over the cooled cake elevates it beautifully. To make a quick ganache, heat ½ cup heavy cream until simmering, then pour it over 4 ounces of finely chopped dark chocolate. Let it sit for 5 minutes, then whisk until smooth and glossy before pouring over the cake. Alternatively, a dusting of powdered sugar or a simple vanilla glaze (made from powdered sugar, milk, and vanilla extract) can add a lovely finish. For a hint of citrus, add 1-2 teaspoons of orange zest to the batter. This cake is incredibly versatile, so feel free to experiment and make it your own!
Storage and Reheating
To keep your Delish Chocolate Cake fresh and moist, it’s best stored at room temperature in an airtight container. If you’ve opted for a simple dusting of powdered sugar, it will keep well for up to 3-4 days. If the cake has been frosted with a cream cheese frosting or a ganache that contains dairy, it’s advisable to store it in the refrigerator. However, refrigeration can sometimes dry out cakes, so if storing in the fridge, ensure it’s tightly wrapped in plastic wrap or placed in a sealed container to minimize moisture loss. Before serving a refrigerated cake, allow it to come to room temperature for about 30-60 minutes to restore its optimal texture and flavor.
This chocolate loaf cake also freezes beautifully, making it an excellent option for meal prepping or having a delicious treat on hand. To freeze, ensure the cake is completely cooled. Wrap the entire loaf or individual slices tightly in plastic wrap, then wrap again in aluminum foil. This double layer of protection helps prevent freezer burn. Label with the date and freeze for up to 2-3 months. When you’re ready to enjoy, simply unwrap the frozen cake (or slices) and let it thaw at room temperature for several hours or overnight. You can also gently warm individual slices in the microwave for 15-30 seconds for a “just baked” experience. Avoid reheating the entire loaf in the microwave, as it can make the edges tough.
Frequently Asked Questions
What kind of cocoa powder should I use for this recipe?
For the deepest, richest chocolate flavor and a beautiful dark color, we highly recommend using Dutch-processed cocoa powder. This type of cocoa has been treated to reduce its acidity, resulting in a smoother, less bitter chocolate taste compared to natural cocoa powder. While natural cocoa powder can be used in a pinch, it may slightly alter the flavor profile and color of the cake.
Can I make this cake without buttermilk?
Yes, you can! If you don’t have buttermilk on hand, you can easily make a substitute. Simply pour 1 tablespoon of white vinegar or lemon juice into a liquid measuring cup, then fill the rest of the way to 1 cup with regular milk (dairy or non-dairy). Stir gently and let it sit for 5-10 minutes until it slightly curdles. This homemade buttermilk substitute works perfectly in this recipe to tenderize the cake and add moisture.
Why is my chocolate cake dry?
The most common reason for a dry chocolate cake is overbaking. Every oven is different, so always rely on the visual cues and the toothpick test rather than just the timer. Overmixing the batter can also lead to a dry, tough cake, as it develops the gluten too much. Ensure your ingredients, especially butter and eggs, are at room temperature, as this helps create a more emulsified batter that retains moisture better. Also, make sure your baking soda is fresh and active, as it contributes to the cake’s rise and overall texture.