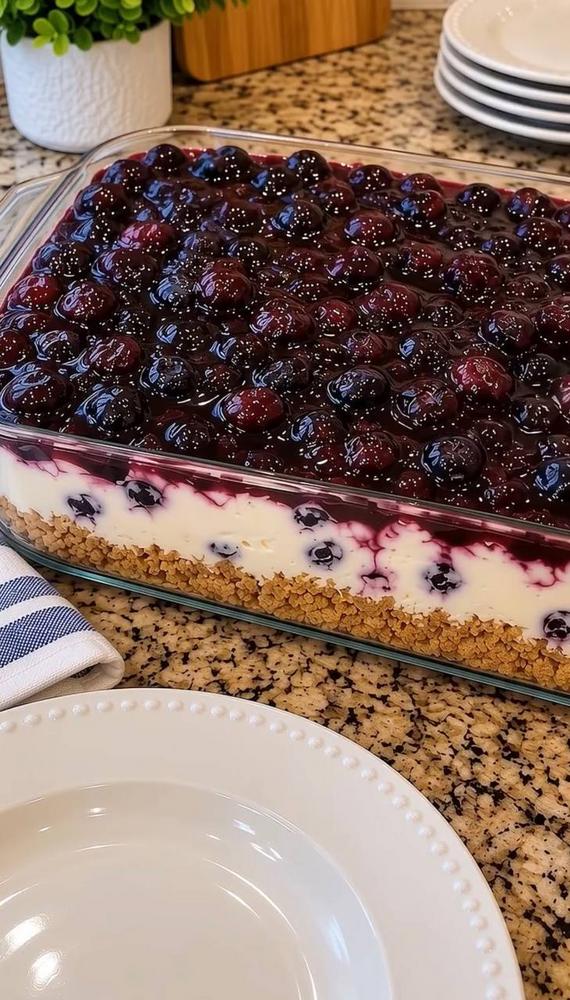
Instructions
- Prepare the Crust:
- In a medium bowl, combine the graham cracker crumbs, melted butter, and ¼ cup granulated sugar. Mix until the crumbs are evenly moistened and resemble wet sand.
- Press the mixture firmly and evenly into the bottom of a 9×13-inch baking dish or a 9-inch springform pan. Use the bottom of a glass or your fingers to ensure a compact crust.
- Place the crust in the refrigerator to chill for at least 30 minutes while you prepare the filling.
- Make the Cheesecake Filling:
- In a large mixing bowl, using an electric mixer, beat the softened cream cheese on medium speed until smooth and creamy, about 2-3 minutes. Make sure there are no lumps.
- Gradually add the sifted powdered sugar to the cream cheese, beating until well combined and fluffy.
- Stir in the vanilla extract and fresh lemon juice until just combined. Do not overmix.
- In a separate, very cold bowl (you can chill the bowl and whisk attachment beforehand), pour the cold heavy cream. Beat on high speed until stiff peaks form. Be careful not to overbeat, or it will turn grainy.
- Gently fold the whipped cream into the cream cheese mixture in two additions using a rubber spatula. Fold until no streaks of whipped cream remain, being careful not to deflate the mixture.
- If desired, gently fold in the ½ cup of fresh blueberries into the cheesecake filling for a speckled effect.
- Retrieve the chilled crust from the refrigerator. Evenly spread the cheesecake filling over the crust.
- Cover the baking dish loosely with plastic wrap and refrigerate for at least 4 hours, or preferably overnight, to allow the cheesecake to set completely.
- Assemble the Blueberry Topping:
- In a medium saucepan, combine the 2 cups of blueberries, ½ cup granulated sugar, and 2 tablespoons of lemon juice.
- Cook over medium heat, stirring occasionally, until the blueberries begin to soften and release their juices, about 5-7 minutes.
- In a small bowl, whisk together the cornstarch and cold water until smooth to create a slurry.
- Pour the cornstarch slurry into the simmering blueberry mixture, stirring constantly.
- Continue to cook and stir for another 1-2 minutes, until the topping thickens and becomes glossy.
- Remove the saucepan from the heat and let the blueberry topping cool completely to room temperature. It will thicken further as it cools.
- Final Chill and Serve:
- Once the cheesecake filling is fully set and the blueberry topping is completely cool, carefully spread the blueberry topping evenly over the cheesecake layer.
- Return the cheesecake to the refrigerator for at least 30 minutes to allow the topping to set slightly.
- When ready to serve, slice the cheesecake into desired portions.
- For a cleaner slice, dip a sharp knife in hot water and wipe it clean between each cut.
- Garnish with a fresh mint sprig or a few extra blueberries, if desired.
Cooking Tips and Variations
Achieving the perfect No-Bake Blueberry Cheesecake Delight is all about attention to detail, especially when it comes to temperature and mixing. For the cheesecake filling, ensuring your cream cheese is truly at room temperature is paramount. If it’s too cold, it won’t cream smoothly, leading to lumps in your filling. You can speed up the softening process by cutting the cream cheese into smaller cubes and letting it sit on the counter for about 30-60 minutes. When whipping the heavy cream, use a very cold bowl and whisk attachment; this helps the cream whip faster and achieve stiffer peaks. Be careful not to overbeat, as overwhipped cream can become grainy. Gently folding the whipped cream into the cream cheese mixture is also key to maintaining the light, airy texture of the filling.
For the crust, make sure to press the graham cracker mixture very firmly into the pan. This prevents it from crumbling apart when sliced. You can use the bottom of a flat glass or a measuring cup to get an even, compact layer. If you prefer a slightly less sweet crust, you can reduce the granulated sugar by a tablespoon or two. For the blueberry topping, allowing it to cool completely before spreading it over the cheesecake is crucial. If it’s warm, it can melt the cheesecake layer and create a messy appearance. The topping will also thicken significantly as it cools, giving it that perfect glossy, spoonable consistency.
This recipe is wonderfully versatile, allowing for many delicious variations. If you’re not a fan of graham crackers, try an Oreo crust by crushing 20-24 Oreo cookies (filling included) and mixing with ¼ cup of melted butter. For a zesty twist, add an extra teaspoon of lemon zest to the cheesecake filling. You can also experiment with other fruit toppings: a cherry topping (using canned cherry pie filling or making a fresh cherry sauce similar to the blueberry one), a strawberry topping, or even a mixed berry compote would be fantastic. For a richer flavor, you could swirl in a tablespoon of lemon curd into the cheesecake filling before chilling. If you want to make individual servings, this recipe works beautifully in small ramekins or dessert cups, adjusting the chilling time accordingly.
Finally, for a truly decadent touch, consider adding a thin layer of white chocolate ganache over the crust before adding the cheesecake filling, or shaving some white chocolate curls over the finished dessert. A sprinkle of chopped nuts like pecans or walnuts on top of the crust before chilling can add another layer of texture. Always remember that the chilling time is not just a suggestion; it’s essential for the cheesecake to fully set and achieve its perfect sliceable consistency. Patience truly pays off with this delightful dessert!
Storage and Reheating
Storing your No-Bake Blueberry Cheesecake Delight properly is essential to maintain its freshness, texture, and flavor. Once the cheesecake is fully assembled and chilled, cover the baking dish tightly with plastic wrap. This prevents it from absorbing any odors from the refrigerator and keeps the surface from drying out. You can also transfer individual slices to airtight containers for more convenient storage. The cheesecake will keep well in the refrigerator for up to 3-4 days. After this time, the crust may start to soften, and the fruit topping might begin to release more liquid, though it will still be safe to eat for a couple more days.
For longer storage, this no-bake cheesecake freezes beautifully. To freeze, ensure the cheesecake is completely set and thoroughly chilled. You can freeze the entire cheesecake or individual slices. If freezing the whole cheesecake, place the uncovered dish in the freezer for 1-2 hours until the top is firm. Then, wrap the entire dish tightly with several layers of plastic wrap, followed by a layer of aluminum foil. If freezing slices, place them on a baking sheet lined with parchment paper, freeze until solid, then transfer the frozen slices to an airtight freezer-safe container or individual freezer bags, separating layers with parchment paper. Frozen cheesecake will maintain its quality for up to 1 month.
When you’re ready to enjoy a frozen slice or the entire cheesecake, transfer it from the freezer to the refrigerator to thaw slowly. A whole cheesecake will need about 4-6 hours to thaw in the refrigerator, while individual slices may take 1-2 hours. Do not thaw at room temperature, as this can compromise the texture and food safety. This no-bake cheesecake does not require reheating; it is meant to be served chilled. In fact, attempting to reheat it would cause the cream cheese filling to melt and the structure to collapse. Always serve it directly from the refrigerator for the best possible experience, ensuring that creamy, refreshing texture everyone loves.
Frequently Asked Questions
How do I prevent my no-bake cheesecake from being too runny?
The key to a firm no-bake cheesecake lies in several factors. First, ensure your cream cheese is full-fat and softened, but not warm. Second, make sure your heavy cream is very cold before whipping it to stiff peaks; this adds crucial structure. Third, do not overmix the cream cheese mixture once the whipped cream is folded in, as overmixing can deflate the air. Most importantly, allow for adequate chilling time – at least 4 hours, but preferably overnight. This gives the ingredients time to set and firm up properly. If it’s still too runny, you might have incorporated too much liquid or not enough thickener (like cream cheese).
Can I make this cheesecake gluten-free?
Absolutely! To make this No-Bake Blueberry Cheesecake Delight gluten-free, simply substitute the traditional graham cracker crumbs with gluten-free graham cracker crumbs or another type of gluten-free cookie crumb (such as gluten-free vanilla wafers or shortbread cookies). The rest of the ingredients in the cheesecake filling and blueberry topping are naturally gluten-free, so no other modifications are necessary. Always double-check ingredient labels to ensure they are certified gluten-free if you have a severe intolerance or allergy.
Can I use frozen blueberries for the topping and filling?
Yes, you can use frozen blueberries for both the topping and for folding into the filling. If using frozen blueberries for the topping, there’s no need to thaw them beforehand; simply add them directly to the saucepan with the sugar and lemon juice. The cooking time might be slightly longer as they release more liquid. If you plan to fold frozen blueberries into the cheesecake filling, it’s best to rinse them quickly under cold water and pat them dry to remove excess ice crystals, but do not fully thaw them, as they can bleed color into the filling. Freezing them slightly before adding them to the filling can also help prevent them from sinking to the bottom.
Why did my blueberry topping turn out too thin or too thick?
The consistency of your blueberry topping depends primarily on the amount of cornstarch used and the cooking time. If the topping is too thin, it likely needed to cook a bit longer after adding the cornstarch slurry, or you might need a tiny bit more cornstarch (mix an additional ½ teaspoon with 1 tablespoon cold water and stir it in). If it’s too thick, you might have cooked it for too long, or used too much cornstarch. You can thin it slightly by stirring in a tablespoon or two of water or lemon juice over low heat until it reaches your desired consistency. Remember, the topping will thicken further as it cools, so err on the side of slightly thinner if unsure.