Instructions
-
Part 1: The Moist Pineapple Cake Layers
- Preheat your oven to 350°F (175°C). Grease and flour three 8-inch round cake pans, or line with parchment paper circles.
- In a medium bowl, whisk together the all-purpose flour, baking powder, baking soda, and salt. Set aside.
- In a large bowl, using an electric mixer, cream together the softened butter and granulated sugar on medium-high speed until light and fluffy, about 3-5 minutes.
- Add the eggs one at a time, beating well after each addition until fully incorporated. Stir in the vanilla extract.
- With the mixer on low speed, gradually add the dry ingredients to the wet ingredients in three additions, alternating with the buttermilk in two additions, beginning and ending with the dry ingredients. Mix until just combined, being careful not to overmix.
- Gently fold in the well-drained crushed pineapple until evenly distributed.
- Divide the batter evenly among the three prepared cake pans.
- Bake for 25-30 minutes, or until a wooden skewer inserted into the center of a cake comes out clean.
- Remove the cakes from the oven and let them cool in the pans for 10-15 minutes before inverting them onto a wire rack to cool completely. Ensure cakes are completely cool before frosting.
-
Part 2: The Creamy Filling
- In a large bowl, using an electric mixer, beat the softened butter on medium speed until creamy, about 2 minutes.
- Gradually add the sifted powdered sugar, ½ cup at a time, beating until smooth after each addition.
- Add the vanilla extract and salt, then beat in 3 tablespoons of heavy cream or milk. If the frosting is too thick, add the remaining tablespoon of cream until you reach a smooth, spreadable consistency.
- Gently fold in the well-drained crushed pineapple until evenly combined.
-
Part 3: The Tangy Pineapple Glaze & Decoration
- In a small saucepan, combine the pineapple juice and granulated sugar. Bring to a simmer over medium heat, stirring until the sugar dissolves.
- In a small bowl, whisk together the cornstarch and water to create a slurry.
- Pour the cornstarch slurry into the simmering pineapple juice mixture, whisking constantly. Continue to simmer and whisk for 1-2 minutes, until the glaze thickens and becomes translucent.
- Remove from heat and let the glaze cool for about 15-20 minutes, stirring occasionally, until it’s still warm but thick enough to coat a spoon and won’t immediately run off the cake.
-
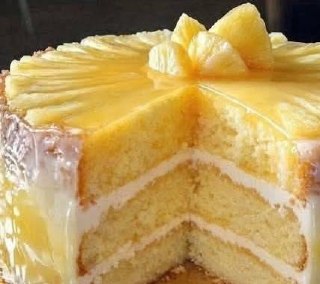
Assembling Your Pineapple Heaven Cake:
- Once the cake layers are completely cool, place one cake layer on your serving plate or cake stand.
- Spread about one-third of the creamy filling evenly over the top of the first cake layer.
- Place the second cake layer on top of the filling, pressing down gently. Spread another one-third of the creamy filling over this layer.
- Top with the third cake layer. Use the remaining filling to thinly frost the top and sides of the cake, creating a “crumb coat.” This helps to seal in any loose crumbs.
- Chill the cake in the refrigerator for 15-20 minutes to set the crumb coat.
- Once chilled, apply a final, thicker layer of the creamy filling to the top and sides of the cake, smoothing it evenly.
- Carefully pour the slightly cooled pineapple glaze over the top center of the cake, allowing it to slowly drip down the sides. Use an offset spatula to gently encourage the glaze to cover the top and create an even drip.
- Immediately arrange the well-drained pineapple slices on top of the cake. You can arrange them in concentric circles, overlapping slightly, or create any desired pattern. Place small pineapple chunks in the center if using.
- Refrigerate the cake for at least 30 minutes to allow the glaze to set and the flavors to meld.
Cooking Tips and Variations
Tips for Pineapple Perfection:
- Room Temperature Ingredients: Ensure your butter, eggs, and buttermilk are at room temperature. This helps them emulsify properly, creating a smoother batter and a more tender cake.
- Don’t Overmix: Mix the cake batter until just combined. Overmixing develops the gluten in the flour, leading to a tough, dry cake.
- Drain Pineapple Well: Whether using crushed or sliced pineapple, make sure to drain it thoroughly. Excess moisture can make your cake soggy or thin out your frosting and glaze. You can even gently press the crushed pineapple between paper towels.
- Cool Cakes Completely: This is crucial! Attempting to frost warm cakes will result in melted frosting and a messy situation. Allow your cake layers to cool completely on a wire rack before assembling.
- Achieve Neat Layers: If your cake layers have domed tops, use a serrated knife to level them flat once cooled. This creates a more stable and aesthetically pleasing cake.
- Crumb Coat is Your Friend: The initial thin layer of frosting (crumb coat) traps any loose crumbs, ensuring your final frosting layer is smooth and crumb-free. Don’t skip chilling it!
- Glaze Consistency is Key: The glaze should be warm but not hot when poured. If it’s too hot, it will run off the cake too quickly. If it’s too cool, it will be too thick to spread easily. Test a small amount on a spoon; it should coat the spoon nicely.
- Chill Before Slicing: Chilling the assembled cake for at least 30 minutes (or longer) helps the frosting and glaze set, making for cleaner, neater slices.
Variations:
- Pina Colada Twist: Add ½ cup of shredded coconut (toasted or untoasted) to the cake batter for a delightful tropical crunch. You can also sprinkle toasted coconut flakes on the sides of the frosted cake.
- Cream Cheese Filling: For a tangier, richer filling, substitute the creamy filling with a classic cream cheese frosting. Combine 8 ounces softened cream cheese with ½ cup softened butter, 4 cups powdered sugar, and 1 teaspoon vanilla extract. Beat until smooth.
- Nutty Crunch: Fold ½ cup of finely chopped toasted pecans or walnuts into the cake batter or sprinkle them between the cake layers for added texture and flavor.
- Boozy Glaze: For an adult version, add 1-2 tablespoons of rum or coconut rum to the pineapple glaze after it has cooled slightly.
- Mini Pineapple Cakes: Bake the batter in cupcake pans for individual “Pineapple Heaven” cupcakes, or in smaller cake pans for mini layer cakes. Adjust baking time accordingly.
- Spiced Pineapple: Add ¼ teaspoon of ground cinnamon or nutmeg to the cake batter for a subtle warmth that complements the pineapple beautifully.
- Candied Pineapple Garnish: Instead of fresh or canned slices, use homemade or store-bought candied pineapple pieces for a different visual and textural appeal.
Storage and Reheating
Storing your Pineapple Heaven Cake properly is essential to maintain its freshness, moisture, and delicious flavor. Because it contains fresh fruit and a creamy filling, refrigeration is key.
Storage:
- Refrigeration: This cake must be stored in the refrigerator. Place the cake in an airtight cake carrier or cover it loosely with plastic wrap. Stored this way, it will remain fresh for up to 3-4 days.
- Prevent Drying Out: If you don’t have a cake carrier, you can place toothpicks around the cake and then drape plastic wrap over them, ensuring the plastic wrap doesn’t touch the frosting or glaze directly. This helps prevent it from drying out.
- Avoid Strong Odors: Refrigerators can sometimes impart odors to uncovered food. An airtight container or well-sealed plastic wrap will protect your cake from absorbing unwanted smells.
Serving:
- Bring to Room Temperature: For the best flavor and texture, it is recommended to let the cake sit out at room temperature for 30-60 minutes before serving. This allows the cake layers to soften slightly and the flavors to become more pronounced, as cold dulls sweetness.
Freezing:
- Unfrosted Layers: You can freeze unfrosted cake layers. Once completely cool, wrap each layer tightly in plastic wrap, then an additional layer of aluminum foil. They can be frozen for up to 2-3 months. Thaw overnight in the refrigerator before frosting.
- Frosted Cake: Freezing an assembled and frosted cake is possible, but the texture of the glaze and fresh pineapple might change slightly upon thawing. If freezing a whole cake, place it in the freezer uncovered for 1-2 hours until the frosting is firm. Then, wrap it tightly in plastic wrap and then foil. Thaw overnight in the refrigerator. The glaze might lose some of its shine, and the pineapple might become a bit softer.
Frequently Asked Questions
Can I use fresh pineapple instead of canned?
Absolutely! Using fresh pineapple will give your cake an even brighter, more vibrant flavor. For the crushed pineapple in the batter and filling, you’ll need to finely dice about 1 cup of fresh pineapple and ensure it’s well-drained to remove excess moisture. For the glaze, you can juice fresh pineapple. For decoration, thin slices of fresh pineapple are perfect. Just be aware that fresh pineapple can sometimes be more acidic, so adjust sweetness to your preference.
My glaze is too thin/thick. What should I do?
If your glaze is too thin after cooling, you can gently reheat it over low heat and mix a slurry of a little more cornstarch and water (e.g., 1 teaspoon cornstarch to 1 tablespoon water) into it, stirring constantly until it thickens. If it’s too thick, you can whisk in a tiny bit more pineapple juice or water, a teaspoon at a time, until it reaches the desired consistency. Remember, it will thicken more as it cools.
How can I prevent my cake layers from sticking to the pan?
The best way to prevent sticking is to properly prepare your cake pans. Grease the pans thoroughly with butter or non-stick spray, then dust them with flour, tapping out any excess. For extra insurance, you can cut parchment paper circles to fit the bottom of the pans and place them in after greasing. This creates a non-stick barrier that ensures easy removal.
Can I make this cake ahead of time?
Yes, this cake is excellent for making ahead! The cake layers can be baked a day or two in advance, cooled completely, and stored tightly wrapped at room temperature or in the refrigerator. The filling can also be made a day ahead and stored in an airtight container in the refrigerator; bring it to room temperature and re-whip it for a minute before using. Assemble the cake the day before or the morning of your event for the freshest taste and best presentation, allowing it time to chill and for flavors to meld.