Instructions
- Prepare the Dough: In a large mixing bowl, combine the all-purpose flour and salt. Make a well in the center.
- Pour the warm water and 2 tablespoons of olive oil into the well.
- Using a wooden spoon or your hands, gradually mix the wet ingredients into the dry ingredients until a shaggy dough forms.
- Transfer the dough to a lightly floured surface and knead for 8-10 minutes, or until the dough is smooth, elastic, and no longer sticky. It should feel soft and pliable.
- Lightly grease a clean bowl with a little olive oil. Place the dough in the bowl, turning it once to coat. Cover the bowl with plastic wrap or a clean kitchen towel and let it rest in a warm place for at least 30 minutes, or up to 1 hour. This resting period is crucial for relaxing the gluten, making the dough easier to roll.
- Divide the Dough: After resting, gently punch down the dough and transfer it back to a lightly floured surface. Divide the dough into 4 equal pieces. Roll each piece into a smooth ball.
- First Rolling and Layering: Lightly flour your work surface. Take one dough ball and roll it out into a very thin circle, approximately 10-12 inches (25-30 cm) in diameter. The thinner you roll it, the flakier your bread will be. Don’t be afraid to stretch it gently with your hands as you roll.
- Generously brush the entire surface of the rolled-out dough with about 1 tablespoon of melted butter.
- Fold one side of the circle towards the center, covering about one-third of the dough. Brush the folded part with more melted butter.
- Fold the opposite side over the first fold, creating a rectangular shape. Brush this layer with melted butter as well.
- Now, fold one end of the rectangle towards the center, and then fold the other end over it, creating a smaller, square-shaped package. Brush the top of this package with a little melted butter.
- Repeat this rolling, brushing, and folding process for the remaining 3 dough balls.
- Place the folded dough squares on a plate, cover loosely with plastic wrap, and refrigerate for at least 15-20 minutes. This helps the butter solidify slightly and makes the dough easier to handle for the second rolling.
- Second Rolling and Cooking: Heat a large non-stick pan or griddle over medium heat.
- Take one chilled dough square. On a lightly floured surface, gently roll it out again into a circle, about 8-9 inches (20-23 cm) in diameter. Be careful not to press too hard, as you want to preserve the layers.
- Once the pan is hot, place one rolled-out flatbread onto the dry pan. Cook for 2-3 minutes per side, or until golden brown and puffed in spots. The layers should separate beautifully.
- As each flatbread cooks, you can brush the top with a tiny bit more melted butter if desired for extra richness and browning.
- Remove the cooked flatbread from the pan and keep it warm while you cook the remaining pieces.
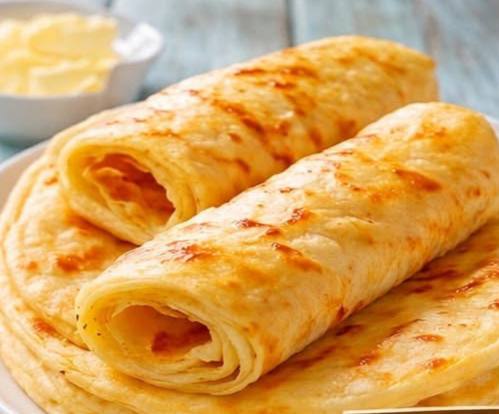
- Serve: Serve the Turkish Layered Flatbread immediately, either plain with a smear of butter, honey, or clotted cream (kaymak), or as a side to savory dishes. You can also roll them up to reveal their beautiful layers.
Cooking Tips and Variations
For the flakiest results, ensure your dough is rolled as thin as possible during the first stage. Don’t be afraid if it looks almost transparent – this is key to achieving those delicate layers. If the dough springs back too much, let it rest for another 5-10 minutes to allow the gluten to relax further. When brushing with melted butter, be generous but not excessive; you want an even coating that aids in separation without making the dough greasy. If you’re working in a warm kitchen, you might need to refrigerate your folded dough squares for a bit longer to prevent the butter from melting too quickly, which can make rolling difficult. During cooking, maintain a medium heat; too low, and the bread will dry out; too high, and it will burn before cooking through. You’re looking for a beautiful golden-brown color and visible puffing, indicating the layers are separating nicely.
This versatile flatbread can be adapted to suit any palate. For a savory twist, before the second rolling, you can spread a thin layer of crumbled feta cheese mixed with chopped parsley, or even a mixture of cooked spinach and onions, over the folded dough square before rolling it out. This creates a delicious, cheesy-herb-filled flatbread similar to a simplified Gozleme. For meat lovers, a thin layer of seasoned ground lamb or beef can also be incorporated. If you prefer a sweeter treat, sprinkle sugar and cinnamon, or even a thin layer of apricot jam, over the buttered dough before folding. Once cooked, these sweet variations are divine with a dusting of powdered sugar. You can also experiment with different oils; while olive oil is traditional for the dough, you could use a neutral oil for a less pronounced flavor. For an extra rich flavor, clarify your butter before melting for brushing the layers.
Storage and Reheating
Leftover Turkish Layered Flatbread can be stored at room temperature in an airtight container for up to 1 day, though it’s best enjoyed fresh. For longer storage, wrap individual flatbreads tightly in plastic wrap and then in aluminum foil, or place them in an airtight freezer-safe bag. They can be frozen for up to 1 month. To reheat from room temperature, simply place the flatbreads in a dry pan over medium heat for 1-2 minutes per side until warmed through and slightly crispy again. You can also warm them in a toaster oven or a conventional oven preheated to 350°F (175°C) for 5-7 minutes, or until heated through and crisp. If reheating from frozen, it’s best to thaw them overnight in the refrigerator first, then reheat as you would from room temperature. Avoid microwaving, as this can make the bread soft and lose its desirable flaky texture.
Frequently Asked Questions
Can I make the dough ahead of time?
Absolutely! You can prepare the dough up to the point of dividing and rolling the first squares. After refrigerating the folded squares, they can be kept in the refrigerator for up to 24 hours. Just bring them back to room temperature for about 15-20 minutes before the second rolling and cooking.
What kind of flour is best for this recipe?
All-purpose flour works perfectly for this recipe, providing a good balance of elasticity and tenderness. You can also use bread flour for a slightly chewier texture, but it might require a bit more kneading and resting time.
Why isn’t my bread flaky?
Lack of flakiness is usually due to not rolling the dough thin enough in the first stage, or not using enough butter between the layers. Ensure you roll the dough until it’s almost transparent and generously brush each fold with melted butter. Also, make sure your pan isn’t too hot or too cold during cooking, as proper heat helps the layers separate and puff.
Can I bake this bread instead of pan-frying?
While the traditional method involves pan-frying to achieve that signature crispy exterior and soft interior, you can bake it. Preheat your oven to 400°F (200°C) and bake the rolled-out flatbreads on a baking sheet lined with parchment paper for 8-12 minutes, or until golden brown. However, the texture will be slightly different, often less crispy and more uniformly baked, compared to the pan-fried version.